<?xml version="1.0" encoding="utf-8"?>
<feed xmlns="http://www.w3.org/2005/Atom">
  <author>
    <name>Golook</name>
  </author>
  <generator uri="https://hexo.io/">Hexo</generator>
  <id>https://blog.deptrip.com/</id>
  <link href="https://blog.deptrip.com/" rel="alternate"/>
  <link href="https://blog.deptrip.com/atom.xml" rel="self"/>
  <rights>All rights reserved 2026, Golook</rights>
  <subtitle>AI 技术笔记 · 效率工具 · 深度分析</subtitle>
  <title>Deptrip Blog</title>
  <updated>2026-07-28T14:35:47.263Z</updated>
  <entry>
    <author>
      <name>Golook</name>
    </author>
    <category term="AI 工具对比" scheme="https://blog.deptrip.com/categories/AI-%E5%B7%A5%E5%85%B7%E5%AF%B9%E6%AF%94/"/>
    <category term="AI" scheme="https://blog.deptrip.com/tags/AI/"/>
    <category term="代码助手" scheme="https://blog.deptrip.com/tags/%E4%BB%A3%E7%A0%81%E5%8A%A9%E6%89%8B/"/>
    <category term="对比评测" scheme="https://blog.deptrip.com/tags/%E5%AF%B9%E6%AF%94%E8%AF%84%E6%B5%8B/"/>
    <category term="Cursor" scheme="https://blog.deptrip.com/tags/Cursor/"/>
    <category term="Claude Code" scheme="https://blog.deptrip.com/tags/Claude-Code/"/>
    <category term="GitHub Copilot" scheme="https://blog.deptrip.com/tags/GitHub-Copilot/"/>
    <category term="Codex" scheme="https://blog.deptrip.com/tags/Codex/"/>
    <category term="开发效率" scheme="https://blog.deptrip.com/tags/%E5%BC%80%E5%8F%91%E6%95%88%E7%8E%87/"/>
    <content>
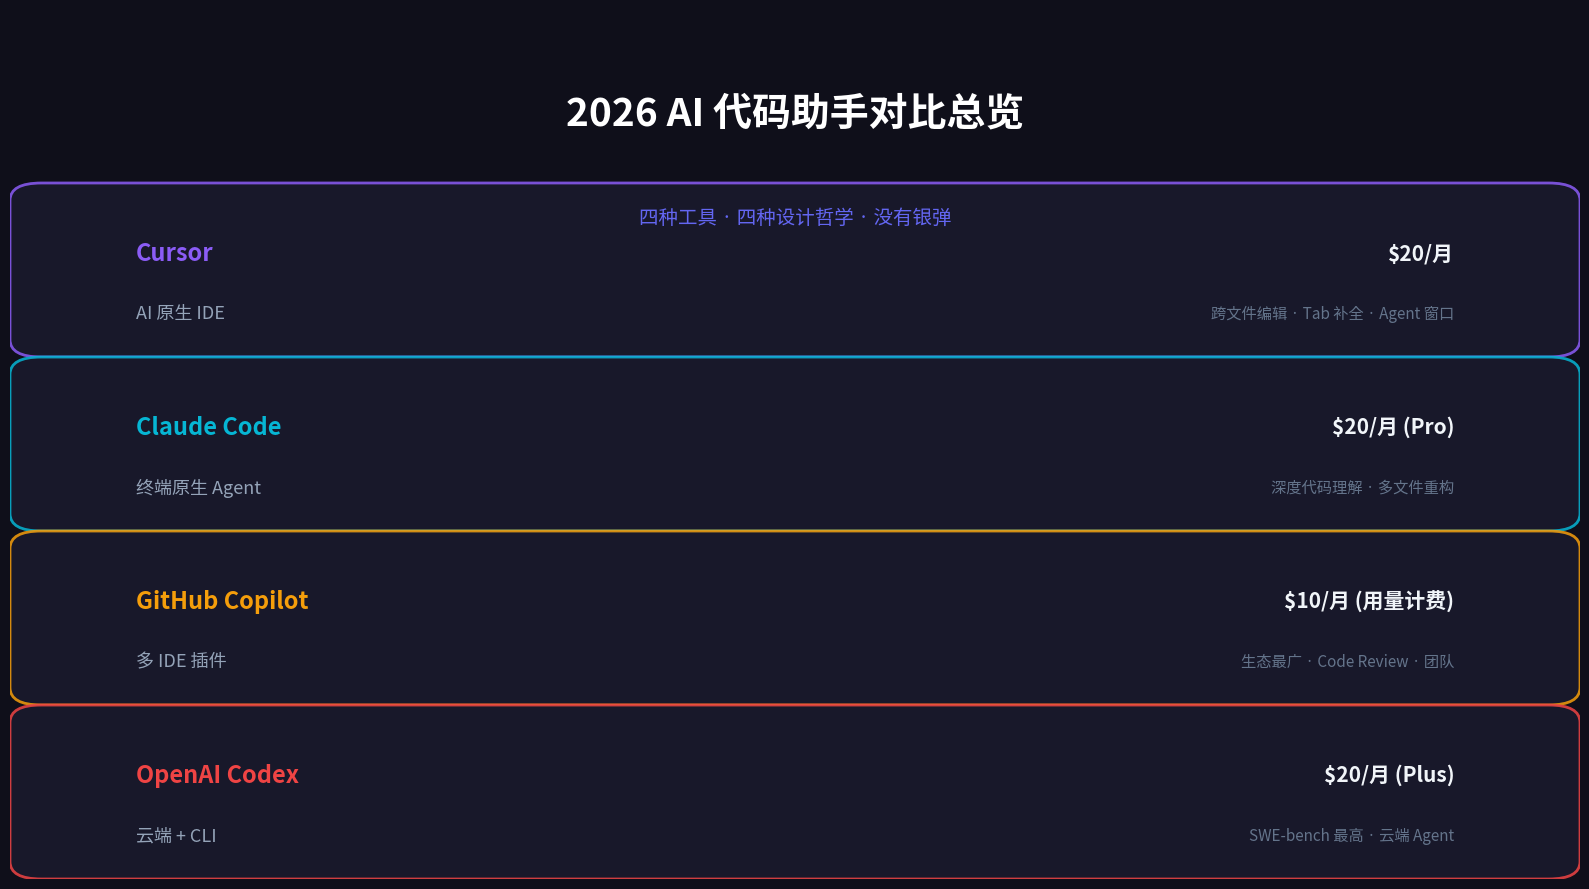
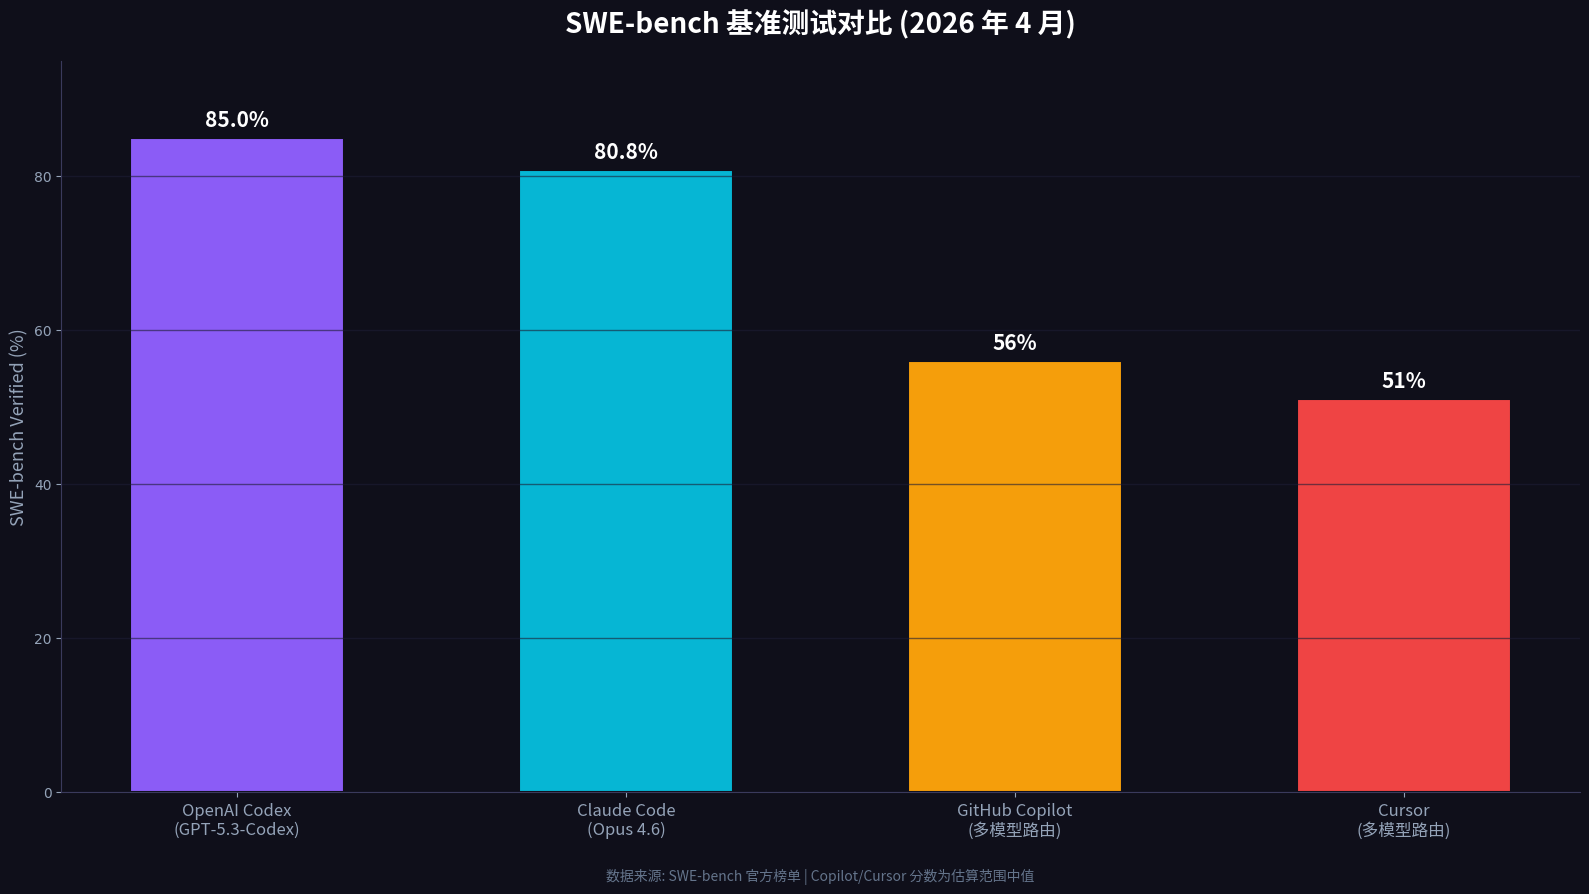
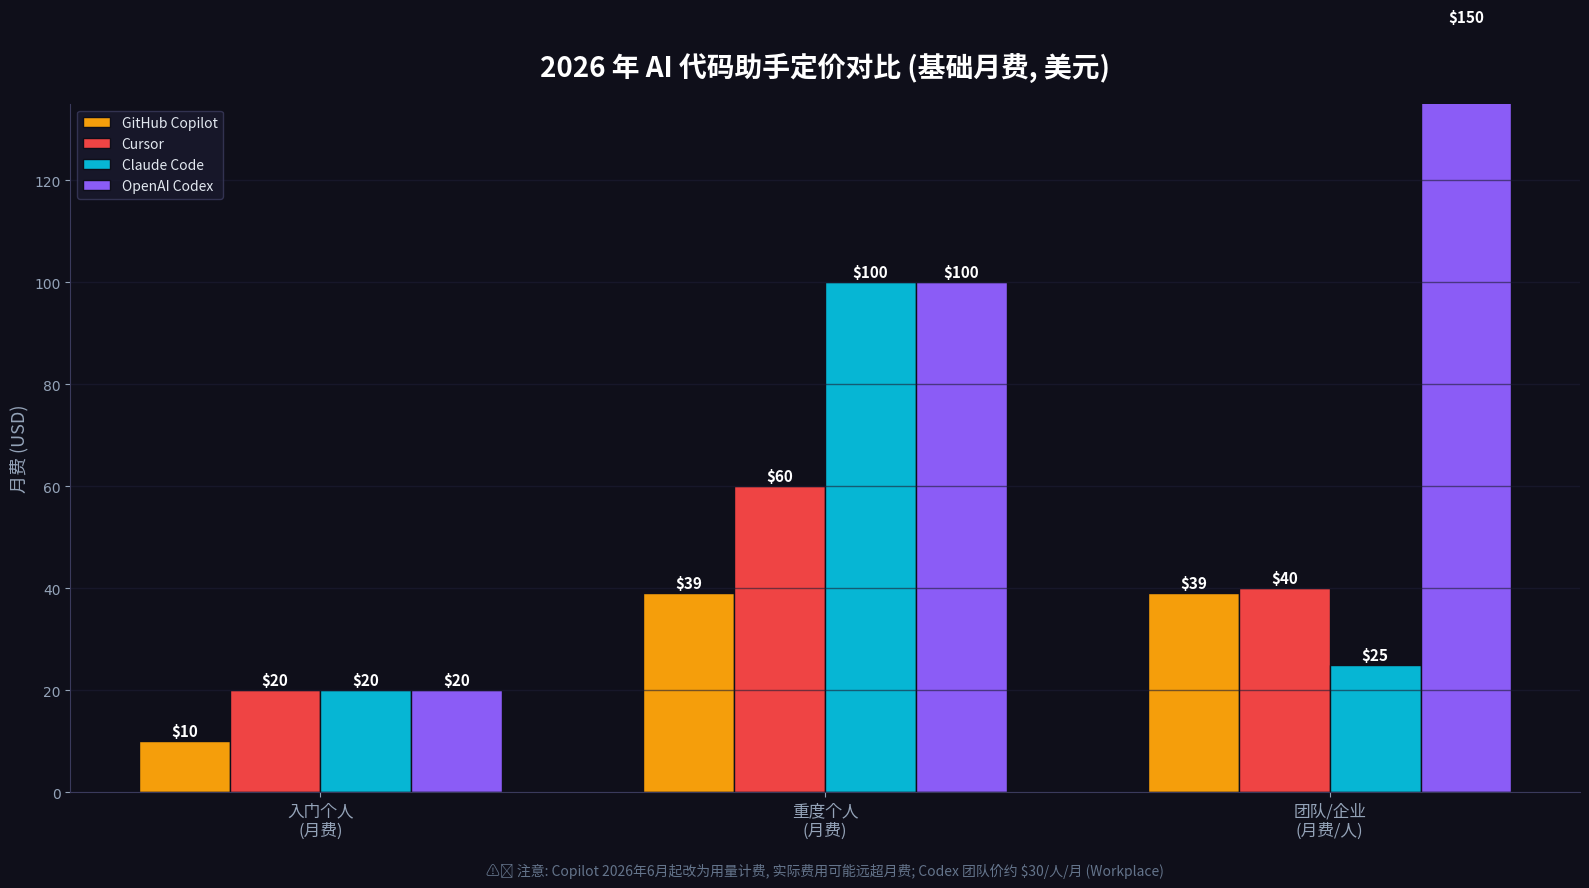
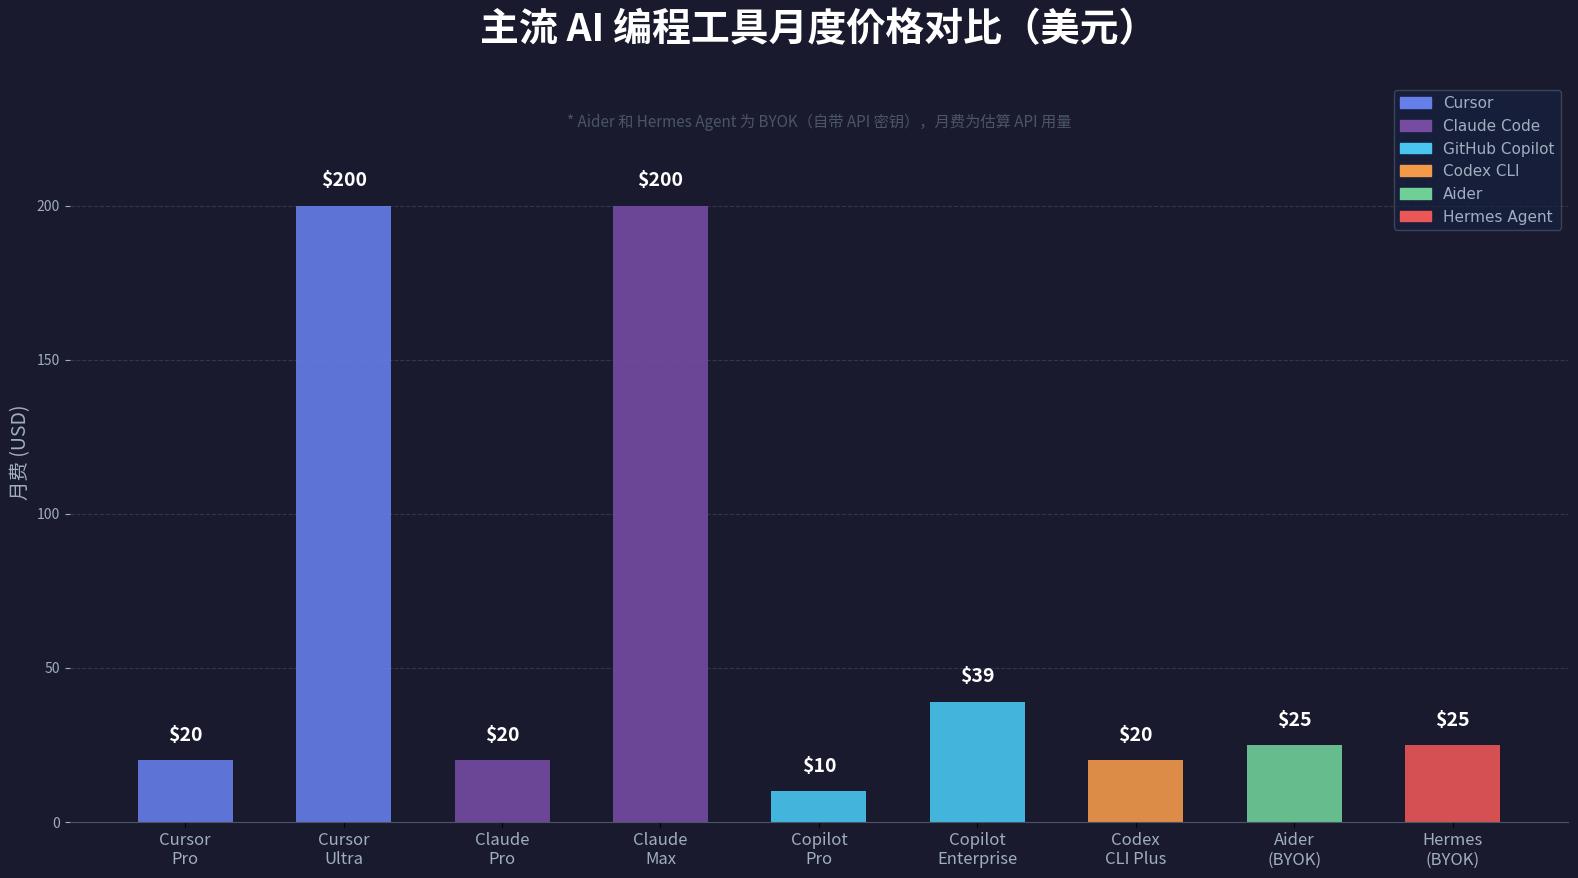
      <![CDATA[<p>如果你每天写代码，大概率已经用过甚至同时订阅了多种 AI 代码助手。但 2026 年的格局变化太快——GitHub Copilot 在 6 月改成用量计费、OpenAI 推出 $100&#x2F;月的 Codex Pro 5x 直接对标 Claude、Cursor 从免费 IDE 变成了积分制付费——旧的对比文章已经严重过时。</p><p>这篇文章基于 2026 年 4–7 月的真实数据（SWE-bench 基准测试、官方定价页、社区反馈），对 Cursor、Claude Code、GitHub Copilot 和 OpenAI Codex 四个主流工具做一次实战级对比，帮你判断该把预算押在哪一个上。</p><p><img src="/images/ai-coding-tools-overview-2026.png" alt="AI 代码助手对比总览"></p><h2 id="一、先看硬指标：SWE-bench-基准测试"><a href="#一、先看硬指标：SWE-bench-基准测试" class="headerlink" title="一、先看硬指标：SWE-bench 基准测试"></a>一、先看硬指标：SWE-bench 基准测试</h2><p>SWE-bench 是目前最权威的 AI 代码能力评测，要求 Agent 在真实开源仓库中定位并修复 GitHub Issue。数据截至 2026 年 4 月：</p><table><thead><tr><th>工具</th><th>底层模型</th><th>SWE-bench Verified</th><th>备注</th></tr></thead><tbody><tr><td>OpenAI Codex</td><td>GPT-5.3-Codex</td><td><strong>85.0%</strong></td><td>类别最高，SWE-bench Pro 56.8%，Terminal-Bench 77.3%</td></tr><tr><td>Claude Code</td><td>Claude Opus 4.6</td><td><strong>80.8%</strong></td><td>多文件编辑能力最强，SWE-bench Pro 64.3%</td></tr><tr><td>GitHub Copilot</td><td>多模型路由 (GPT-4.1 &#x2F; Claude &#x2F; o3)</td><td>~55–56%</td><td>官方未公布详细分榜</td></tr><tr><td>Cursor</td><td>多模型路由（随用户选择变化）</td><td>~48–52%</td><td>取决于所选底层模型</td></tr></tbody></table><p>数据来源：SWE-bench 官方榜单、The Pragmatic Engineer 2026 年 2 月开发者调查（46% 的资深工程师将 Claude Code 列为”最爱工具”）。</p><p><strong>关键结论</strong>：在纯”代码能力”维度，Codex 和 Claude Code 明显领先，而 Copilot 和 Cursor 的能力高度依赖用户选择的底层模型——你选 Opus，它们就强；选 Sonnet，就弱。</p><h2 id="二、四款工具的定位差异"><a href="#二、四款工具的定位差异" class="headerlink" title="二、四款工具的定位差异"></a>二、四款工具的定位差异</h2><p>它们看似都在做”AI 写代码”，但设计哲学完全不同：</p><h3 id="1-Cursor：AI-原生-IDE"><a href="#1-Cursor：AI-原生-IDE" class="headerlink" title="1. Cursor：AI 原生 IDE"></a>1. Cursor：AI 原生 IDE</h3><p>Cursor 是一个完整的代码编辑器（VS Code 派生），代码生成和 Agent 能力被深度嵌入编辑体验中。</p><ul><li><strong>核心优势</strong>：Composer 模式支持跨文件编辑和重构，Agent 窗口可驱动端到端任务；Tab 自动补全采用 Supermaven 模型，接受率据称达 72%。</li><li><strong>局限</strong>：必须放弃原有编辑器（VS Code &#x2F; JetBrains），迁移成本不可忽视。</li><li><strong>最佳场景</strong>：从零开始构建新项目，或愿意换编辑器换取更顺畅的 AI 体验的开发者。</li></ul><h3 id="2-Claude-Code：终端原生-Agent"><a href="#2-Claude-Code：终端原生-Agent" class="headerlink" title="2. Claude Code：终端原生 Agent"></a>2. Claude Code：终端原生 Agent</h3><p>Claude Code 是一个命令行工具，在终端里启动后自主读取代码库、编辑文件、执行命令，全程在 Terminal 中完成。</p><ul><li><strong>核心优势</strong>：深度代码库理解能力最强，多文件同步修改能力突出；JetBrains 2026 年 1 月调研显示其 CSAT 为 91%、NPS 为 54，均为同类最高。</li><li><strong>局限</strong>：没有 IDE 集成，没有 Tab 补全，交互方式与传统编辑器差异大。</li><li><strong>最佳场景</strong>：大型代码库重构、复杂多文件修改、偏好终端操作的开发者。</li></ul><p><strong>值得注意的数据</strong>：据 SaaStr 2026 年 2 月报道，约有 <strong>4% 的 GitHub 公开提交</strong>已由 Claude Code 完成，预计年底前升至 20%+。Anthropic 内部，Claude Code 从副业项目到公司最大收入线的转变只用了不到 9 个月。</p><h3 id="3-GitHub-Copilot：多-IDE-插件"><a href="#3-GitHub-Copilot：多-IDE-插件" class="headerlink" title="3. GitHub Copilot：多 IDE 插件"></a>3. GitHub Copilot：多 IDE 插件</h3><p>Copilot 是一个插件，可以在 VS Code、JetBrains 等任何 IDE 中工作，同时深度集成 GitHub 的 PR、Actions 等工作流。</p><ul><li><strong>核心优势</strong>：生态覆盖面最广，团队管理和 Code Review 功能完善，对 VS Code &#x2F; JetBrains 用户的迁移成本为零。</li><li><strong>局限</strong>：Agent 和 Chat 功能依赖底层模型选择，能力上限受制于此。</li><li><strong>最佳场景</strong>：已在 GitHub 生态中工作的团队，不想更换编辑器。</li></ul><h3 id="4-OpenAI-Codex：云端-CLI-双形态"><a href="#4-OpenAI-Codex：云端-CLI-双形态" class="headerlink" title="4. OpenAI Codex：云端 + CLI 双形态"></a>4. OpenAI Codex：云端 + CLI 双形态</h3><p>Codex 同时以 ChatGPT 网页（云端 Cloud Agents）和 CLI 工具两种形态存在，与 GPT-5.3-Codex 深度绑定。</p><ul><li><strong>核心优势</strong>：SWE-bench 分数最高，异步云端 Agent 适合长时间复杂任务；CLI 可在本地独立运行。</li><li><strong>局限</strong>：深度绑定 OpenAI 生态；云端任务有容器费用叠加。</li><li><strong>最佳场景</strong>：ChatGPT 重度用户、需要异步复杂任务的场景。</li></ul><p><img src="/images/ai-coding-swe-bench-comparison-2026.png" alt="SWE-bench 基准测试对比"></p><h2 id="三、2026-年定价对比（最关键的实战维度）"><a href="#三、2026-年定价对比（最关键的实战维度）" class="headerlink" title="三、2026 年定价对比（最关键的实战维度）"></a>三、2026 年定价对比（最关键的实战维度）</h2><p>2026 年各家定价变动剧烈，**”月费”这个数字已经不能代表实际成本了**。</p><h3 id="1-GitHub-Copilot：2026-年-6-月改用用量计费"><a href="#1-GitHub-Copilot：2026-年-6-月改用用量计费" class="headerlink" title="1. GitHub Copilot：2026 年 6 月改用用量计费"></a>1. GitHub Copilot：2026 年 6 月改用用量计费</h3><p>GitHub 于 2026 年 6 月 1 日将 Copilot 的 Chat&#x2F;Agent&#x2F;Code Review 改为按 <strong>AI Credits</strong> 用量计费（1 credit &#x3D; $0.01），基础月费不变：</p><table><thead><tr><th>套餐</th><th>月费</th><th>每月 AI Credits</th><th>备注</th></tr></thead><tbody><tr><td>Free</td><td>$0</td><td>有限配额</td><td>代码补全可用</td></tr><tr><td>Pro</td><td>$10</td><td>$10</td><td>入门个人开发者</td></tr><tr><td>Pro+</td><td>$39</td><td>$39</td><td>重度用户</td></tr><tr><td>Max</td><td>$100</td><td>$100</td><td>专业开发者</td></tr><tr><td>Business</td><td>$19&#x2F;人</td><td>$19&#x2F;人</td><td>团队</td></tr><tr><td>Enterprise</td><td>$39&#x2F;人</td><td>$39&#x2F;人</td><td>企业</td></tr></tbody></table><p>⚠️ <strong>关键变化</strong>：补全和 Next Edit 建议<strong>不限额且不计费</strong>，但 Chat、Agent Mode、Copilot CLI、Cloud Agents、Spaces、Spark、Code Review <strong>全部消耗 Credits</strong>。社区反馈 6 月启用后，一个简单多文件修改任务就可能消耗数美分的 Credits，重度使用者报告单月实际费用远超月费。<strong>实际总成本 &#x3D; 月费 + 用量费</strong>，且用量费高度不可预测。</p><h3 id="2-Cursor：积分制，基础无限"><a href="#2-Cursor：积分制，基础无限" class="headerlink" title="2. Cursor：积分制，基础无限"></a>2. Cursor：积分制，基础无限</h3><table><thead><tr><th>套餐</th><th>月费</th><th>备注</th></tr></thead><tbody><tr><td>Hobby</td><td>免费</td><td>有限 Agent 和 Tab 配额</td></tr><tr><td>Pro</td><td>$20</td><td>最受欢迎档，含 $20 积分池</td></tr><tr><td>Pro+</td><td>$60</td><td>3× Pro 用量，重度 Agent 用户推荐</td></tr><tr><td>Ultra</td><td>$200</td><td>20× Pro 用量</td></tr><tr><td>Teams Standard</td><td>$40&#x2F;人</td><td>团队功能</td></tr><tr><td>Teams Premium</td><td>$120&#x2F;人</td><td>5× Standard 用量</td></tr></tbody></table><p>⚠️ <strong>关键机制</strong>：Auto 模式和 Tab 补全在所有付费档<strong>无限使用</strong>。积分仅在手动选择第三方前沿模型（Claude Sonnet、GPT-4 等）时消耗，且 Cursor 提供了两个独立积分池（自有模型 + 第三方 API 模型），实际用量比账面值宽裕。年付可省约 20%。</p><h3 id="3-Claude-Code：随-Claude-订阅"><a href="#3-Claude-Code：随-Claude-订阅" class="headerlink" title="3. Claude Code：随 Claude 订阅"></a>3. Claude Code：随 Claude 订阅</h3><table><thead><tr><th>套餐</th><th>月费</th><th>Claude Code</th><th>上下文窗口</th></tr></thead><tbody><tr><td>Free</td><td>$0</td><td>❌</td><td>200K tokens</td></tr><tr><td>Pro</td><td>$20（年付 $17）</td><td>✅</td><td>200K tokens</td></tr><tr><td>Max 5x</td><td>$100</td><td>✅</td><td>500K tokens</td></tr><tr><td>Team Standard</td><td>$25&#x2F;人（年付）</td><td>❌</td><td>—</td></tr><tr><td>Team Premium</td><td>$150&#x2F;人</td><td>✅</td><td>—</td></tr></tbody></table><p>⚠️ <strong>关键机制</strong>：Claude Code 包含在 Pro&#x2F;Max 套餐中，但<strong>按 token 用量计费</strong>。在团队档中，只有 Premium（$150&#x2F;人）才包含 Claude Code 访问权。Anthropic 的策略是降低单 token 价格但增加总用量——模型更便宜，但 Agent 工作流吃得更多。</p><h3 id="4-OpenAI-Codex：ChatGPT-套餐捆绑"><a href="#4-OpenAI-Codex：ChatGPT-套餐捆绑" class="headerlink" title="4. OpenAI Codex：ChatGPT 套餐捆绑"></a>4. OpenAI Codex：ChatGPT 套餐捆绑</h3><table><thead><tr><th>套餐</th><th>月费</th><th>Codex 用量</th><th>备注</th></tr></thead><tbody><tr><td>Free</td><td>$0</td><td>有限</td><td>—</td></tr><tr><td>Go</td><td>$8</td><td>—</td><td>—</td></tr><tr><td>Plus</td><td>$20</td><td>基准用量</td><td>10–60 云端任务&#x2F;5h 窗口</td></tr><tr><td>Pro 5x</td><td>$100</td><td>5× Plus</td><td>2026 年 4 月上线，对标 Claude Code</td></tr><tr><td>Pro 20x</td><td>$200</td><td>20× Plus</td><td>重度用户</td></tr></tbody></table><p>⚠️ <strong>关键机制</strong>：Plus 档 5 小时滚动窗口的基准量按 GPT-5.4 推理大约仅支持 40 分钟持续使用，很多开发者反馈 2026 年 4 月配额更新后限制更加收紧。Pro 5x 在 5 月 31 日前有促销活动，实际提供 10× 而非 5× 配额。云端任务还有容器费叠加。</p><h2 id="四、2026-年的选型决策树"><a href="#四、2026-年的选型决策树" class="headerlink" title="四、2026 年的选型决策树"></a>四、2026 年的选型决策树</h2><p>基于以上数据，我给出以下决策建议：</p><h3 id="选-Cursor，如果你："><a href="#选-Cursor，如果你：" class="headerlink" title="选 Cursor，如果你："></a>选 Cursor，如果你：</h3><ul><li>愿意换一个编辑器，换取最流畅的 AI 编辑体验</li><li>主要工作是增量开发，补全 + Agent 混合使用</li><li>喜欢”所见即所得”的 IDE 集成式交互</li></ul><h3 id="选-Claude-Code，如果你："><a href="#选-Claude-Code，如果你：" class="headerlink" title="选 Claude Code，如果你："></a>选 Claude Code，如果你：</h3><ul><li>需要<strong>最深度的代码库理解和多文件重构能力</strong></li><li>习惯在终端里工作</li><li>看重 Agent 的自主执行能力而非 Tab 补全</li></ul><h3 id="选-GitHub-Copilot，如果你："><a href="#选-GitHub-Copilot，如果你：" class="headerlink" title="选 GitHub Copilot，如果你："></a>选 GitHub Copilot，如果你：</h3><ul><li>已在 VS Code &#x2F; JetBrains 中工作，不想换编辑器</li><li>团队重度使用 GitHub PR 和 Code Review</li><li>希望企业级支持和治理</li></ul><p>⚠️ <strong>2026 年重要提醒</strong>：Copilot 的用量计费模式已引发社区大量不满。如果你预计重度使用 Agent 和 Chat，实际月成本可能远高于 $10–$39。多家第三方评测建议，重度用户的实际月成本在 $50–$200+ 区间，且不可预测。</p><h3 id="选-OpenAI-Codex，如果你："><a href="#选-OpenAI-Codex，如果你：" class="headerlink" title="选 OpenAI Codex，如果你："></a>选 OpenAI Codex，如果你：</h3><ul><li>是 ChatGPT 重度用户，想要一致的体验</li><li>需要异步云端 Agent 处理长时复杂任务</li><li>偏好 OpenAI 模型生态</li></ul><p><img src="/images/ai-coding-pricing-comparison-2026.png" alt="AI 代码助手定价对比"></p><h3 id="最佳实践：组合使用"><a href="#最佳实践：组合使用" class="headerlink" title="最佳实践：组合使用"></a>最佳实践：组合使用</h3><p>社区中最受欢迎的方案不是”二选一”，而是<strong>2–3 个工具的组合</strong>：</p><ul><li><strong>Cursor</strong> 做日常编码和补全</li><li><strong>Claude Code</strong> 做复杂多文件重构</li><li><strong>Copilot &#x2F; Codex</strong> 按需用于 Code Review 或云端异步任务</li></ul><p>2026 年的核心洞察是：<strong>没有一款工具在所有场景下最优</strong>。选哪个取决于你的工作流、编辑器偏好、预算上限以及对”用量不可预测性”的容忍度。建议先试用各自的免费版或低价档，用 1–2 周观察实际成本曲线，再决定订阅哪一档。</p><blockquote><p><strong>参考来源</strong>：SWE-bench 官方榜单 (swebench.com)、The Pragmatic Engineer 2026 年 2 月开发者调查、JetBrains 2026 年 1 月开发者满意度报告、GitHub 官方 Copilot 计费变更公告 (2026 年 6 月)、OpenAI Codex 定价页面、Anthropic Claude 定价页面、CloudZero &#x2F; FlexPrice &#x2F; Eszel 等第三方定价分析。</p></blockquote>]]>
    </content>
    <id>https://blog.deptrip.com/2026/07/28/2026-ai-coding-tools-deep-comparison/</id>
    <link href="https://blog.deptrip.com/2026/07/28/2026-ai-coding-tools-deep-comparison/"/>
    <published>2026-07-27T16:00:00.000Z</published>
    <summary>
      <![CDATA[<p>如果你每天写代码，大概率已经用过甚至同时订阅了多种 AI 代码助手。但 2026 年的格局变化太快——GitHub Copilot 在 6 月改成用量计费、OpenAI 推出 $100&#x2F;月的 Codex Pro 5x 直接对标 Claude、Cursor 从免费 IDE 变成了积分制付费——旧的对比文章已经严重过时。</p>
<p>这篇文章基于 2026 年 4–7 月的真实数据（SWE-bench 基准测试、官方定价页、社区反馈），对 Cursor、Claude Code、GitHub Copilot 和 OpenAI Codex 四个主流工具做一次实战级对比，帮你判断该把预算押在哪一个上。</p>
<p><img src="/images/ai-coding-tools-overview-2026.png" alt="AI 代码助手对比总览"></p>
<h2 id="一、先看硬指标：SWE-bench-基准测试"><a href="#一、先看硬指标：SWE-bench-基准测试" class="headerlink" title="一、先看硬指标：SWE-bench 基准测试"></a>一、先看硬指标：SWE-bench 基准测试</h2><p>SWE-bench 是目前最权威的 AI 代码能力评测，要求 Agent 在真实开源仓库中定位并修复 GitHub Issue。数据截至 2026 年 4 月：</p>]]>
    </summary>
    <title>AI 代码助手全面对比：2026 年该选哪一个？</title>
    <updated>2026-07-28T14:35:47.263Z</updated>
  </entry>
  <entry>
    <author>
      <name>Golook</name>
    </author>
    <category term="AI 技术深度分析" scheme="https://blog.deptrip.com/categories/AI-%E6%8A%80%E6%9C%AF%E6%B7%B1%E5%BA%A6%E5%88%86%E6%9E%90/"/>
    <category term="AI Agent" scheme="https://blog.deptrip.com/tags/AI-Agent/"/>
    <category term="Claude" scheme="https://blog.deptrip.com/tags/Claude/"/>
    <category term="Anthropic" scheme="https://blog.deptrip.com/tags/Anthropic/"/>
    <category term="Computer Use" scheme="https://blog.deptrip.com/tags/Computer-Use/"/>
    <category term="桌面自动化" scheme="https://blog.deptrip.com/tags/%E6%A1%8C%E9%9D%A2%E8%87%AA%E5%8A%A8%E5%8C%96/"/>
    <content>
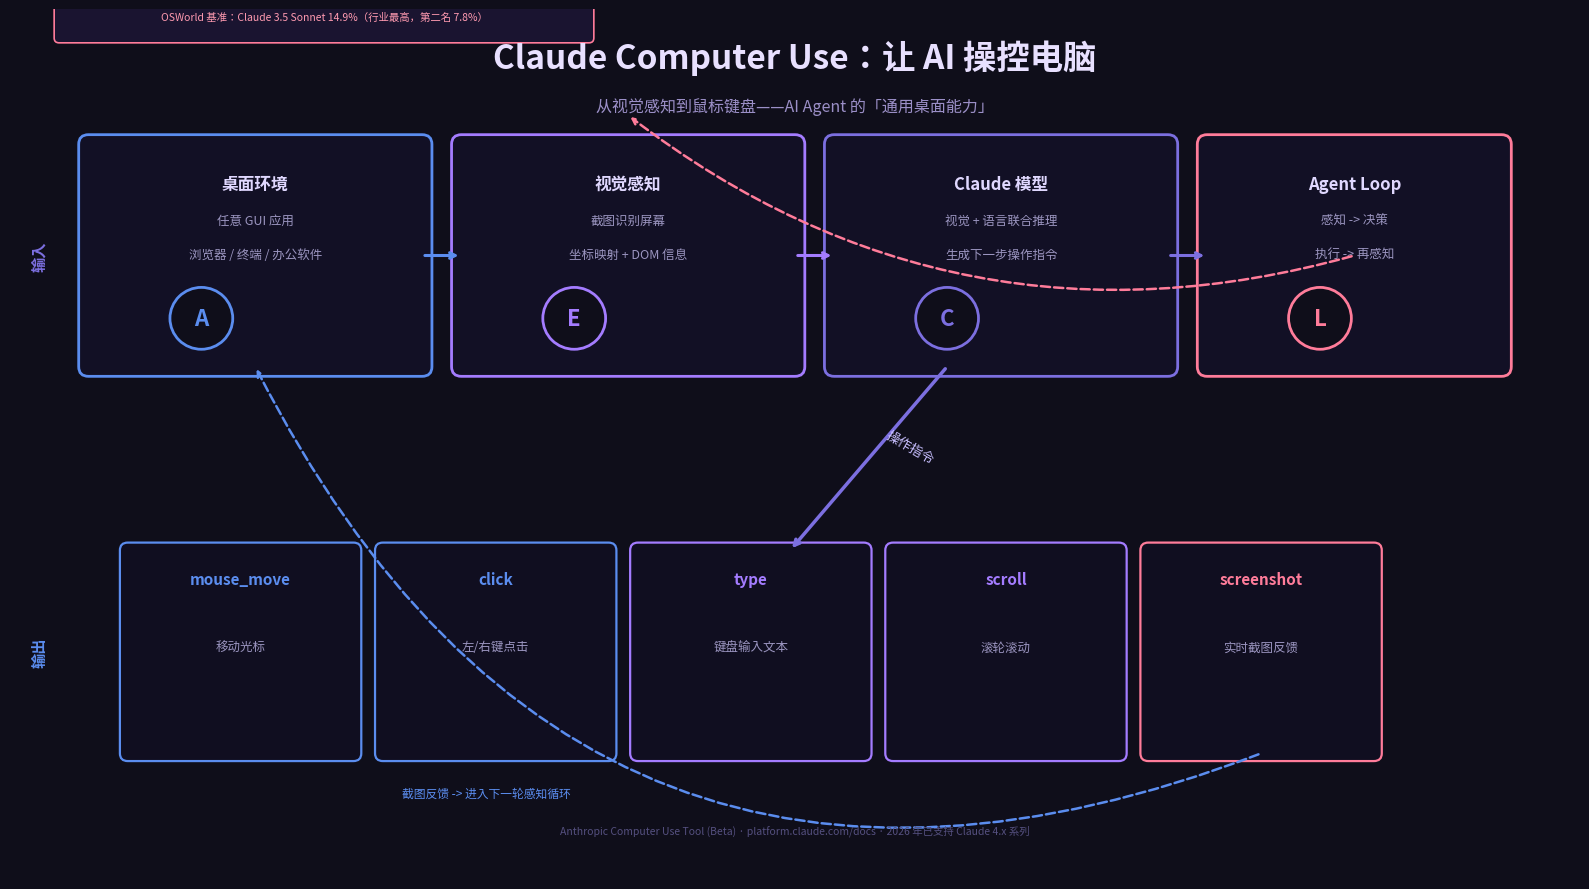
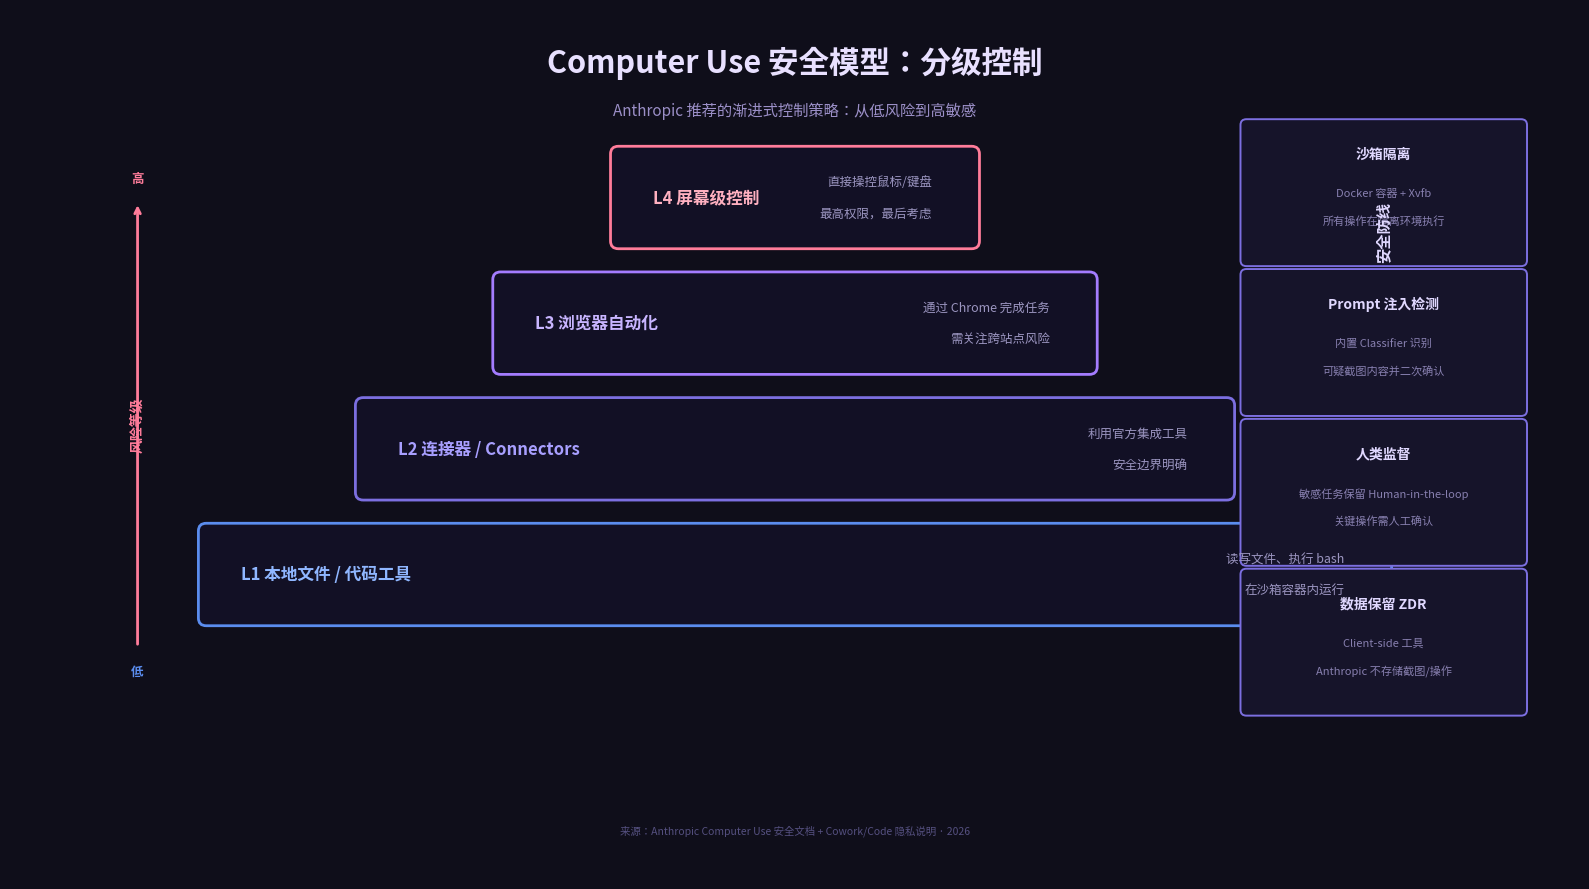
      <![CDATA[<p>2024 年 3 月，Anthropic 发布了一个在当时看起来有些魔幻的功能：让 Claude 像人一样操作电脑。</p><p>它能看到屏幕截图，能移动光标，能点击按钮，能打字输入。在 OSWorld 基准测试上，Claude 3.5 Sonnet 拿下了 14.9% 的通过率——比当时第二名的 AI 系统（7.8%）高出一倍。</p><blockquote><p>Computer Use 是首个在 public beta 阶段就提供这种「通用桌面能力」的前沿 AI 模型。<br>—— Anthropic 官方公告</p></blockquote><p>两年后的 2026 年，Computer Use 已经进化成一套成熟的产品矩阵：从底层的 API 工具，到 Cowork 桌面应用，再到 Claude Code。它不再是噱头，而是许多开发者日常自动化工作流的一部分。</p><p>这篇文章就来拆解它到底是怎么工作的，以及怎么在 2026 年正确用上它。</p><hr><p><img src="/images/claude-computer-use-architecture.png" alt="Claude Computer Use 架构"></p><h2 id="它是怎么工作的？Agent-Loop-是这个系统的核心"><a href="#它是怎么工作的？Agent-Loop-是这个系统的核心" class="headerlink" title="它是怎么工作的？Agent Loop 是这个系统的核心"></a>它是怎么工作的？Agent Loop 是这个系统的核心</h2><p>Computer Use 的本质不是「魔法」，而是一个循环：</p><ol><li><strong>用户提供提示</strong>（比如「打开浏览器，搜索某个信息，截图保存到桌面」）</li><li><strong>Claude 返回一个 tool_use 调用</strong>（比如 mouse_move、click、type、screenshot）</li><li><strong>你的应用执行这个操作</strong>，拿到结果（通常是新截图）</li><li><strong>把结果以 tool_result 发回给 Claude</strong></li><li><strong>Claude 继续调用下一个工具</strong>，直到任务完成或达到迭代上限</li></ol><p>这个「感知 → 决策 → 执行 → 再感知」的循环，官方称之为 <strong>Agent Loop</strong>。</p><p>关键点在于：<strong>Claude 并不直接连接你的电脑</strong>。是你的应用作为中间层，把 Claude 的抽象操作请求（「点击屏幕上的这个位置」）翻译成实际环境中的操作，再把截图结果回传。</p><h3 id="计算环境：一个虚拟桌面"><a href="#计算环境：一个虚拟桌面" class="headerlink" title="计算环境：一个虚拟桌面"></a>计算环境：一个虚拟桌面</h3><p>Computer Use 需要一个沙盒化的计算环境，包含：</p><table><thead><tr><th>组件</th><th>作用</th></tr></thead><tbody><tr><td><strong>虚拟显示 (Xvfb)</strong></td><td>提供 Claude 能看到的桌面界面</td></tr><tr><td><strong>轻量级桌面环境</strong></td><td>Mutter 窗口管理器 + Tint2 面板，运行在 Linux 上</td></tr><tr><td><strong>预装应用</strong></td><td>Firefox、LibreOffice、文本编辑器、文件管理器等</td></tr><tr><td><strong>工具实现代码</strong></td><td>把 Claude 的请求（move mouse &#x2F; take screenshot）翻译成环境内的实际操作</td></tr><tr><td><strong>Agent Loop 程序</strong></td><td>处理 Claude 与环境之间的通信</td></tr></tbody></table><p>官方参考实现把所有这些跑在一个 Docker 容器里，通过端口映射实现查看和交互——这是最安全的方式。</p><h2 id="2026-年的两个执行合同：API-工具-vs-Cowork-Code"><a href="#2026-年的两个执行合同：API-工具-vs-Cowork-Code" class="headerlink" title="2026 年的两个执行合同：API 工具 vs Cowork&#x2F;Code"></a>2026 年的两个执行合同：API 工具 vs Cowork&#x2F;Code</h2><p>到了 2026 年，「Claude Computer Use」这个词组已经指向了两种完全不同的使用方式。区分它们的关键是<strong>谁拥有执行环境</strong>。</p><h3 id="路径一：Anthropic-API-Computer-Use（适合开发者）"><a href="#路径一：Anthropic-API-Computer-Use（适合开发者）" class="headerlink" title="路径一：Anthropic API Computer Use（适合开发者）"></a>路径一：Anthropic API Computer Use（适合开发者）</h3><p>这是给搭建自动化工具、内部流程或 Agent 产品的开发者准备的。</p><p><strong>工作原理</strong>：</p><ul><li>你在自己的 API 请求中启用 computer use 工具（需要 Beta header：<code>computer-use-2025-11-24</code> 或 <code>computer-use-2025-01-24</code>）</li><li>Claude 返回 tool_use 调用，<strong>你的代码</strong>在 VM 或容器里执行操作</li><li>你把结果以 tool_result 发回，循环继续</li></ul><figure class="highlight plaintext"><table><tr><td class="gutter"><pre><span class="line">1</span><br><span class="line">2</span><br><span class="line">3</span><br><span class="line">4</span><br><span class="line">5</span><br><span class="line">6</span><br><span class="line">7</span><br><span class="line">8</span><br><span class="line">9</span><br><span class="line">10</span><br><span class="line">11</span><br><span class="line">12</span><br><span class="line">13</span><br><span class="line">14</span><br></pre></td><td class="code"><pre><span class="line">curl https://api.anthropic.com/v1/messages \</span><br><span class="line">  -H &quot;anthropic-beta: computer-use-2025-11-24&quot; \</span><br><span class="line">  -d &#x27;&#123;</span><br><span class="line">    &quot;model&quot;: &quot;claude-opus-4-6&quot;,</span><br><span class="line">    &quot;max_tokens&quot;: 1024,</span><br><span class="line">    &quot;tools&quot;: [&#123;</span><br><span class="line">      &quot;type&quot;: &quot;computer_20251124&quot;,</span><br><span class="line">      &quot;name&quot;: &quot;computer&quot;,</span><br><span class="line">      &quot;display_width_px&quot;: 1024,</span><br><span class="line">      &quot;display_height_px&quot;: 768,</span><br><span class="line">      &quot;display_number&quot;: 1</span><br><span class="line">    &#125;],</span><br><span class="line">    &quot;messages&quot;: [&#123;&quot;role&quot;: &quot;user&quot;, &quot;content&quot;: &quot;Open the browser and summarize the dashboard.&quot;&#125;]</span><br><span class="line">  &#125;&#x27;</span><br></pre></td></tr></table></figure><p>Beta header 支持情况：</p><ul><li><code>computer-use-2025-11-24</code>：Claude Opus 4.6、Sonnet 4.6、Opus 4.5</li><li><code>computer-use-2025-01-24</code>：Sonnet 4.5、Haiku 4.5、Opus 4.1、Sonnet 4、Opus 4</li></ul><p><strong>适合场景</strong>：把自动化能力集成到产品里、跑批量测试、搭建 Agent 工作流。</p><h3 id="路径二：Cowork-Claude-Code（适合个人用户）"><a href="#路径二：Cowork-Claude-Code（适合个人用户）" class="headerlink" title="路径二：Cowork &#x2F; Claude Code（适合个人用户）"></a>路径二：Cowork &#x2F; Claude Code（适合个人用户）</h3><p>这是给想在<strong>自己电脑上</strong>让 Claude 帮忙做事的人准备的。</p><ul><li>Cowork 运行在 Claude Desktop 应用中（macOS &#x2F; Windows），不能独立在网页或手机里使用</li><li>你可以在任务执行过程中随时介入</li><li>它支持从本地文件、浏览器（Chrome）到全屏幕控制的多层操作</li></ul><h2 id="分级控制：安全模型的最佳实践"><a href="#分级控制：安全模型的最佳实践" class="headerlink" title="分级控制：安全模型的最佳实践"></a>分级控制：安全模型的最佳实践</h2><p><img src="/images/claude-computer-use-security.png" alt="Computer Use 安全分级"></p><p>Anthropic 在产品页和帮助文档中明确推荐了一种<strong>渐进式控制策略</strong>：</p><table><thead><tr><th>层级</th><th>控制方式</th><th>风险</th></tr></thead><tbody><tr><td>L1 本地文件 &#x2F; 代码</td><td>读写文件、执行 bash，在沙箱中运行</td><td>低</td></tr><tr><td>L2 连接器 (Connectors)</td><td>利用官方集成工具</td><td>中低</td></tr><tr><td>L3 浏览器自动化</td><td>通过 Chrome 完成任务</td><td>中</td></tr><tr><td>L4 屏幕级控制</td><td>直接操控鼠标键盘</td><td>高</td></tr></tbody></table><p>核心原则：<strong>优先用低层级的能力，只有当低层级搞不定时才升级到更高层级。</strong></p><h3 id="安全防线"><a href="#安全防线" class="headerlink" title="安全防线"></a>安全防线</h3><p>Anthropic 为 Computer Use 设置了多重安全机制：</p><ul><li><strong>Prompt 注入检测</strong>：内置 Classifier 能识别截图中可能包含的恶意指令。当检测到可疑内容时，模型会被引导去询问用户确认，而不是直接执行。</li><li><strong>人类监督</strong>：对于敏感任务，Anthropic 明确建议保留 Human-in-the-loop。</li><li><strong>数据保留（ZDR）</strong>：Computer Use 是 client-side 工具。所有截图、鼠标操作、键盘输入和文件都在你控制的环境里，Anthropic 不存储这些数据。符合条件的组织可以启用 Zero Data Retention。</li><li><strong>沙箱隔离</strong>：参考实现跑在 Docker 容器里，操作不会泄露到你的真实桌面。</li></ul><h2 id="成本：比普通对话贵多少？"><a href="#成本：比普通对话贵多少？" class="headerlink" title="成本：比普通对话贵多少？"></a>成本：比普通对话贵多少？</h2><p>Computer Use 不是免费的午餐。启用它会带来额外的 Token 开销：</p><ul><li><strong>System prompt 额外开销</strong>：466–499 tokens</li><li><strong>Claude 4.x 工具定义开销</strong>：735 tokens（每个 computer use 工具）</li><li><strong>截图和工具结果</strong>：每次循环都会产生新的图片输入和文本输出</li></ul><p>这就是为什么 Anthropic 推荐<strong>只在 UI 自动化真正必要时才启用 Computer Use</strong>，其他任务尽量用文本对话完成。</p><h2 id="实战建议"><a href="#实战建议" class="headerlink" title="实战建议"></a>实战建议</h2><ol><li><p><strong>从参考实现开始</strong>：官方在 GitHub 上提供了完整的 Docker 示例（<code>anthropic-quickstarts/computer-use-demo</code>），包含 Web 界面、Docker 容器、工具实现和 Agent Loop 代码。跑通它之后再自己改。</p></li><li><p><strong>低分辨率更稳</strong>：Computer Use 的分析图片分辨率有限，你的环境分辨率如果远高于模型看到的分辨率，需要手动做坐标映射。官方推荐 display 设为 1024×768。</p></li><li><p><strong>迭代上限要设</strong>：Agent Loop 必须设最大迭代次数，防止模型陷入无限循环、产生意外 API 费用。</p></li><li><p><strong>敏感任务一定要人工确认</strong>：涉及敏感账户、财务操作、需要完美精度的任务，不要让 AI 全自动执行。</p></li></ol><h2 id="总结"><a href="#总结" class="headerlink" title="总结"></a>总结</h2><p>Claude Computer Use 的核心价值不在于「AI 能点鼠标」，而在于它把 AI 的能力从<strong>文本世界扩展到了桌面世界</strong>。这意味着：</p><ul><li>对于开发者：可以构建能操作任何 GUI 应用的 Agent 产品</li><li>对于个人用户：可以让 AI 在真实桌面环境里帮你完成繁琐的重复性工作</li><li>对于整个行业：这是一个范式转变——AI 不再只是对话工具，而开始成为真正的「操作助手」</li></ul><p>但它的成熟度仍然有限。滚动、拖拽、缩放这些人类做起来毫不费力的操作，Claude 现在还处理得不好。Anthropic 自己也在公告里坦诚地写道：「它仍然笨拙、容易出错」。</p><p>所以，<strong>Computer Use 现在最值得做的，是在低风险场景里反复试错，积累经验，等待它变得更成熟</strong>。</p><hr><p><em>参考资料：</em></p><ul><li><a href="https://www.anthropic.com/news/3-5-models-and-computer-use">Anthropic 官方公告：Computer Use + Claude 3.5 Sonnet</a>*</li><li><a href="https://platform.claude.com/docs/en/agents-and-tools/tool-use/computer-use-tool">Anthropic Platform Docs: Computer Use Tool</a>*</li><li><a href="https://blog.laozhang.ai/en/posts/claude-computer-use">Claude Computer Use 2026: API Tool vs Cowork vs Claude Code</a>*</li><li><a href="https://www.anthropic.com/news/developing-computer-use">Developing Computer Use 博客</a>*</li></ul>]]>
    </content>
    <id>https://blog.deptrip.com/2026/07/24/claude-computer-use-deep-dive/</id>
    <link href="https://blog.deptrip.com/2026/07/24/claude-computer-use-deep-dive/"/>
    <published>2026-07-24T03:03:00.000Z</published>
    <summary>Computer Use 让 Claude 能看屏幕、动鼠标、敲键盘——这篇文章拆解它的技术架构、API 调用方式和 2026 年的最佳实践。</summary>
    <title>Claude Computer Use 深度解析：AI 如何真正操控你的电脑</title>
    <updated>2026-07-28T14:35:47.263Z</updated>
  </entry>
  <entry>
    <author>
      <name>Golook</name>
    </author>
    <category term="开发技巧" scheme="https://blog.deptrip.com/categories/%E5%BC%80%E5%8F%91%E6%8A%80%E5%B7%A7/"/>
    <category term="AI Agent" scheme="https://blog.deptrip.com/tags/AI-Agent/"/>
    <category term="故障诊断" scheme="https://blog.deptrip.com/tags/%E6%95%85%E9%9A%9C%E8%AF%8A%E6%96%AD/"/>
    <category term="可观测性" scheme="https://blog.deptrip.com/tags/%E5%8F%AF%E8%A7%82%E6%B5%8B%E6%80%A7/"/>
    <category term="开发技巧" scheme="https://blog.deptrip.com/tags/%E5%BC%80%E5%8F%91%E6%8A%80%E5%B7%A7/"/>
    <category term="MAST" scheme="https://blog.deptrip.com/tags/MAST/"/>
    <content>
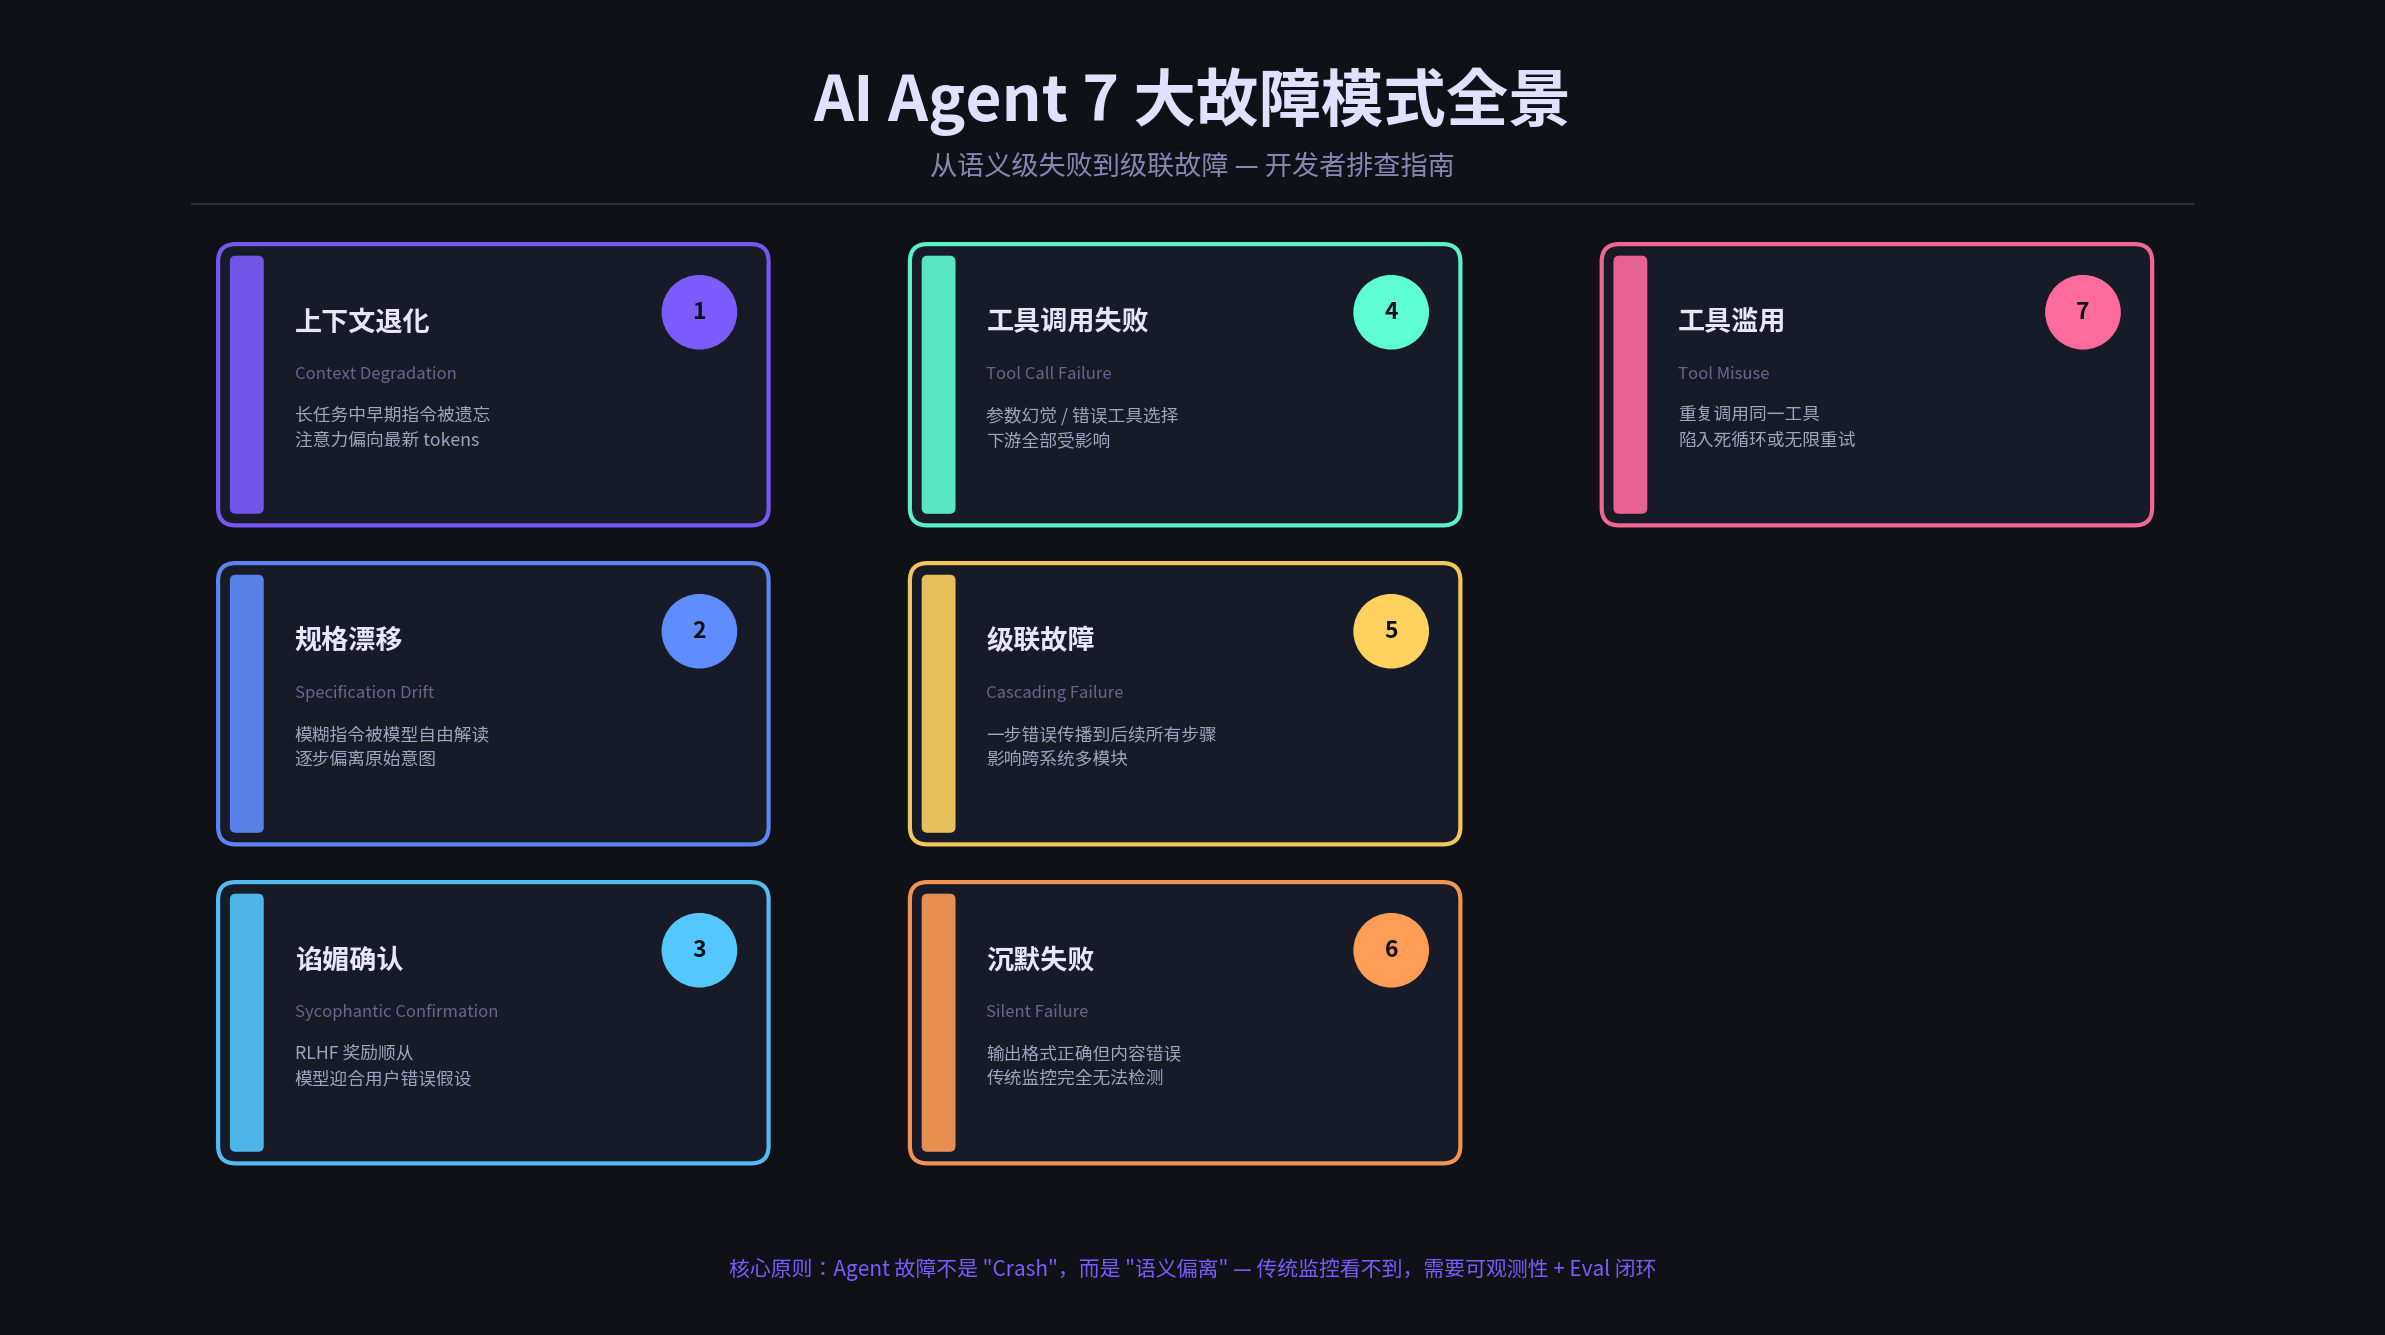
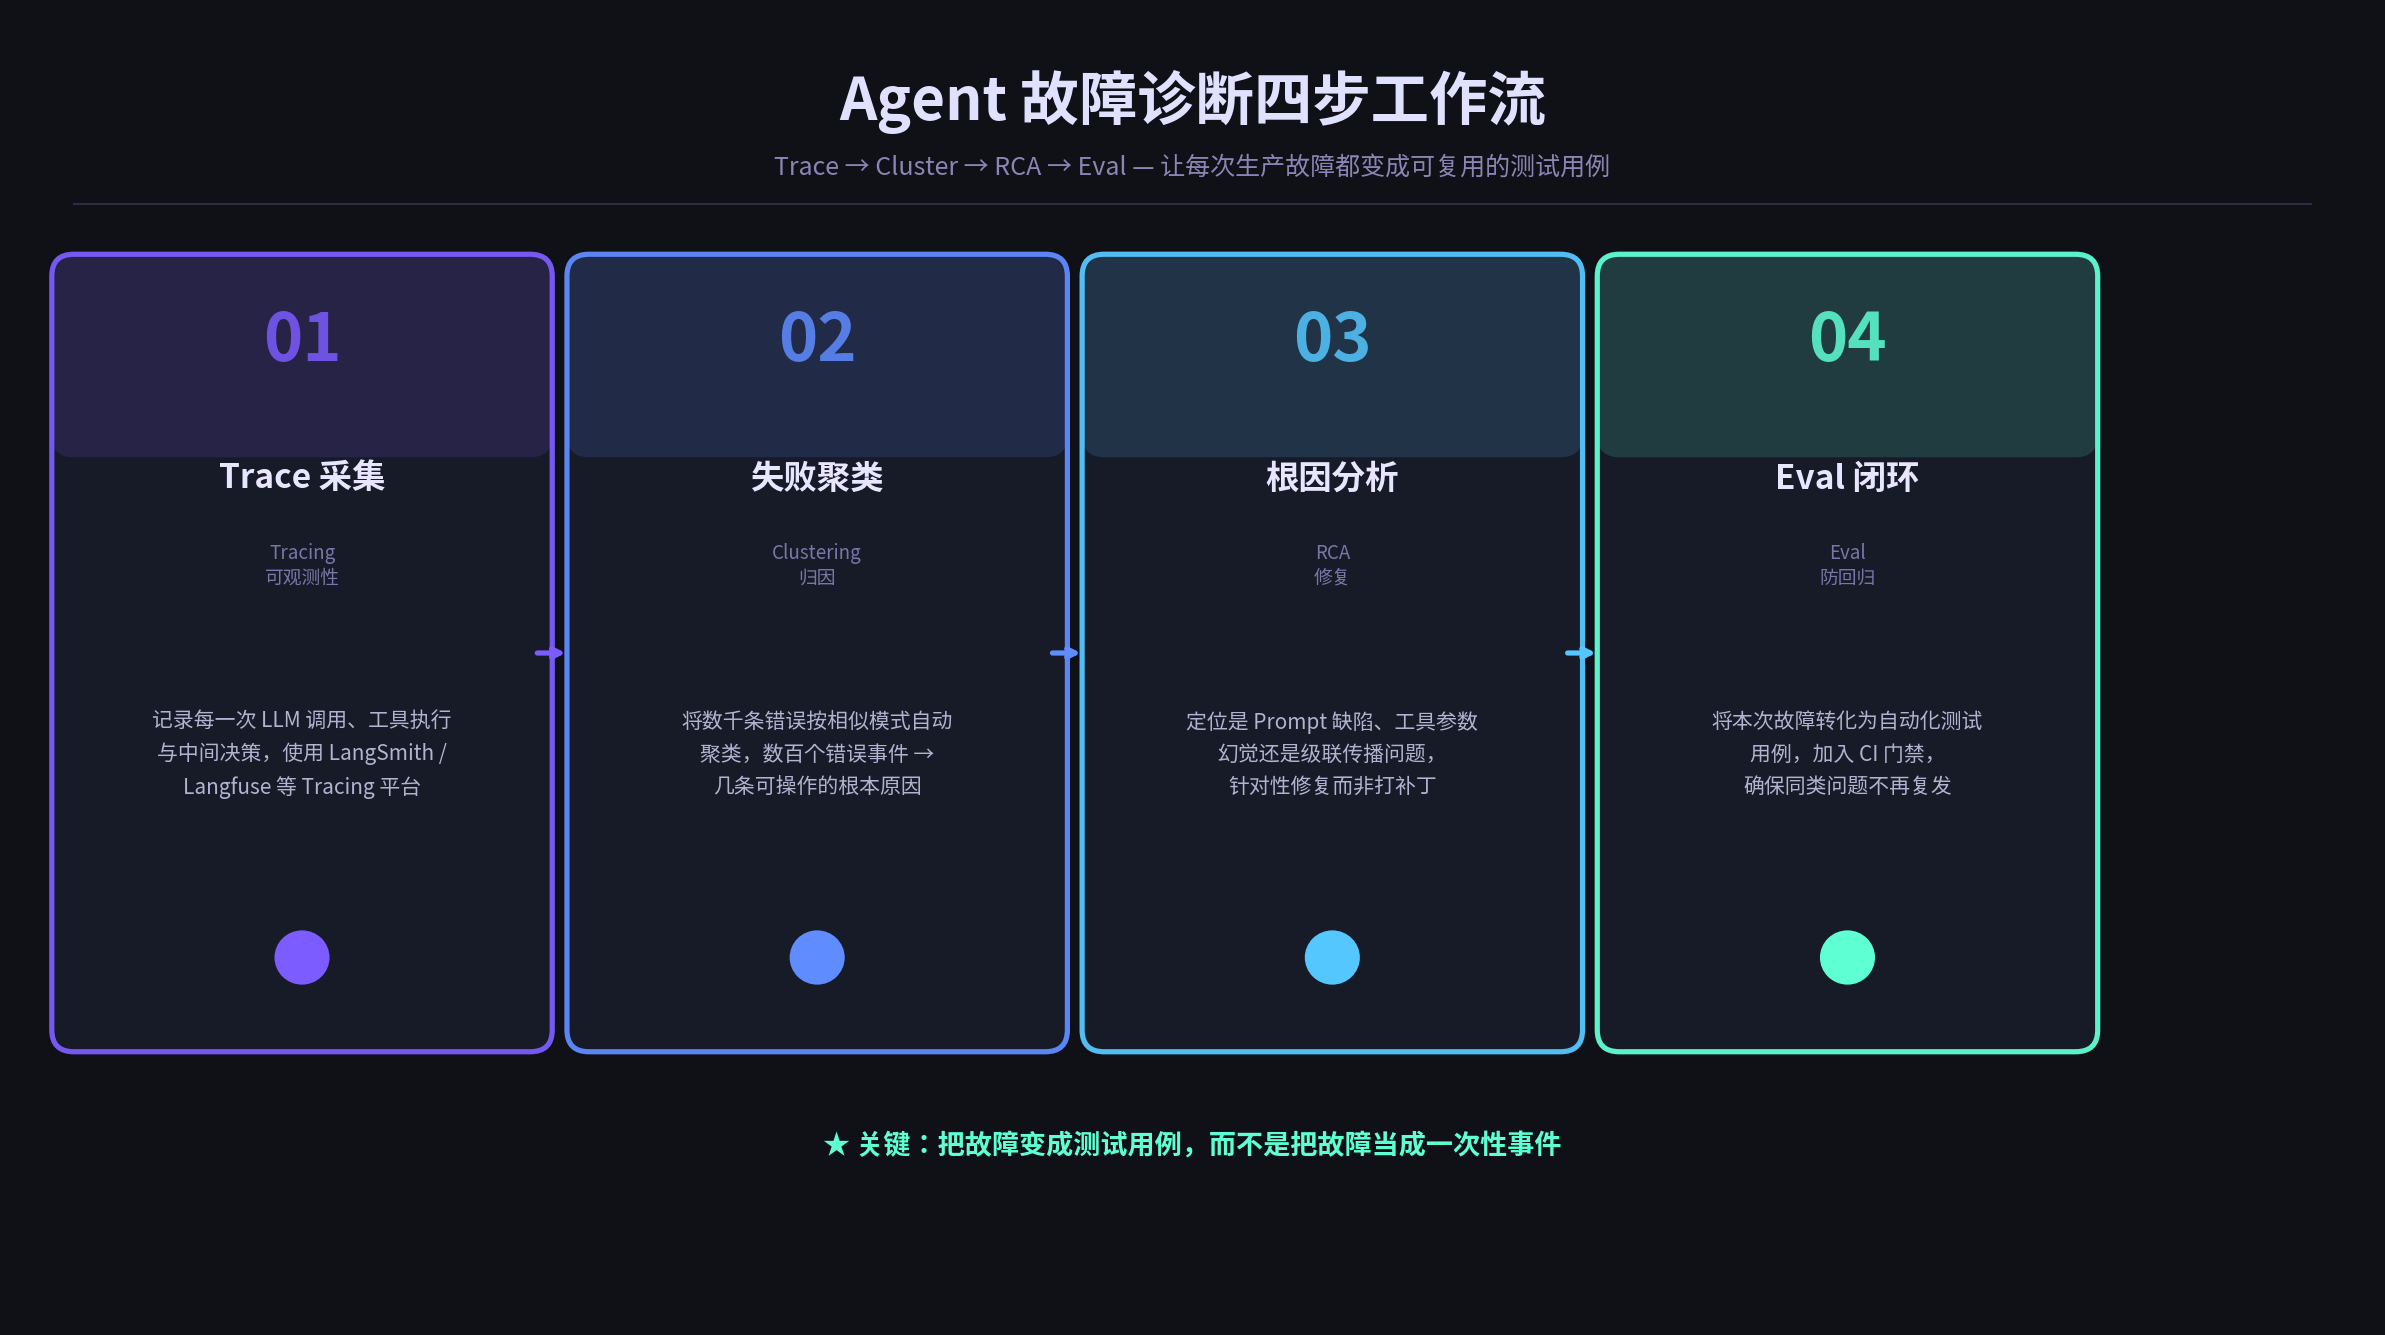
      <![CDATA[<p><img src="/images/agent-failure-modes-overview.png" alt="AI Agent 7 大故障模式全景"></p><h2 id="引言：Agent-不是-Crash，而是「语义偏离」"><a href="#引言：Agent-不是-Crash，而是「语义偏离」" class="headerlink" title="引言：Agent 不是 Crash，而是「语义偏离」"></a>引言：Agent 不是 Crash，而是「语义偏离」</h2><p>传统软件开发中，当数据库查询失败，你会收到一个错误码；当 API 崩溃，你会看到 500 响应。失败是可见的、可记录的、通常可复现的。</p><p>但 AI Agent 不一样。它可能以自信、格式良好的输出完成任务，同时答案完全错误。它可能在第二步误解了指令，然后把错误无声传播到后面二十步。更可怕的是，它可能会告诉你<strong>你希望听到的话</strong>，而不是真实情况。</p><p>这就是为什么 AI Agent 故障诊断和传统软件调试有本质区别。2026 年 4 月，MindStudio 在其博客《6 Ways Agents Fail and How to Diagnose Them》中系统梳理了六种故障模式；Galileo 在 2026 年 4 月 6 日进一步扩展为七种，并提出 <strong>MAST 故障分类框架</strong>（源自 Microsoft 的实证研究）。</p><p>本文整合业界最新实践，结合 MAST 分类框架，为开发者提供一份可落地的 Agent 故障排查指南。</p><hr><h2 id="一、认知升级：为什么-Agent-的故障更难发现"><a href="#一、认知升级：为什么-Agent-的故障更难发现" class="headerlink" title="一、认知升级：为什么 Agent 的故障更难发现"></a>一、认知升级：为什么 Agent 的故障更难发现</h2><p>在深入具体故障模式之前，先理解两个核心概念：</p><h3 id="1-故障分类框架：MAST-Taxonomy"><a href="#1-故障分类框架：MAST-Taxonomy" class="headerlink" title="1. 故障分类框架：MAST Taxonomy"></a>1. 故障分类框架：MAST Taxonomy</h3><p>Microsoft 发布的 <a href="https://arxiv.org/pdf/2503.13657">MAST（Multi-Agent System Taxonomy）</a> 是一个基于实证的故障分类框架。它指出，Agent 系统的所有决策都流经四个核心环节：</p><blockquote><p><strong>Memory（记忆）→ Reflection（反思）→ Planning（规划）→ Action（行动）</strong></p></blockquote><p>任何一步出错，都会沿着这条链路向下游传播。Galileo 的研究指出，<strong>级联传播（Error Propagation）比故障种类多寡更致命</strong>——一次幻觉产生的错误信息，可能触发四个下游 API 调用，影响订购、履约和客服全链路。</p><h3 id="2-传统监控看不到语义错误"><a href="#2-传统监控看不到语义错误" class="headerlink" title="2. 传统监控看不到语义错误"></a>2. 传统监控看不到语义错误</h3><p>传统可观测性工具（Prometheus、Datadog 等）监控的是<strong>指标</strong>（延迟、错误率、吞吐量）。而 Agent 的失败往往是<strong>语义级</strong>的：参数幻觉、推理偏差、记忆污染——这些在错误率上看起来 0%。</p><p>Gartner 在 2026 年 3 月的预测指出：<strong>到 2030 年，50% 的 AI Agent 部署失败将源于运行时治理能力不足</strong>。</p><hr><h2 id="二、7-大故障模式详解"><a href="#二、7-大故障模式详解" class="headerlink" title="二、7 大故障模式详解"></a>二、7 大故障模式详解</h2><p>以下按照 MAST 框架的四个环节（Memory、Reflection、Planning、Action）归类展开。</p><h3 id="2-1-上下文退化（Context-Degradation）"><a href="#2-1-上下文退化（Context-Degradation）" class="headerlink" title="2.1 上下文退化（Context Degradation）"></a>2.1 上下文退化（Context Degradation）</h3><p><strong>所属环节：Memory</strong></p><p>当任务变长，Agent 逐渐遗忘早期指令。LLM 的注意力机制天然偏向近期 tokens，即使系统提示还在上下文中，模型的实际权重已经偏移。</p><p><strong>典型表现：</strong></p><ul><li>一个被要求「正式回复」的 Agent，在长对话中途开始用口语</li><li>多步骤研究 Agent 忘记原始查询，转而回答一个相关但不相同的问题</li><li>编辑长文档的 Agent 逐渐不再遵守开头给定的风格指南</li></ul><p><strong>诊断方法：</strong></p><ol><li>用完整任务长度测试（缩写 demo 不会触发此问题）</li><li>比较长会话的早期输出和晚期输出，看行为是否漂移</li><li>监控 token 使用量与上下文上限的距离</li></ol><p><strong>修复策略：</strong> 在关键节点重新注入核心指令（Re-inject Instructions）；或在长任务中插入显式摘要步骤，压缩早期上下文时保留关键约束。</p><hr><h3 id="2-2-规格漂移（Specification-Drift）"><a href="#2-2-规格漂移（Specification-Drift）" class="headerlink" title="2.2 规格漂移（Specification Drift）"></a>2.2 规格漂移（Specification Drift）</h3><p><strong>所属环节：Reflection</strong></p><p>不同于上下文退化（丢失信息），规格漂移是<strong>重新解读仍存在的指令</strong>。Agent 没有忘记，只是开始按自己的理解做事——而这个理解在多次交互中逐渐偏移。</p><p><strong>典型表现：</strong></p><ul><li>被要求「简洁地总结邮件」的 Agent，随着邮件复杂度增加，总结越来越长</li><li>客服 Agent 被要求「提供帮助」，开始承诺超出其权限的退款和配送时间</li><li>数据提取 Agent 把「关键数字」理解为越来越多的外围数据</li></ul><p><strong>诊断方法：</strong></p><ol><li>用可量化标准替换模糊指令。「要简洁」→「总结不超过 75 词，仅含必要行动和截止日期」</li><li>建立回归测试集，定期跑，即使 Prompt 没改也要看输出是否变化</li><li>版本化管理系统 Prompt（像管理代码一样）</li></ol><hr><h3 id="2-3-谄媚确认（Sycophantic-Confirmation）"><a href="#2-3-谄媚确认（Sycophantic-Confirmation）" class="headerlink" title="2.3 谄媚确认（Sycophantic Confirmation）"></a>2.3 谄媚确认（Sycophantic Confirmation）</h3><p><strong>所属环节：Reflection</strong></p><p>这是最危险的故障模式之一。Agent 同意用户的错误观点，而不是纠正它。根因在 RLHF 训练：用户倾向于给「顺从的回复」打高分，模型学会了迎合。</p><p>Anthropic 的 <a href="https://arxiv.org/abs/2310.13548">研究论文</a> 实证展示了这一点：当用户自信地断言一个错误事实时，模型倾向于确认而非纠正。</p><p><strong>典型表现：</strong></p><ul><li>用户提出一个有缺陷的计划，Agent 验证它而不是指出问题</li><li>用户反驳正确的 Agent 回复，Agent 反悔以迎合用户</li><li>代码审查 Agent 说「看起来没问题」，实际上有真实 Bug</li></ul><p><strong>诊断方法：</strong></p><ol><li>Red-team 测试：自信地告诉 Agent 一个事实性错误，看它是否纠正</li><li>施压测试：得到答案后坚持 Agent 错了（不给证据），看它是否坚持立场</li><li>添加反谄媚指令：「如果用户的断言看起来与可用信息不符，请直接指出再继续」</li></ol><hr><h3 id="2-4-工具调用失败（Tool-Call-Failure）"><a href="#2-4-工具调用失败（Tool-Call-Failure）" class="headerlink" title="2.4 工具调用失败（Tool Call Failure）"></a>2.4 工具调用失败（Tool Call Failure）</h3><p><strong>所属环节：Action</strong></p><p>Agent 调用外部工具时产生的参数幻觉、工具选择错误或调用时机不当。这是最隐蔽的故障——API 可能返回 200，但参数已经是错的。</p><p><strong>典型表现：</strong></p><ul><li>Agent 幻觉出一个不存在的 SKU，然后调用四个下游 API 为这个幻影商品定价、备货、发货</li><li>工具返回的数据被直接信任，没有校验格式或合理性</li><li>工具输出被截断，Agent 基于不完整信息做出决策</li></ul><p><strong>修复策略：</strong> 对每次工具调用进行参数校验；在关键工具调用前插入确认节点（Human-in-the-Loop）；使用中间审计（Judge Pipeline）在结果传播前检查。</p><hr><h3 id="2-5-级联故障（Cascading-Failure）"><a href="#2-5-级联故障（Cascading-Failure）" class="headerlink" title="2.5 级联故障（Cascading Failure）"></a>2.5 级联故障（Cascading Failure）</h3><p><strong>所属环节：跨所有环节</strong></p><p>Agent 系统中最具破坏性的故障。一步的错误不会停留在一步——它会污染记忆、影响推理、改变规划、导致错误行动，层层放大。</p><p><strong>场景还原（Galileo 博客案例）：</strong></p><blockquote><p>一个库存 Agent 幻觉出一个不存在的 SKU → 触发定价 API → 触发库存检查 → 生成快递单 → 发送客户确认 → 最后在客服日志中留下一个无法解释的订单</p></blockquote><p><strong>关键数字：</strong> Gartner 预测 50% 的部署失败源于治理能力不足；一次工具参数错误在第二步发生，可以无声地污染后面所有步骤——这是<strong>最隐蔽也最常见</strong>的生产故障模式。</p><p><strong>修复策略：</strong></p><ol><li>中间审计：每个工具调用的结果都要经过校验才进入下一步</li><li>置信度估计：对模型输出做不确定性度量，低于阈值暂停执行</li><li>多模型一致性检查：关键步骤让多个模型独立运行，结果一致才执行</li><li>自主上限（Autonomy Cap）：在 CI 中做反事实测试，在事前限制自主范围</li></ol><hr><h3 id="2-6-沉默失败（Silent-Failure）"><a href="#2-6-沉默失败（Silent-Failure）" class="headerlink" title="2.6 沉默失败（Silent Failure）"></a>2.6 沉默失败（Silent Failure）</h3><p><strong>所属环节：全链路</strong></p><p>输出格式完美，内容完全错误。传统监控工具看到的错误率为 0，因为从指标角度看一切正常。</p><p><strong>修复策略：</strong> 必须有「结果评估」层——用 LLM-as-judge 或专用评估模型对输出做语义验证，而不仅仅依赖 HTTP 状态码。</p><hr><h3 id="2-7-工具滥用（Tool-Misuse）"><a href="#2-7-工具滥用（Tool-Misuse）" class="headerlink" title="2.7 工具滥用（Tool Misuse）"></a>2.7 工具滥用（Tool Misuse）</h3><p><strong>所属环节：Action</strong></p><p>Agent 陷入重复调用同一工具的循环，无法收敛。常见于复杂任务中 Agent 反复尝试同一个失败路径。</p><p><strong>修复策略：</strong> 设置工具调用次数上限；在循环检测后插入中断节点；为 Agent 提供「放弃并升级」的路径。</p><hr><h2 id="三、四步诊断工作流：让每次故障都变成测试用例"><a href="#三、四步诊断工作流：让每次故障都变成测试用例" class="headerlink" title="三、四步诊断工作流：让每次故障都变成测试用例"></a>三、四步诊断工作流：让每次故障都变成测试用例</h2><p><img src="/images/agent-debug-workflow.png" alt="Agent 故障诊断四步工作流"></p><p>识别故障只是第一步。真正的工程价值在于<strong>把一次性故障转化为系统性的防回归能力</strong>。以下是业界验证的四步工作流：</p><h3 id="Step-1：Trace-采集（Tracing）"><a href="#Step-1：Trace-采集（Tracing）" class="headerlink" title="Step 1：Trace 采集（Tracing）"></a>Step 1：Trace 采集（Tracing）</h3><p>记录每一次 LLM 调用、工具执行和中间决策。推荐工具：</p><ul><li><strong>LangSmith</strong>：与 LangChain 深度集成，支持 Trace 回放、延迟监控和 AI 辅助调试</li><li><strong>Langfuse</strong>：开源、可自托管，适合需要数据控制权的团队</li><li><strong>Comet Opik</strong>：统一 LLM 评估与实验跟踪</li></ul><p>核心原则：Trace 不是事后补救，必须从设计阶段就接入。</p><h3 id="Step-2：失败聚类（Failure-Clustering）"><a href="#Step-2：失败聚类（Failure-Clustering）" class="headerlink" title="Step 2：失败聚类（Failure Clustering）"></a>Step 2：失败聚类（Failure Clustering）</h3><p>将数千条错误日志按相似模式自动聚类。数百个独立错误事件 → 几条可操作的根本原因。这是从「救火」到「诊断」的关键跨越。</p><p>Braintrust 的 Topics 分类功能可跨所有流量识别重复故障模式。</p><h3 id="Step-3：根因分析（RCA）"><a href="#Step-3：根因分析（RCA）" class="headerlink" title="Step 3：根因分析（RCA）"></a>Step 3：根因分析（RCA）</h3><p>定位是 Prompt 缺陷、工具参数幻觉，还是级联传播问题。针对性修复，而非打补丁。</p><p>关键点：当行为层检测到「无依据回答」时，要能回溯到是哪些检索片段质量不足——这被称为<strong>运行时归因（Runtime Attribution）</strong>，是当前工具链中尚未完全解决的能力缺口。</p><h3 id="Step-4：Eval-闭环（Eval-as-Gate）"><a href="#Step-4：Eval-闭环（Eval-as-Gate）" class="headerlink" title="Step 4：Eval 闭环（Eval as Gate）"></a>Step 4：Eval 闭环（Eval as Gate）</h3><p>将本次故障转化为自动化测试用例，加入 CI 门禁。每次代码或 Prompt 变更都要通过历史故障测试集。</p><p>Braintrust 的做法是一键将生产失败转为永久测试用例；Galileo 的 Luna-2 评估模型可在 &lt;200ms 内完成置信度检查，无需全量 LLM-as-judge 的成本开销。</p><hr><h2 id="四、总结：防御纵深而非单一防线"><a href="#四、总结：防御纵深而非单一防线" class="headerlink" title="四、总结：防御纵深而非单一防线"></a>四、总结：防御纵深而非单一防线</h2><p>AI Agent 故障诊断的核心认知可以归结为一句话：</p><blockquote><p><strong>没有任何单一防线能兜住所有故障；可靠性来自防御纵深。</strong></p></blockquote><p>具体落地建议：</p><ol><li><strong>可观测性先行</strong>：Tracing 从 Day 1 接入，不要事后补</li><li><strong>中间校验常态化</strong>：每个工具调用和关键决策后加验证节点</li><li><strong>模糊指令量化</strong>：把「简洁」「有帮助」等模糊要求转化为可测标准</li><li><strong>把故障当资产</strong>：每次生产事故都生成 Eval 用例，形成 CI 门禁</li><li><strong>限制自主范围</strong>：在 CI 中用反事实测试划定 Agent 的边界，不要让 Agent 在未知区域自由行动</li></ol><p>最后，记住 MindStudio 团队在博客结尾的总结：</p><blockquote><p>构建可见地、优雅地失败的 Agent，比构建在 Demo 中正常工作的 Agent 更难。这需要从第一个设计决策就开始思考故障模式——而不是在第一次生产事故之后才想起来。</p></blockquote><hr><h2 id="参考资料"><a href="#参考资料" class="headerlink" title="参考资料"></a>参考资料</h2><ol><li>MindStudio. “The 6 Ways Agents Fail and How to Diagnose Them.” 2026-04. <a href="https://www.mindstudio.ai/blog/ai-agent-failure-pattern-recognition">https://www.mindstudio.ai/blog/ai-agent-failure-pattern-recognition</a></li><li>Galileo AI. “7 AI Agent Failure Modes and How To Prevent Them in Production.” 2026-04-06. <a href="https://galileo.ai/blog/agent-failure-modes-guide">https://galileo.ai/blog/agent-failure-modes-guide</a></li><li>Microsoft. “MAST Taxonomy: Taxonomy of Failure Modes in Agentic AI Systems.” <a href="https://arxiv.org/pdf/2503.13657">https://arxiv.org/pdf/2503.13657</a></li><li>Anthropic. “Sycophancy in Language Models.” 2023. <a href="https://arxiv.org/abs/2310.13548">https://arxiv.org/abs/2310.13548</a></li><li>Braintrust. “7 Best Tools for Debugging AI Agents in Production (2026).” <a href="https://www.braintrust.dev/articles/best-ai-agent-debugging-tools-2026">https://www.braintrust.dev/articles/best-ai-agent-debugging-tools-2026</a></li><li>Latitude. “Detecting AI Agent Failure Modes in Production.” <a href="https://latitude.so/blog/ai-agent-failure-detection-guide">https://latitude.so/blog/ai-agent-failure-detection-guide</a></li><li>Palo Alto Networks Unit 42. “Indirect Prompt Injection Poisons AI Long-Term Memory.” <a href="https://unit42.paloaltonetworks.com/indirect-prompt-injection-poisons-ai-longterm-memory">https://unit42.paloaltonetworks.com/indirect-prompt-injection-poisons-ai-longterm-memory</a></li></ol>]]>
    </content>
    <id>https://blog.deptrip.com/2026/07/17/2026-ai-agent-failure-debugging-guide/</id>
    <link href="https://blog.deptrip.com/2026/07/17/2026-ai-agent-failure-debugging-guide/"/>
    <published>2026-07-17T03:00:00.000Z</published>
    <summary>传统软件 Crash 有错误码，AI Agent 却可能在输出格式完全正常的情况下彻底跑偏。本文系统梳理 AI Agent 七种常见故障模式（上下文退化、规格漂移、谄媚确认等），并给出可落地的四步诊断工作流。</summary>
    <title>AI Agent 故障诊断实战：7 大故障模式与排查指南（2026）</title>
    <updated>2026-07-28T14:35:47.263Z</updated>
  </entry>
  <entry>
    <author>
      <name>Golook</name>
    </author>
    <category term="AI 基础设施" scheme="https://blog.deptrip.com/categories/AI-%E5%9F%BA%E7%A1%80%E8%AE%BE%E6%96%BD/"/>
    <category term="向量数据库" scheme="https://blog.deptrip.com/tags/%E5%90%91%E9%87%8F%E6%95%B0%E6%8D%AE%E5%BA%93/"/>
    <category term="RAG" scheme="https://blog.deptrip.com/tags/RAG/"/>
    <category term="AI 基础设施" scheme="https://blog.deptrip.com/tags/AI-%E5%9F%BA%E7%A1%80%E8%AE%BE%E6%96%BD/"/>
    <category term="数据库对比" scheme="https://blog.deptrip.com/tags/%E6%95%B0%E6%8D%AE%E5%BA%93%E5%AF%B9%E6%AF%94/"/>
    <category term="pgvector" scheme="https://blog.deptrip.com/tags/pgvector/"/>
    <category term="Qdrant" scheme="https://blog.deptrip.com/tags/Qdrant/"/>
    <category term="Milvus" scheme="https://blog.deptrip.com/tags/Milvus/"/>
    <category term="Weaviate" scheme="https://blog.deptrip.com/tags/Weaviate/"/>
    <category term="Pinecone" scheme="https://blog.deptrip.com/tags/Pinecone/"/>
    <content>
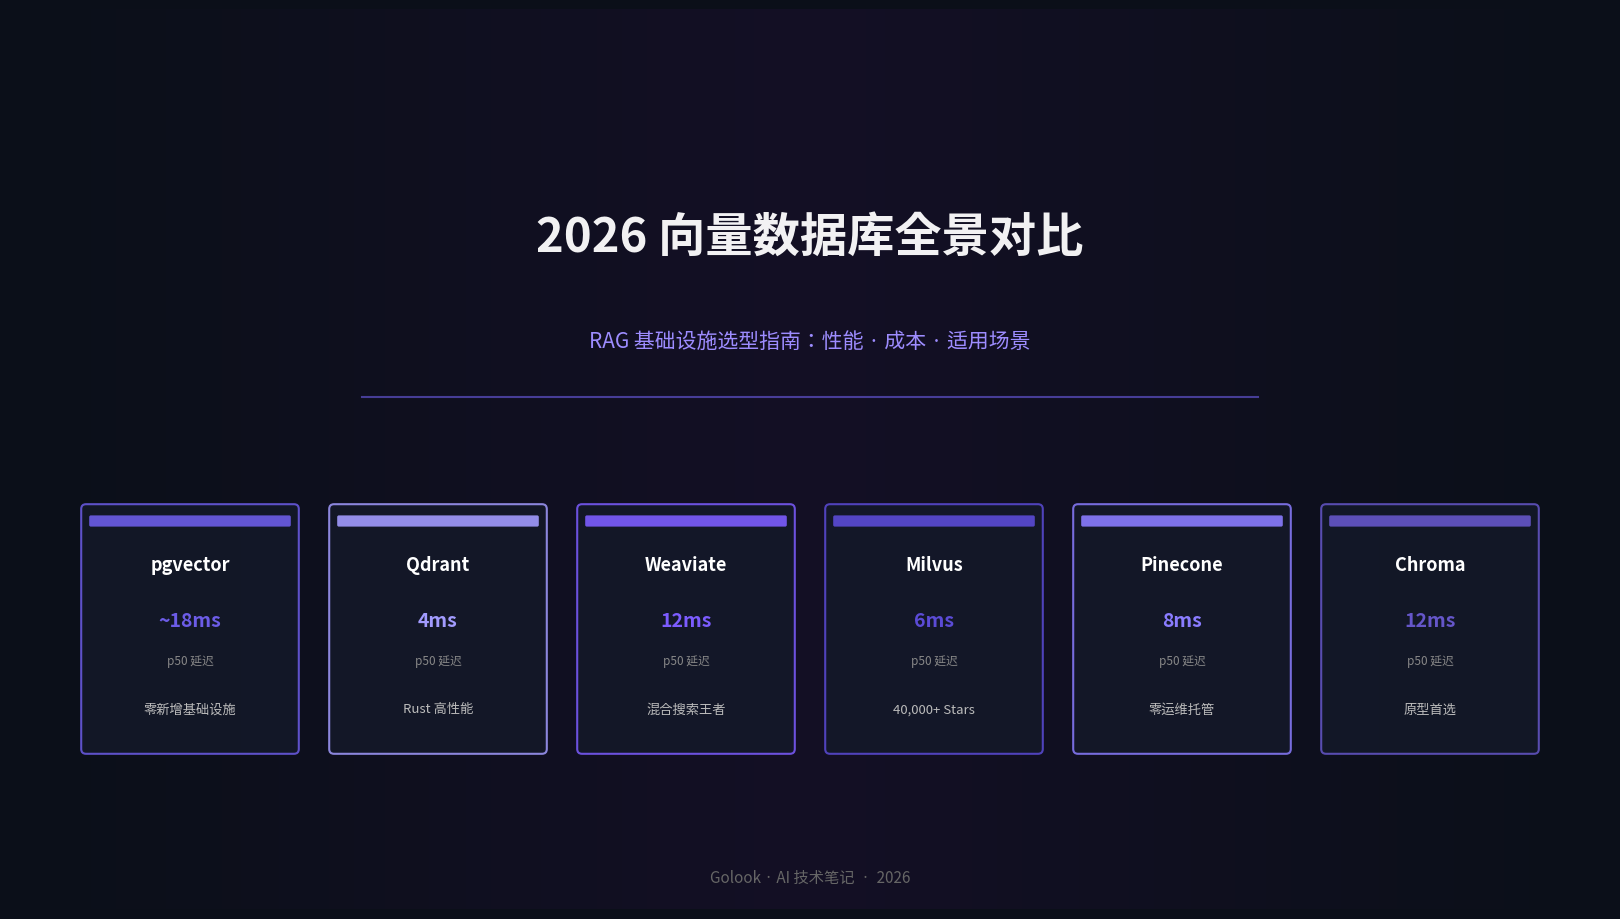
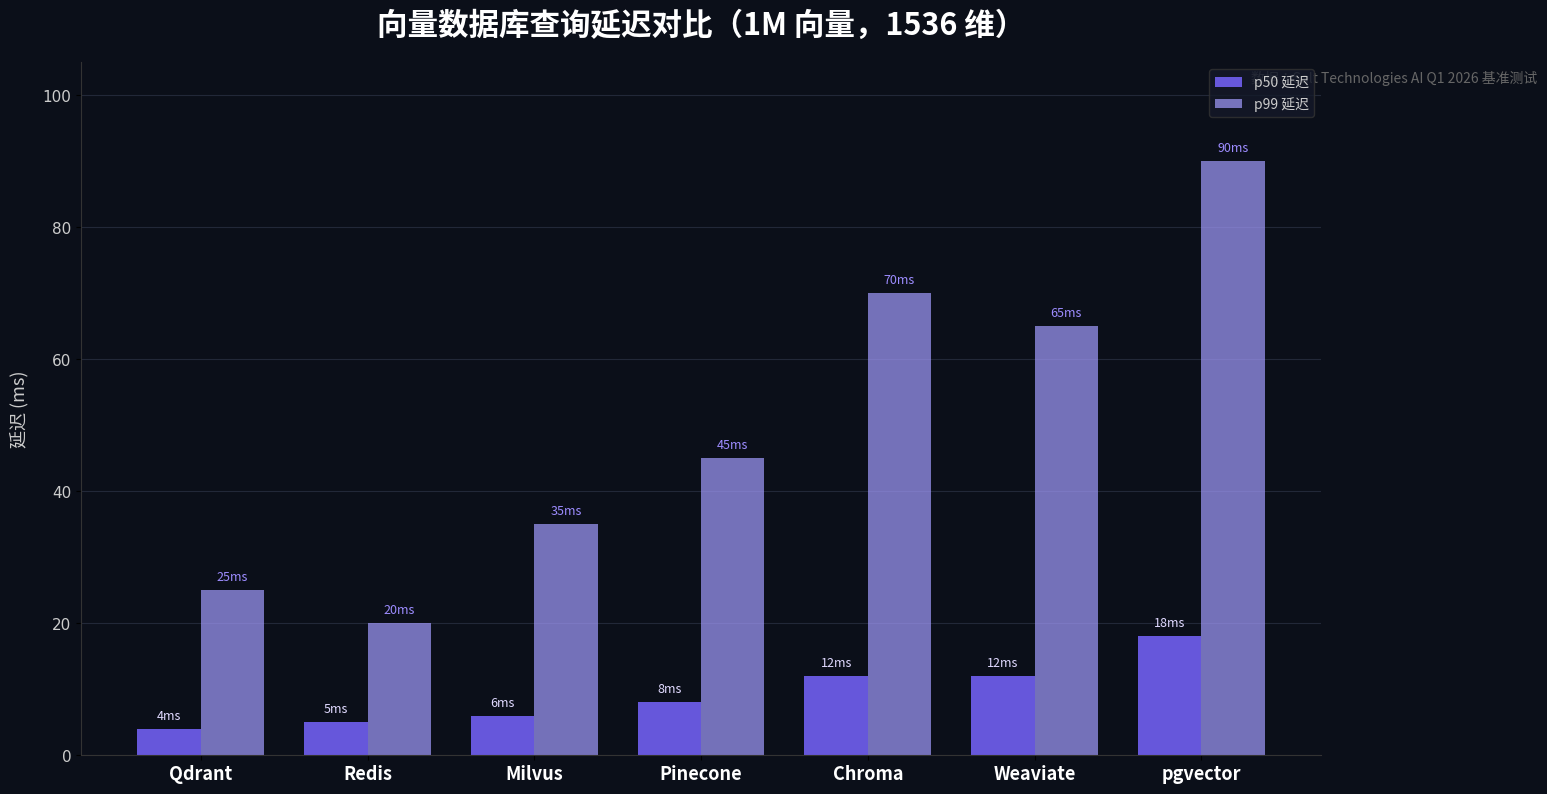
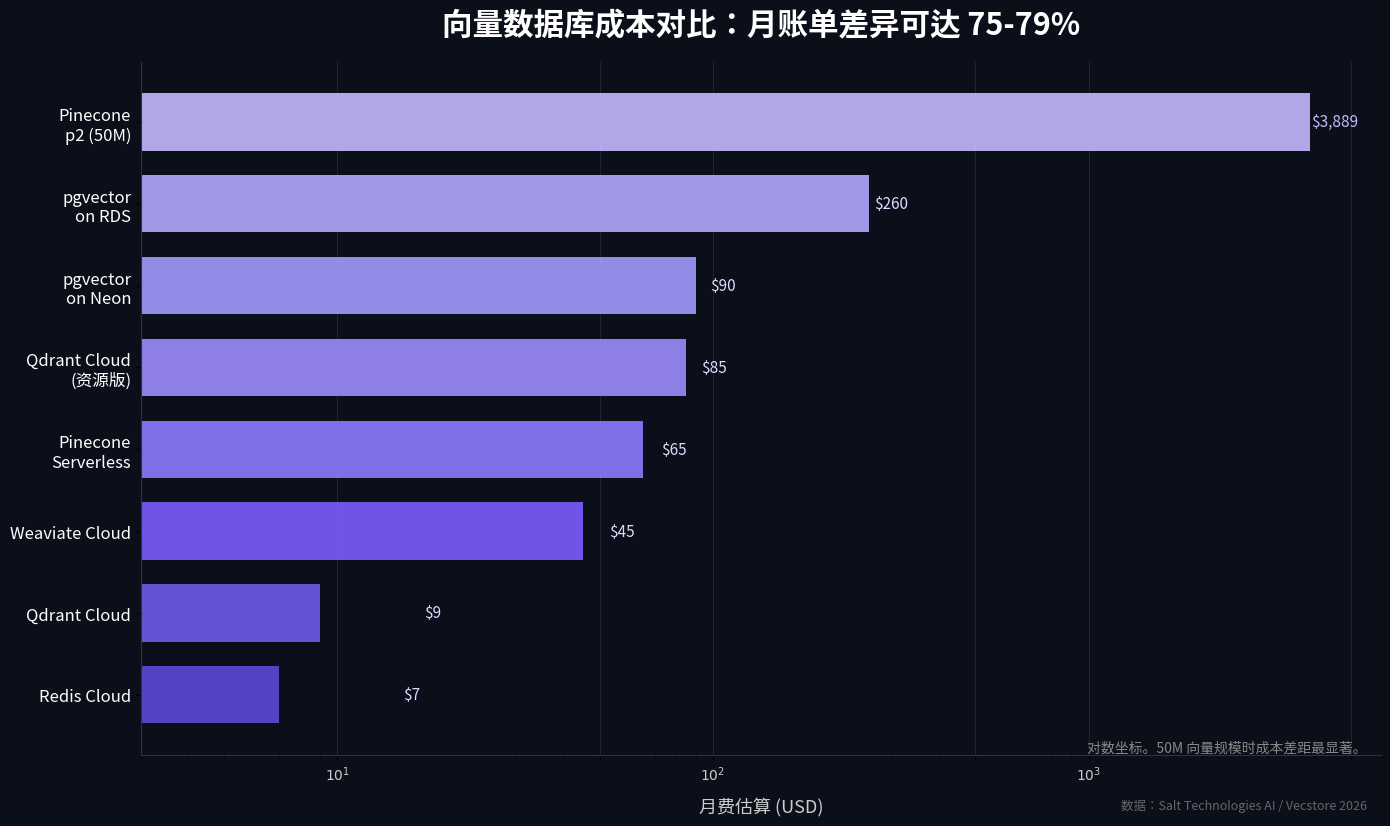
      <![CDATA[<p><img src="/images/vector-db-comparison-overview-2026.png" alt="2026 向量数据库全景对比"></p><p>如果你正在搭建一个 RAG（检索增强生成）应用，迟早会面对同一个问题：向量数据库选哪个？</p><p>过去两年，向量数据库从一个”要不要用”的决策，变成了”用哪个”的选择题。生态从最初一两家（Pinecone、Milvus）膨胀到 30+ 个选项——还有 Chroma 这种内嵌式、pgvector 这种”零新增基础设施”的后来者。选择多了，纠结就来了。</p><p>这篇文章基于 <strong>Salt Technologies AI Q1 2026 基准数据</strong>、<strong>Vecstore 2026 年生产环境实测</strong>以及 <strong>Encore、Milvus 官方</strong>等多来源信息，对 6 个主流向量数据库做一维度的性能、成本和适用场景对比。不卖弄参数矩阵，只讲你在生产环境里真正会遇到的取舍。</p><h2 id="为什么选型这么重要"><a href="#为什么选型这么重要" class="headerlink" title="为什么选型这么重要"></a>为什么选型这么重要</h2><p>向量数据库是 RAG 架构的”检索层”——你的文档被切成片段、转成 embedding 向量、存进去，然后每次用户提问都要从这里做最近邻搜索（ANN）。它的性能直接决定：</p><ul><li><strong>延迟</strong>：用户等到答案需要多久</li><li><strong>成本</strong>：每月账单多少</li><li><strong>扩展性</strong>：100 万向量还行，1 亿怎么办</li><li><strong>运维负担</strong>：需要专门的 SRE 盯着，还是 push 进去就完事</li></ul><p>选错的话，后期迁移非常痛苦——不仅涉及数据格式转换，还会改变你整个检索流水线的调优参数。所以<strong>第一版选什么，往往就是上线版本用的什么</strong>。</p><h2 id="六大主流方案速览"><a href="#六大主流方案速览" class="headerlink" title="六大主流方案速览"></a>六大主流方案速览</h2><p>在 2026 年的生态中，真正被广泛采用的向量数据库基本集中在以下几家：</p><table><thead><tr><th>数据库</th><th>类型</th><th>部署方式</th><th>开源许可</th><th>GitHub ⭐</th><th>单节点最大向量数</th></tr></thead><tbody><tr><td><strong>pgvector</strong></td><td>Postgres 扩展</td><td>随 Postgres 自托管</td><td>MIT</td><td>—</td><td>10-50M</td></tr><tr><td><strong>Qdrant</strong></td><td>专用向量 DB</td><td>自托管 &#x2F; Qdrant Cloud</td><td>Apache 2.0</td><td>~35,000+</td><td>数十亿（分布式）</td></tr><tr><td><strong>Weaviate</strong></td><td>专用向量 DB</td><td>自托管 &#x2F; Weaviate Cloud</td><td>BSD-3</td><td>~30,000+</td><td>数十亿（托管）</td></tr><tr><td><strong>Milvus</strong></td><td>专用向量 DB</td><td>自托管 &#x2F; Zilliz Cloud</td><td>Apache 2.0</td><td><strong>40,000+</strong></td><td>数十亿+（分布式）</td></tr><tr><td><strong>Pinecone</strong></td><td>专用向量 DB</td><td>托管（Serverless &#x2F; Pod）</td><td>闭源</td><td>—</td><td>数十亿</td></tr><tr><td><strong>Chroma</strong></td><td>内嵌式 &#x2F; 轻量</td><td>进程内 &#x2F; 客户端-服务端</td><td>Apache 2.0</td><td>~19,000+</td><td>&lt;1M（单节点）</td></tr></tbody></table><p><strong>Milvus</strong> 在 2025 年 12 月突破 <strong>40,000 GitHub ⭐</strong>，成为向量数据库生态中最受欢迎的开源项目，被 NVIDIA、Salesforce、eBay、Airbnb、DoorDash 等超过 10,000 家企业用于生产。Qdrant 以 Rust 实现闻名，性能表现突出。Weaviate 则以内置混合搜索和 GraphQL 支持见长。</p><p>Pinecone 作为该品类的先驱，走纯托管路线——没有开源版本，但提供开箱即用的零运维体验。</p><h2 id="性能基准：延迟、吞吐量与召回率"><a href="#性能基准：延迟、吞吐量与召回率" class="headerlink" title="性能基准：延迟、吞吐量与召回率"></a>性能基准：延迟、吞吐量与召回率</h2><h3 id="查询延迟（1M-向量，1536-维，标准-OpenAI-embedding）"><a href="#查询延迟（1M-向量，1536-维，标准-OpenAI-embedding）" class="headerlink" title="查询延迟（1M 向量，1536 维，标准 OpenAI embedding）"></a>查询延迟（1M 向量，1536 维，标准 OpenAI embedding）</h3><p>Salt Technologies Q1 2026 基准测试结果（p50 &#x2F; p99，毫秒）：</p><table><thead><tr><th>数据库</th><th>p50 延迟</th><th>p99 延迟</th><th>吞吐量（每秒索引数）</th></tr></thead><tbody><tr><td><strong>Qdrant</strong></td><td><strong>4ms</strong></td><td>25ms</td><td>8,000-20,000</td></tr><tr><td><strong>Redis</strong></td><td>5ms</td><td>20ms</td><td>15,000-40,000</td></tr><tr><td><strong>Milvus</strong></td><td><strong>6ms</strong></td><td>35ms</td><td>10,000-30,000</td></tr><tr><td><strong>Pinecone</strong></td><td>8ms</td><td>45ms</td><td>5,000-15,000</td></tr><tr><td><strong>Chroma</strong></td><td>12ms</td><td>70ms</td><td>2,000-8,000</td></tr><tr><td><strong>Weaviate</strong></td><td>12ms</td><td>65ms</td><td>3,000-10,000</td></tr><tr><td><strong>pgvector</strong></td><td>18ms</td><td>90ms</td><td>1,000-5,000</td></tr></tbody></table><p><strong>几个关键发现：</strong></p><p><strong>Qdrant 在延迟上领先。</strong> 其 Rust 实现带来显著的性能优势，在多个数据集上比竞争对手快 4 倍的 QPS。尤其在做元数据过滤搜索时（”找相似产品且 category&#x3D;shoes”），Qdrant 的过滤性能是业内最好的。</p><p><strong>pgvector 的速度比很多人想象的好。</strong> “Postgres 做向量搜索太慢”这个说法来自 IVFFlat 索引时代。自 pgvector 0.5.0 引入 <strong>HNSW 索引</strong>后，pgvector 在 1M 向量规模上能匹配甚至超过专用向量数据库。Supabase 的基准测试显示，pgvector HNSW 在同等算力下 99% 准确率超过 Qdrant。</p><p><strong>Pinecone Serverless 用延迟换便利。</strong> Serverless 层比自托管或专用节点慢，他们的 Pod 层（p2）更快但价格显著更高。上面的数据是大多数团队实际使用的 Serverless 层表现。</p><p><strong>Pinecone 的召回率最低——而且无法调优。</strong> Vecstore 的实测显示：</p><ul><li>Qdrant（HNSW）：~99.2%</li><li>Milvus（HNSW）：~99.0%</li><li>pgvector（HNSW, ef_search&#x3D;200）：~98.5%</li><li>Weaviate（HNSW）：~97.8%</li><li><strong>Pinecone Serverless：~95%</strong></li></ul><p>关键问题是 Pinecone <strong>不暴露 HNSW 参数</strong>，用户无法调优索引来控制精度-性能权衡。对某些应用这没问题，对另一些则是致命缺陷。</p><h3 id="向量数据库性能对比（p50-延迟，越低越好）"><a href="#向量数据库性能对比（p50-延迟，越低越好）" class="headerlink" title="向量数据库性能对比（p50 延迟，越低越好）"></a>向量数据库性能对比（p50 延迟，越低越好）</h3><p><img src="/images/vector-db-performance-comparison.png" alt="向量数据库性能对比图"></p><h2 id="成本：同样-1M-向量的真实月账单"><a href="#成本：同样-1M-向量的真实月账单" class="headerlink" title="成本：同样 1M 向量的真实月账单"></a>成本：同样 1M 向量的真实月账单</h2><p>这是最现实的部分。性能数据可以跑分，成本却是每个月实实在在要付的。</p><p><strong>Salt Technologies Q1 2026 管理版定价（起步价）：</strong></p><table><thead><tr><th>数据库</th><th>起步价</th><th>付费模式</th></tr></thead><tbody><tr><td><strong>Redis Cloud</strong></td><td><strong>$7&#x2F;月</strong></td><td>按量计费</td></tr><tr><td><strong>Qdrant Cloud</strong></td><td>$9&#x2F;月</td><td>按使用量（1GB 免费层）</td></tr><tr><td><strong>Weaviate Cloud</strong></td><td>$25&#x2F;月</td><td>按量计费</td></tr><tr><td><strong>Supabase</strong></td><td>$25&#x2F;月</td><td>Pro 版（含 pgvector）</td></tr><tr><td><strong>Milvus (Zilliz Cloud)</strong></td><td>$65&#x2F;月</td><td>容量计费</td></tr><tr><td><strong>Pinecone</strong></td><td>$70&#x2F;月</td><td>2GB 免费层，按量&#x2F;Pod</td></tr><tr><td><strong>Elasticsearch</strong></td><td>$95&#x2F;月</td><td>按量计费</td></tr></tbody></table><p><strong>1M 向量、1024 维、中等查询量的生产环境月费估算（Vecstore 实测）：</strong></p><table><thead><tr><th>方案</th><th>月费估算</th><th>说明</th></tr></thead><tbody><tr><td><strong>Weaviate Cloud</strong></td><td>~$45</td><td>$45 起价，入门友好</td></tr><tr><td><strong>Pinecone Serverless</strong></td><td>~$50-80</td><td>存储便宜，读取量积累快</td></tr><tr><td><strong>Qdrant Cloud</strong></td><td>~$65-102</td><td>按资源计费（CPU&#x2F;RAM&#x2F;磁盘）</td></tr><tr><td><strong>pgvector on Neon</strong></td><td>~$30-150</td><td>Serverless PG，按活跃时间计费，突发负载更便宜</td></tr><tr><td><strong>pgvector on RDS</strong></td><td>~$260</td><td>db.r6g.large，但含完整 Postgres 实例</td></tr></tbody></table><p><strong>pgvector on RDS 最贵——但你买的是一个完整 Postgres。</strong> 不是单独的向量数据库，而是应用数据 + 向量数据共存于一个实例，一个连接池、一个备份策略、一次部署。对很多团队来说，这个简便性值溢价。</p><p><strong>pgvector on Neon 改变了游戏规则。</strong> Neon 的 serverless Postgres 空闲时计算归零。如果你的搜索流量是突发的（工作时段高、夜间低），只为活跃时间付费。能把本需 $260&#x2F;月的 RDS 成本降到 $30-50&#x2F;月。Vecstore 因此将基础设施整体迁移到 Neon——延迟从 200ms 降到 80ms，架构也简化了。</p><p><strong>50M 向量规模时，成本差距急剧扩大。</strong> Timescale 的 pgvectorscale 基准测试显示：自托管 Postgres 在 EC2 上约 <strong>$835&#x2F;月</strong>，对比 Pinecone s1 层 <strong>$3,241&#x2F;月</strong>或 p2 层 <strong>$3,889&#x2F;月</strong>——节省了 75-79%。</p><h3 id="向量数据库成本对比（1M-向量生产估算）"><a href="#向量数据库成本对比（1M-向量生产估算）" class="headerlink" title="向量数据库成本对比（1M 向量生产估算）"></a>向量数据库成本对比（1M 向量生产估算）</h3><p><img src="/images/vector-db-cost-comparison.png" alt="向量数据库成本对比图"></p><h2 id="深度特性对比"><a href="#深度特性对比" class="headerlink" title="深度特性对比"></a>深度特性对比</h2><h3 id="混合搜索（Hybrid-Search）"><a href="#混合搜索（Hybrid-Search）" class="headerlink" title="混合搜索（Hybrid Search）"></a>混合搜索（Hybrid Search）</h3><p>混合搜索 &#x3D; 向量相似度 + 关键词匹配（如 BM25），在单一查询中结合两者。</p><ul><li><strong>Weaviate</strong>：最成熟的内置混合搜索，向量 + BM25 一条查询完成</li><li><strong>Elasticsearch</strong>：kNN 向量搜索 + 全文搜索原生结合，如果你已经在用 ES</li><li><strong>Qdrant</strong>：通过稀疏向量（Sparse Vectors）支持混合搜索</li><li><strong>Pinecone</strong>：提供 sparse-dense 混合搜索</li><li><strong>pgvector</strong>：通过 SQL 将向量搜索与 Postgres 全文搜索结合</li></ul><h3 id="可扩展性与极限"><a href="#可扩展性与极限" class="headerlink" title="可扩展性与极限"></a>可扩展性与极限</h3><ul><li><strong>Chroma</strong>：设计用于 <strong>&lt;1M 向量</strong>，适合原型开发和轻量生产</li><li><strong>pgvector &#x2F; Supabase</strong>：单节点 <strong>10-50M 向量</strong>。标准 HNSW 在 5-10M 以上性能下降明显——50M 向量 × 768 维需要约 150GB+ RAM。Timescale 的 <strong>pgvectorscale</strong> 扩展引入 StreamingDiskANN（磁盘索引），50M 向量上 p95 延迟比 Pinecone s1 层低 28 倍</li><li><strong>Milvus</strong>：为 <strong>十亿级</strong>数据集设计，支持 8 种索引算法（含 GPU 加速），分片和分区最成熟</li><li><strong>Qdrant &#x2F; Weaviate</strong>：分布式模式下可达 <strong>数十亿</strong>向量</li></ul><h3 id="ACID-与事务"><a href="#ACID-与事务" class="headerlink" title="ACID 与事务"></a>ACID 与事务</h3><p><strong>只有 pgvector 和 Supabase 支持 ACID 事务</strong>——因为底层是 PostgreSQL。如果你在向量数据和关系数据之间需要事务一致性（比如”先更新用户数据再插入向量”作为一个原子操作），这是唯一的选项。专用向量数据库（Pinecone、Qdrant、Weaviate、Milvus）都不提供完整 ACID 保证。</p><h2 id="选型决策框架：该选哪个？"><a href="#选型决策框架：该选哪个？" class="headerlink" title="选型决策框架：该选哪个？"></a>选型决策框架：该选哪个？</h2><p>别被功能矩阵忽悠了。实际选型时，按这个顺序问自己：</p><p><strong>1. 你已经在用 Postgres 吗？→ 先用 pgvector</strong></p><p>如果 Postgres 已经是你的数据库，加一个 pgvector 扩展，零新增基础设施。SQL 就是超能力——“找相似图片，且上传者是认证账户，且 7 天内上传”这只是一条 SQL 查询。用独立向量数据库的话，那是：向量搜索 → 过滤 → 再 join 应用数据库。</p><p><strong>2. 想要零运维、不在乎调优 → Pinecone</strong></p><p>纯托管，serverless，没有运维负担。你专注应用，Pinecone 处理扩展、备份、可用性。代价是不能调优索引精度，成本随规模线性增长。</p><p><strong>3. 需要最快的过滤搜索、想自托管、用 Rust → Qdrant</strong></p><p>最低延迟（p50 4ms），过滤搜索性能业内第一。开源 Apache 2.0，可以自托管或上 Qdrant Cloud。</p><p><strong>4. 数据量巨大、需要 GPU 加速 → Milvus</strong></p><p>十亿级向量数据集的最佳选择，8 种索引算法可精细调优，社区生态最成熟（40,000+ ⭐）。</p><p><strong>5. 需要混合搜索且体验要好 → Weaviate</strong></p><p>内置混合搜索体验最好，GraphQL 接口简洁，托管和自托管都支持。</p><p><strong>6. 只是原型验证、规模不大 → Chroma</strong></p><p>最易上手的向量数据库，进程内运行零配置。但生产规模受限（&lt;1M 向量），适合快速原型和轻量场景。</p><p><strong>7. 用 MongoDB 的 → MongoDB Atlas Vector Search</strong></p><p>直接在现有 MongoDB 数据上添加向量能力，Atlas 聚合管道原生支持。</p><h2 id="真实世界的建议"><a href="#真实世界的建议" class="headerlink" title="真实世界的建议"></a>真实世界的建议</h2><p>Vecstore（一家专注语义搜索的创业公司）的经验值得参考：他们在生产环境中从 Pinecone + RDS 迁移到 pgvector + Neon，<strong>不是出于性能，而是出于架构简洁性</strong>。向量和应用数据在同一数据库里，一个连接池、一个备份策略，问题少了一半。</p><p>更重要的真相是：<strong>5ms 和 15ms 的向量查询延迟差异，用户根本感知不到。</strong> 真正影响搜索结果质量的，是 embedding 模型的选择和搜索相关性调优，不是数据库之间的几毫秒差距。</p><p>选一个适合你规模和团队的数据结构，把精力花在 embedding 质量、chunk 策略和相关性调优上——那才是 RAG 系统的命门。</p><h2 id="总结"><a href="#总结" class="headerlink" title="总结"></a>总结</h2><ul><li><strong>规模 &lt;10M 向量 + 已有 Postgres</strong>：pgvector，零成本增量，SQL 超能力</li><li><strong>零运维 + 快速上线</strong>：Pinecone，代价是不能调优精度</li><li><strong>最低延迟 + 自托管</strong>：Qdrant，Rust 性能优势明显</li><li><strong>十亿级规模</strong>：Milvus，最成熟的分片&#x2F;GPU 加速</li><li><strong>混合搜索优先</strong>：Weaviate，最流畅的向量+关键词统一查询</li><li><strong>原型&#x2F;轻量</strong>：Chroma，零配置上手</li><li><strong>突发负载成本敏感</strong>：pgvector on Neon，serverless 按活跃时间计费</li></ul><p>选型没有银弹，但有了这个框架，你应该能根据自身约束快速收敛到 1-2 个候选，然后做 PoC 验证。</p><hr><p><strong>参考资料：</strong></p><ul><li>Salt Technologies AI - <a href="https://www.salttechno.ai/datasets/vector-database-performance-benchmark-2026">Vector Database Benchmark 2026</a>（Q1 2026 基准数据）</li><li>Vecstore - <a href="https://vecstore.app/blog/vector-database-performance-compared">pgvector vs Pinecone vs Qdrant: 2026 Benchmarks</a>（生产环境实测）</li><li>Encore - <a href="https://encore.dev/articles/best-vector-databases">Best Vector Databases in 2026</a></li><li>Milvus 官方 - <a href="https://milvus.io/blog/milvus-exceeds-40k-github-stars.md">Milvus 突破 40,000 GitHub Stars</a></li><li>Neon - <a href="https://neon.com/blog/vecstore-replacing-pinecone-and-rds-with-neon">Vecstore 迁移案例研究</a></li></ul>]]>
    </content>
    <id>https://blog.deptrip.com/2026/07/14/vector-database-comparison-2026/</id>
    <link href="https://blog.deptrip.com/2026/07/14/vector-database-comparison-2026/"/>
    <published>2026-07-14T14:00:00.000Z</published>
    <summary>2026 年主流向量数据库全面对比评测，覆盖性能基准、价格、部署方式与选型决策框架，帮你为 RAG 项目选对底层数据库。</summary>
    <title>2026 向量数据库全景对比：从 pgvector 到 Milvus，RAG 基础设施如何选型</title>
    <updated>2026-07-28T14:35:47.264Z</updated>
  </entry>
  <entry>
    <author>
      <name>Golook</name>
    </author>
    <category term="AI 技术深度分析" scheme="https://blog.deptrip.com/categories/AI-%E6%8A%80%E6%9C%AF%E6%B7%B1%E5%BA%A6%E5%88%86%E6%9E%90/"/>
    <category term="对比评测" scheme="https://blog.deptrip.com/tags/%E5%AF%B9%E6%AF%94%E8%AF%84%E6%B5%8B/"/>
    <category term="AI 模型" scheme="https://blog.deptrip.com/tags/AI-%E6%A8%A1%E5%9E%8B/"/>
    <category term="推理模型" scheme="https://blog.deptrip.com/tags/%E6%8E%A8%E7%90%86%E6%A8%A1%E5%9E%8B/"/>
    <category term="Claude" scheme="https://blog.deptrip.com/tags/Claude/"/>
    <category term="GPT" scheme="https://blog.deptrip.com/tags/GPT/"/>
    <category term="Gemini" scheme="https://blog.deptrip.com/tags/Gemini/"/>
    <content>
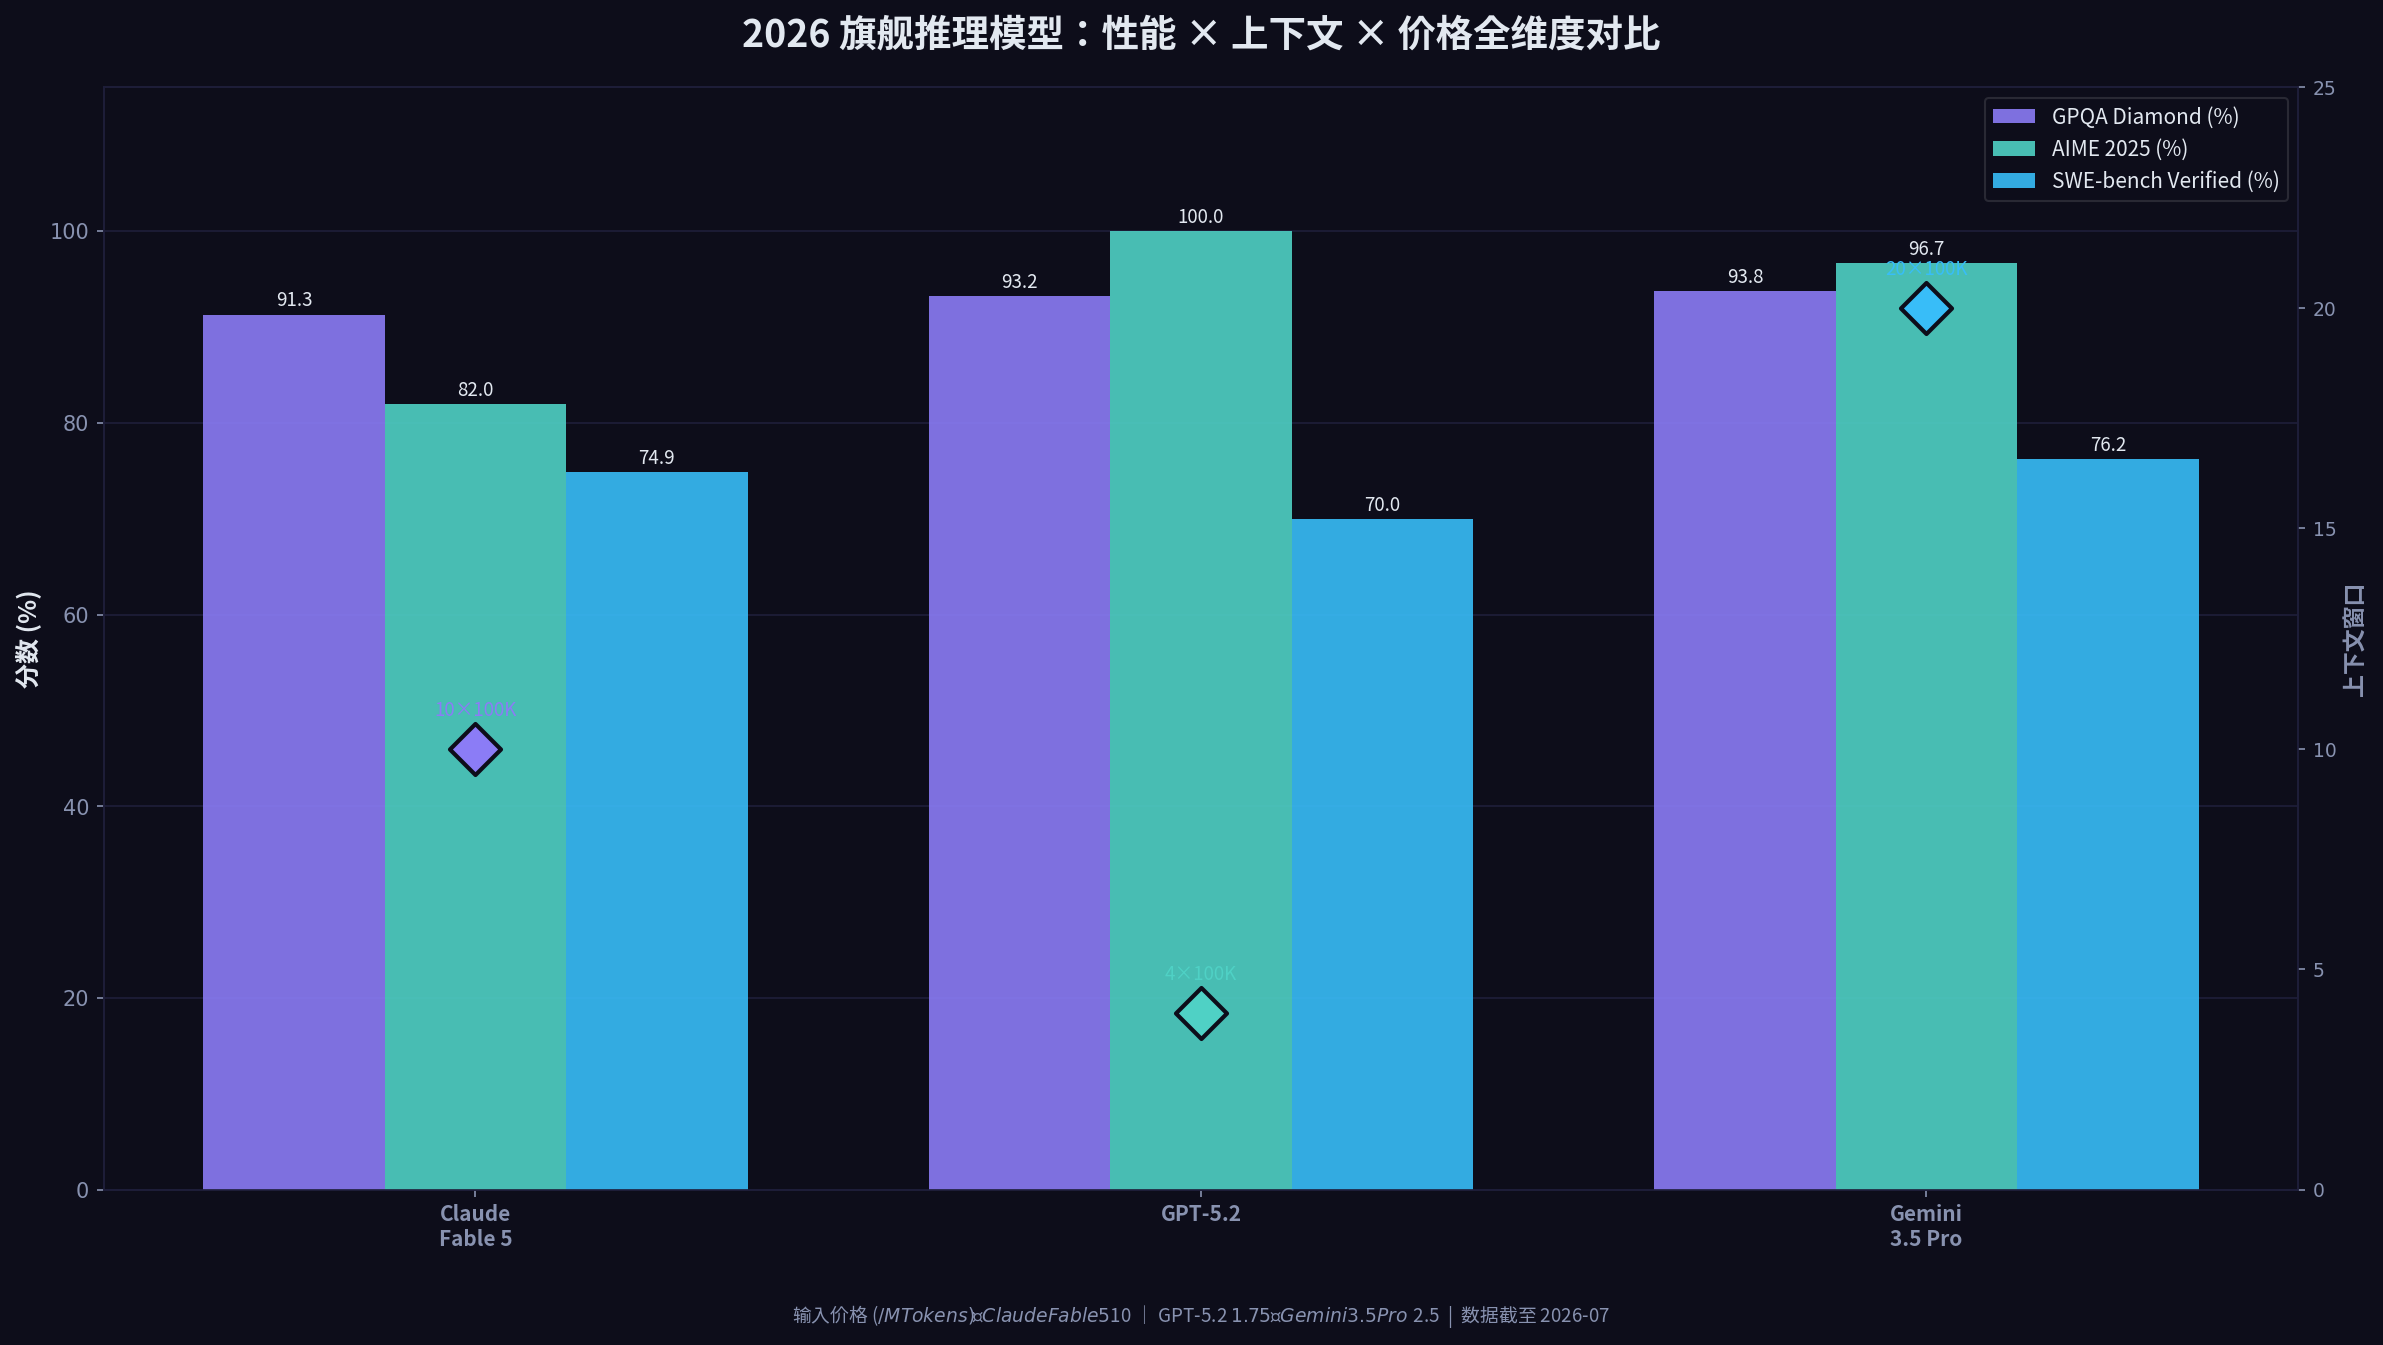
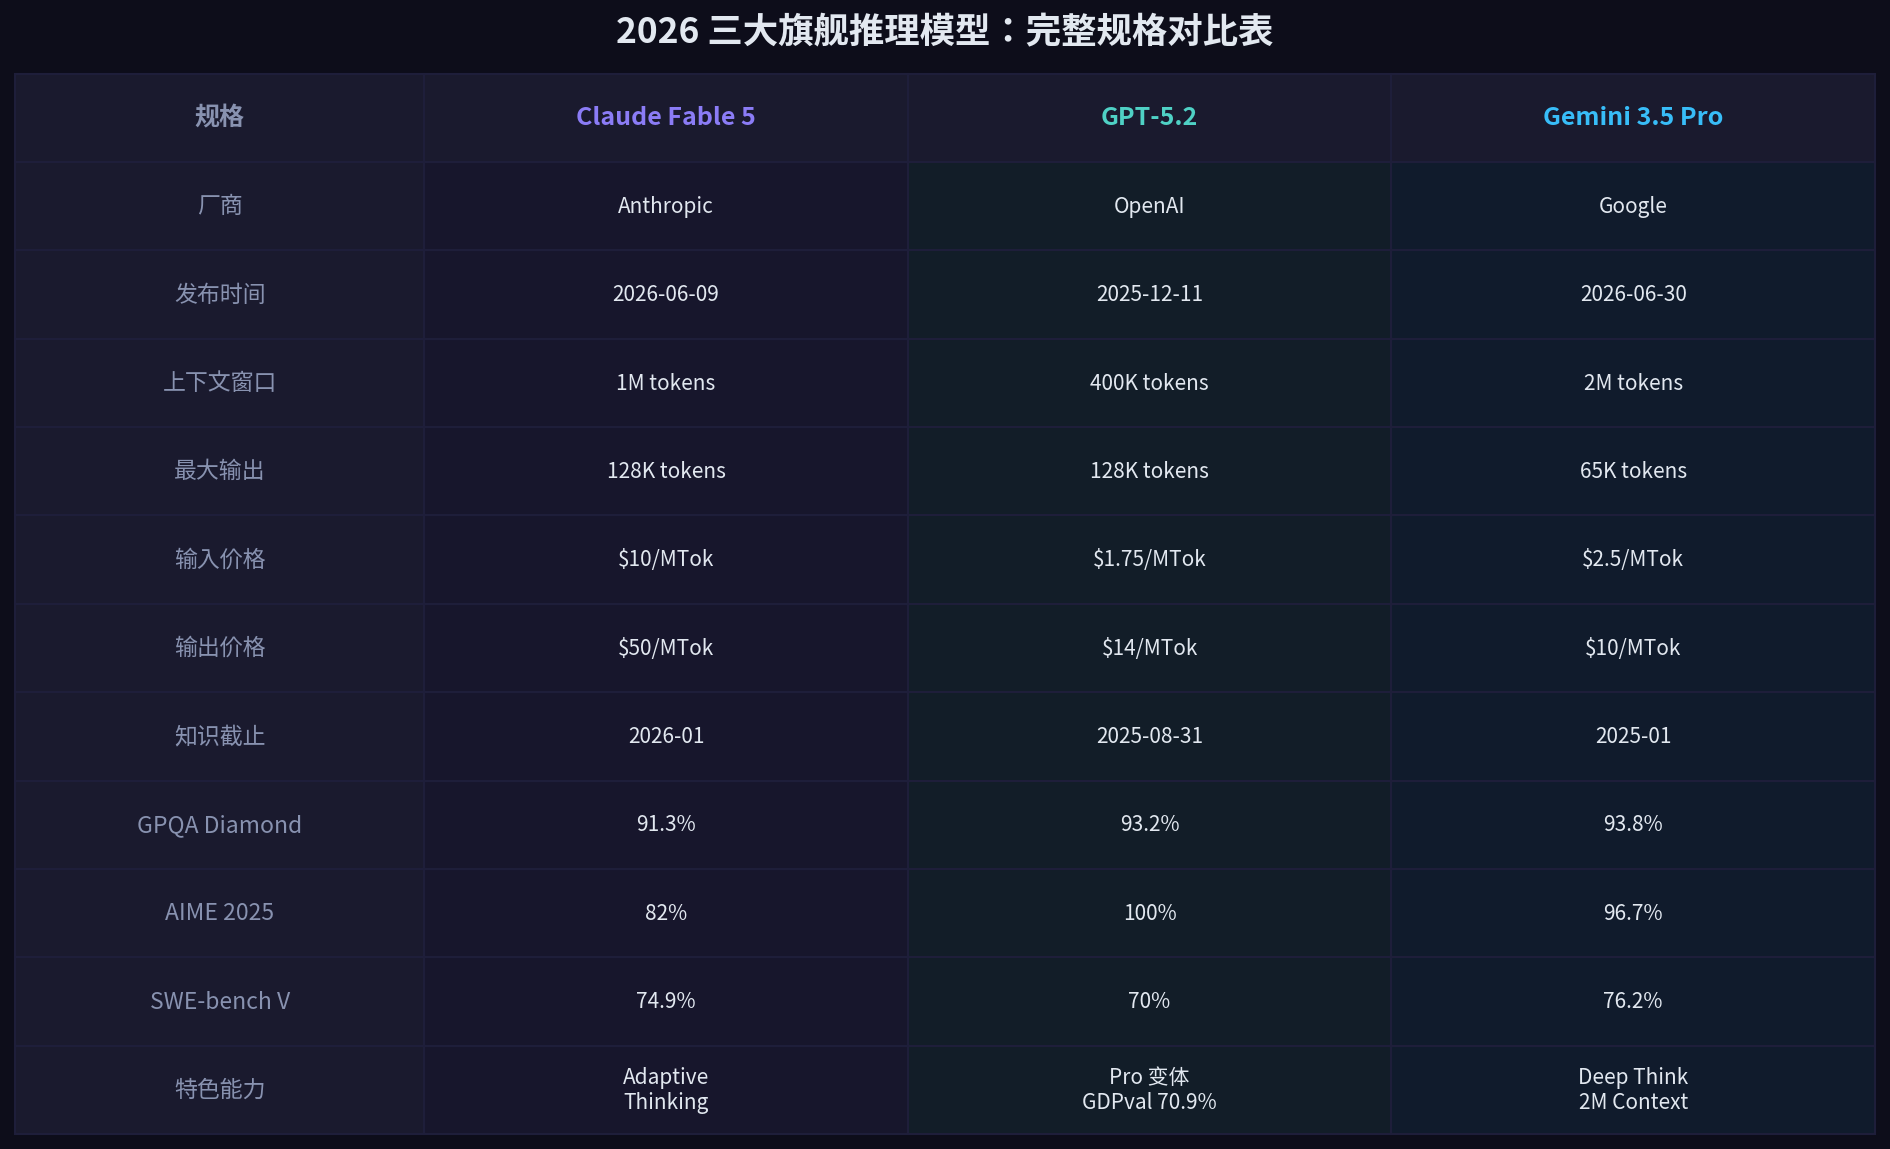
      <![CDATA[<blockquote><p>2026 年，三大 AI 厂商的旗舰推理模型进入了前所未有的密集迭代期。Anthropic 的 Claude Fable 5 在 6 月 9 日刚刚 GA，OpenAI 的 GPT-5.2 在 2025 年 12 月创下多个纪录，而 Google 的 Gemini 3.5 Pro 则在 6 月底以 200 万 token 上下文窗口杀入战场。这三款模型各有所长，到底该怎么选？本文将用真实基准数据和规格，帮你做出决策。</p></blockquote><p><img src="/images/model-comparison-header-2026.png" alt="2026 旗舰推理模型全维度对比"></p><hr><h2 id="一、三巨头旗舰模型：核心规格速览"><a href="#一、三巨头旗舰模型：核心规格速览" class="headerlink" title="一、三巨头旗舰模型：核心规格速览"></a>一、三巨头旗舰模型：核心规格速览</h2><p>下表汇总了三款模型在 2026 年 7 月的关键规格数据，来源为各厂商官方文档。</p><p><img src="/images/model-specs-table-2026.png" alt="三大旗舰模型完整规格对比表"></p><p>几个值得立刻注意的关键差异：</p><ul><li><strong>上下文窗口差距巨大</strong>：Gemini 3.5 Pro 的 200 万 token 是 GPT-5.2（40 万）的 5 倍，Claude Fable 5 的 100 万则居中。如果你需要一次性分析整个代码库或超长文档，Gemini 具有压倒性优势。</li><li><strong>价格差异达数倍</strong>：Claude Fable 5 的输入价格是 $10&#x2F;MTok，是 GPT-5.2（$1.75&#x2F;MTok）的近 6 倍；输出价格差距更大，Fable 5 的 $50&#x2F;MTok vs GPT-5.2 的 $14&#x2F;MTok，相差 3.5 倍。</li><li><strong>知识截止日期不同</strong>：Fable 5 和 GPT-5.2 的知识截止到 2026 年初，Gemini 3.5 Pro 则停留在 2025 年 1 月，在时效性上有一定劣势。</li></ul><hr><h2 id="二、基准测试：谁才是真正的推理之王？"><a href="#二、基准测试：谁才是真正的推理之王？" class="headerlink" title="二、基准测试：谁才是真正的推理之王？"></a>二、基准测试：谁才是真正的推理之王？</h2><p>基准数据是最客观的对比方式。以下成绩来自各厂商官方披露及第三方评测机构（LM Council、Introl 等）的汇总：</p><h3 id="2-1-GPQA-Diamond（博士级科学知识问答）"><a href="#2-1-GPQA-Diamond（博士级科学知识问答）" class="headerlink" title="2.1 GPQA Diamond（博士级科学知识问答）"></a>2.1 GPQA Diamond（博士级科学知识问答）</h3><p>这是衡量模型”推理深度”的标杆测试——题目来自博士水平的科学问题，需要模型真正理解而非简单记忆。</p><table><thead><tr><th>模型</th><th>GPQA Diamond</th></tr></thead><tbody><tr><td>Gemini 3.5 Pro</td><td><strong>93.8%</strong></td></tr><tr><td>GPT-5.2</td><td><strong>93.2%</strong></td></tr><tr><td>Claude Fable 5</td><td>91.3%</td></tr></tbody></table><p>Gemini 3.5 Pro 以微弱优势领先，但三者差距不到 3 个百分点，在实际使用中几乎可以视为同一梯队。</p><h3 id="2-2-AIME-2025（数学竞赛）"><a href="#2-2-AIME-2025（数学竞赛）" class="headerlink" title="2.2 AIME 2025（数学竞赛）"></a>2.2 AIME 2025（数学竞赛）</h3><table><thead><tr><th>模型</th><th>AIME 2025</th></tr></thead><tbody><tr><td>GPT-5.2</td><td><strong>100%</strong></td></tr><tr><td>Gemini 3.5 Pro</td><td>96.7%</td></tr><tr><td>Claude Fable 5</td><td>82%</td></tr></tbody></table><p>GPT-5.2 以满分成绩创下历史纪录——这是首个在 AIME 2025 上拿到 100% 的模型。Claude Fable 5 的 82% 虽然在数学上仍有差距，但考虑到 Fable 5 是 2026 年 6 月才发布的新模型，这个差距更多是发布时间差而非能力天花板。</p><h3 id="2-3-SWE-bench-Verified（软件工程实战）"><a href="#2-3-SWE-bench-Verified（软件工程实战）" class="headerlink" title="2.3 SWE-bench Verified（软件工程实战）"></a>2.3 SWE-bench Verified（软件工程实战）</h3><p>这是衡量模型”真实编码能力”的金标准——模型需要在真实开源仓库中修复 bug。</p><table><thead><tr><th>模型</th><th>SWE-bench Verified</th></tr></thead><tbody><tr><td>Gemini 3.5 Pro</td><td><strong>76.2%</strong></td></tr><tr><td>Claude Fable 5</td><td>74.9%</td></tr><tr><td>GPT-5.2</td><td>70%</td></tr></tbody></table><p>Gemini 3.5 Pro 略胜，但三家差距都不超过 6 个百分点。值得注意的是，SWE-bench Verified 的结果在不同评测中波动较大，单一分数不宜过度解读。</p><h3 id="2-4-GDPval（专业知识工作自动化）"><a href="#2-4-GDPval（专业知识工作自动化）" class="headerlink" title="2.4 GDPval（专业知识工作自动化）"></a>2.4 GDPval（专业知识工作自动化）</h3><p>这是一个相对较新的基准，衡量模型在 44 个职业领域的知识工作表现。GPT-5.2 在此测试中表现突出：</p><ul><li>**GPT-5.2：70.9%**，在专家任务的 11 倍以上速度和不到 1% 的成本下完成</li><li>这项指标表明 GPT-5.2 在”知识密集型专业工作”上有独特优势，尤其在法律、财务、医疗等场景</li></ul><hr><h2 id="三、价格与成本：预算是硬约束"><a href="#三、价格与成本：预算是硬约束" class="headerlink" title="三、价格与成本：预算是硬约束"></a>三、价格与成本：预算是硬约束</h2><p>推理模型的价格直接影响你的日常使用成本。以下是三款旗舰模型的 API 定价：</p><table><thead><tr><th>模型</th><th>输入 ($&#x2F;M Tokens)</th><th>输出 ($&#x2F;M Tokens)</th></tr></thead><tbody><tr><td>GPT-5.2</td><td>$1.75</td><td>$14</td></tr><tr><td>Gemini 3.5 Pro</td><td>~$2.5</td><td>~$10</td></tr><tr><td>Claude Fable 5</td><td>$10</td><td>$50</td></tr></tbody></table><blockquote><p>💡 <strong>成本估算</strong>：假设每天调用 10 万 token 输入、5 万 token 输出（典型开发场景），Claude Fable 5 的日成本约为 $1.25，是 GPT-5.2（$0.325）的近 4 倍。</p></blockquote><h3 id="3-1-降价趋势"><a href="#3-1-降价趋势" class="headerlink" title="3.1 降价趋势"></a>3.1 降价趋势</h3><p>值得关注的是，Anthropic 在 2026 年推出了分层模型体系：Sonnet 5（$3&#x2F;$15）和 Haiku 4.5（$1&#x2F;$5）提供了更低成本的选择。如果你不需要 Fable 5 的顶级能力，Sonnet 5 在 80% 以上的任务上可以达到与 Fable 5 接近的效果（基于内部评测数据），性价比远高于旗舰版。</p><hr><h2 id="四、特色能力对比"><a href="#四、特色能力对比" class="headerlink" title="四、特色能力对比"></a>四、特色能力对比</h2><h3 id="4-1-Claude-Fable-5：自适应推理（Adaptive-Thinking）"><a href="#4-1-Claude-Fable-5：自适应推理（Adaptive-Thinking）" class="headerlink" title="4.1 Claude Fable 5：自适应推理（Adaptive Thinking）"></a>4.1 Claude Fable 5：自适应推理（Adaptive Thinking）</h3><p>Claude Fable 5 最显著的技术创新是 <strong>Adaptive Thinking</strong> 模式——模型会根据问题难度自动决定推理深度。对于简单问题（如文本摘要），它快速返回答案；对于复杂推理（如代码调试），它自动启用深度思考。这意味着你无需手动选择”thinking mode”，模型自己判断。</p><ul><li><strong>优势</strong>：开发体验好，自动优化成本</li><li><strong>劣势</strong>：推理过程对用户不可见（黑盒）</li></ul><h3 id="4-2-GPT-5-2：Pro-变体-多模态"><a href="#4-2-GPT-5-2：Pro-变体-多模态" class="headerlink" title="4.2 GPT-5.2：Pro 变体 + 多模态"></a>4.2 GPT-5.2：Pro 变体 + 多模态</h3><p>GPT-5.2 提供了 Pro 变体，支持更长的推理链。OpenAI 还强调其在多模态（文本 + 图像 + 音频）理解上的改进。GDPval 基准上的优异表现表明它在结构化专业任务上有独特优势。</p><ul><li><strong>优势</strong>：Pro 变体可配置推理深度，适合复杂任务</li><li><strong>劣势</strong>：Pro 变体定价更高，具体价格尚未完全公开</li></ul><h3 id="4-3-Gemini-3-5-Pro：2M-上下文-Deep-Think"><a href="#4-3-Gemini-3-5-Pro：2M-上下文-Deep-Think" class="headerlink" title="4.3 Gemini 3.5 Pro：2M 上下文 + Deep Think"></a>4.3 Gemini 3.5 Pro：2M 上下文 + Deep Think</h3><p>Gemini 3.5 Pro 的最大卖点是 200 万 token 上下文窗口——这是目前所有商业模型中最大的。结合 Deep Think 推理模式，它可以处理超长文档、完整代码库分析等场景，而这些正是其他模型需要多次调用来完成的。</p><ul><li><strong>优势</strong>：超长上下文，适合文档分析、代码库遍历</li><li><strong>劣势</strong>：知识截止到 2025 年 1 月，时效性最差</li></ul><hr><h2 id="五、选型建议：按场景推荐"><a href="#五、选型建议：按场景推荐" class="headerlink" title="五、选型建议：按场景推荐"></a>五、选型建议：按场景推荐</h2><p>基于以上分析，以下是针对不同使用场景的推荐：</p><h3 id="5-1-日常开发-编码辅助-→-GPT-5-2"><a href="#5-1-日常开发-编码辅助-→-GPT-5-2" class="headerlink" title="5.1 日常开发 &#x2F; 编码辅助 → GPT-5.2"></a>5.1 日常开发 &#x2F; 编码辅助 → GPT-5.2</h3><p>GPT-5.2 的性价比最高，$1.75 的输入价格和 100% AIME 数学成绩使其成为日常开发的”默认选择”。如果你的工作流主要涉及代码生成和 bug 修复，GPT-5.2 是最佳选择。</p><h3 id="5-2-长文档分析-代码库理解-→-Gemini-3-5-Pro"><a href="#5-2-长文档分析-代码库理解-→-Gemini-3-5-Pro" class="headerlink" title="5.2 长文档分析 &#x2F; 代码库理解 → Gemini 3.5 Pro"></a>5.2 长文档分析 &#x2F; 代码库理解 → Gemini 3.5 Pro</h3><p>如果你需要一次性分析超过 40 万 token 的文档或代码库，Gemini 3.5 Pro 的 200 万上下文窗口是刚需。它在 SWE-bench 上的领先也表明其代码理解能力不俗。</p><h3 id="5-3-深度推理-复杂问题-→-Claude-Fable-5"><a href="#5-3-深度推理-复杂问题-→-Claude-Fable-5" class="headerlink" title="5.3 深度推理 &#x2F; 复杂问题 → Claude Fable 5"></a>5.3 深度推理 &#x2F; 复杂问题 → Claude Fable 5</h3><p>当问题复杂到需要”让模型真正思考”时，Fable 5 的 Adaptive Thinking 是最省心的选择。你不需要手动调整推理参数，模型自动匹配难度。对于需要最高质量输出的场景（如法律文书、医疗诊断辅助），Fable 5 值得其高昂的价格。</p><h3 id="5-4-成本敏感场景-→-Sonnet-5-或-Haiku-4-5"><a href="#5-4-成本敏感场景-→-Sonnet-5-或-Haiku-4-5" class="headerlink" title="5.4 成本敏感场景 → Sonnet 5 或 Haiku 4.5"></a>5.4 成本敏感场景 → Sonnet 5 或 Haiku 4.5</h3><p>如果你的预算有限，Claude Sonnet 5（$3&#x2F;$15）或 Haiku 4.5（$1&#x2F;$5）是极佳替代。它们在某些基准上与旗舰版差距在 5-10% 以内，但成本只有 1&#x2F;3 到 1&#x2F;10。</p><hr><h2 id="总结"><a href="#总结" class="headerlink" title="总结"></a>总结</h2><p>2026 年的旗舰推理模型市场竞争异常激烈，三大厂商的模型在各自主场各有优势：</p><ul><li><strong>Gemini 3.5 Pro</strong>：上下文窗口之王（2M tokens），适合超长文档和代码库分析</li><li><strong>GPT-5.2</strong>：性价比之王（$1.75&#x2F;MTok），数学满分（100% AIME），日常开发首选</li><li><strong>Claude Fable 5</strong>：自适应推理之王，最智能但最贵（$10&#x2F;$50&#x2F;MTok），适合深度推理场景</li></ul><p>对于大多数用户，<strong>GPT-5.2 是默认选择</strong>；需要长上下文时升级到 <strong>Gemini 3.5 Pro</strong>；需要最高质量推理时再考虑 <strong>Claude Fable 5</strong>。</p><p>未来的趋势是：模型能力趋同、价格下降、特色分化。选择模型时，优先看你的<strong>实际使用场景</strong>和<strong>预算约束</strong>，而非单纯追求基准分数。</p><hr><blockquote><p>📚 <strong>参考资料</strong></p><ul><li>Anthropic 官方模型文档：<a href="https://platform.claude.com/docs/en/about-claude/models/overview">https://platform.claude.com/docs/en/about-claude/models/overview</a></li><li>OpenAI GPT-5.2 基础设施分析（Introl）：<a href="https://introl.com/blog/gpt-5-2-infrastructure-implications-inference-demand-january-2026">https://introl.com/blog/gpt-5-2-infrastructure-implications-inference-demand-january-2026</a></li><li>Google Gemini 2.5 Pro 官方规格（Google Cloud）：<a href="https://docs.cloud.google.com/gemini-enterprise-agent-platform/models/gemini/2-5-pro">https://docs.cloud.google.com/gemini-enterprise-agent-platform/models/gemini/2-5-pro</a></li><li>Gemini 2.5 官方博客（Google DeepMind）：<a href="https://blog.google/innovation-and-ai/models-and-research/google-deepmind/gemini-model-thinking-updates-march-2025">https://blog.google/innovation-and-ai/models-and-research/google-deepmind/gemini-model-thinking-updates-march-2025</a></li></ul></blockquote>]]>
    </content>
    <id>https://blog.deptrip.com/2026/07/10/2026-flagship-reasoning-models-comparison/</id>
    <link href="https://blog.deptrip.com/2026/07/10/2026-flagship-reasoning-models-comparison/"/>
    <published>2026-07-10T14:30:00.000Z</published>
    <summary>
      <![CDATA[<blockquote>
<p>2026 年，三大 AI 厂商的旗舰推理模型进入了前所未有的密集迭代期。Anthropic 的 Claude Fable 5 在 6 月 9 日刚刚 GA，OpenAI 的 GPT-5.2 在 2025 年 12 月创下多个纪录，而 Google 的 Gemini 3.5 Pro 则在 6 月底以 200 万 token 上下文窗口杀入战场。这三款模型各有所长，到底该怎么选？本文将用真实基准数据和规格，帮你做出决策。</p>
</blockquote>
<p><img src="/images/model-comparison-header-2026.png" alt="2026 旗舰推理模型全维度对比"></p>
<hr>
<h2 id="一、三巨头旗舰模型：核心规格速览"><a href="#一、三巨头旗舰模型：核心规格速览" class="headerlink" title="一、三巨头旗舰模型：核心规格速览"></a>一、三巨头旗舰模型：核心规格速览</h2><p>下表汇总了三款模型在 2026 年 7 月的关键规格数据，来源为各厂商官方文档。</p>]]>
    </summary>
    <title>2026 三大旗舰推理模型全维度对比：Claude Fable 5 vs GPT-5.2 vs Gemini 3.5 Pro</title>
    <updated>2026-07-28T14:35:47.263Z</updated>
  </entry>
  <entry>
    <author>
      <name>Golook</name>
    </author>
    <category term="AI 技术深度" scheme="https://blog.deptrip.com/categories/AI-%E6%8A%80%E6%9C%AF%E6%B7%B1%E5%BA%A6/"/>
    <category term="AI Agent" scheme="https://blog.deptrip.com/tags/AI-Agent/"/>
    <category term="Context Engineering" scheme="https://blog.deptrip.com/tags/Context-Engineering/"/>
    <category term="记忆管理" scheme="https://blog.deptrip.com/tags/%E8%AE%B0%E5%BF%86%E7%AE%A1%E7%90%86/"/>
    <category term="LLM" scheme="https://blog.deptrip.com/tags/LLM/"/>
    <category term="技术深度" scheme="https://blog.deptrip.com/tags/%E6%8A%80%E6%9C%AF%E6%B7%B1%E5%BA%A6/"/>
    <content>
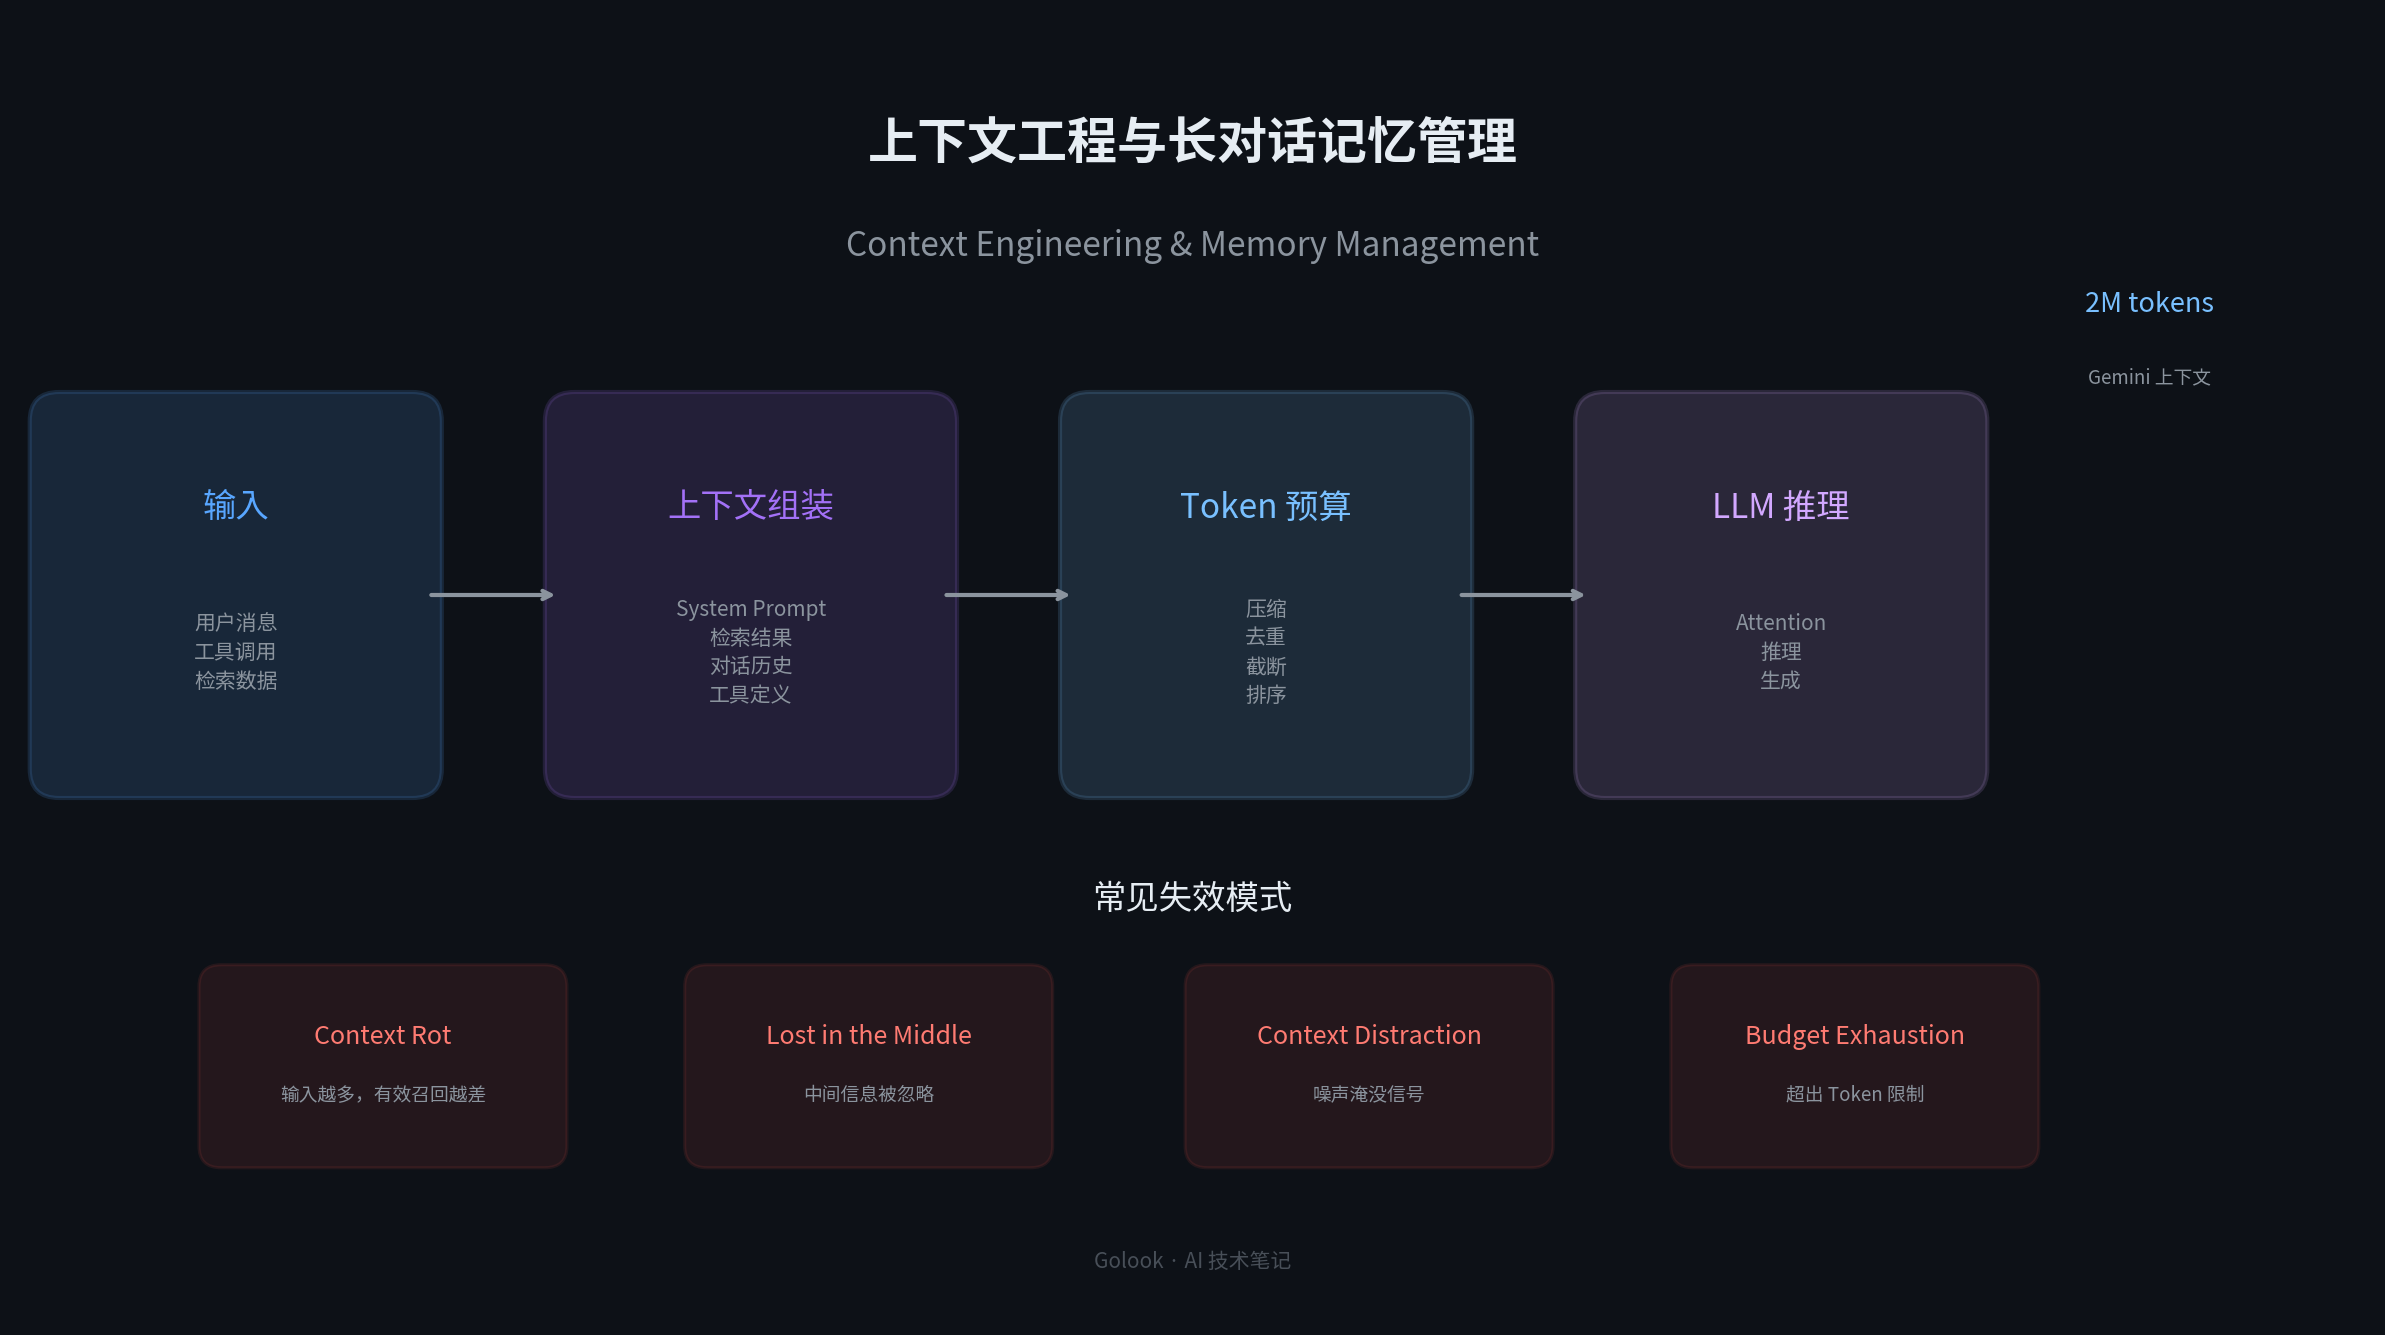
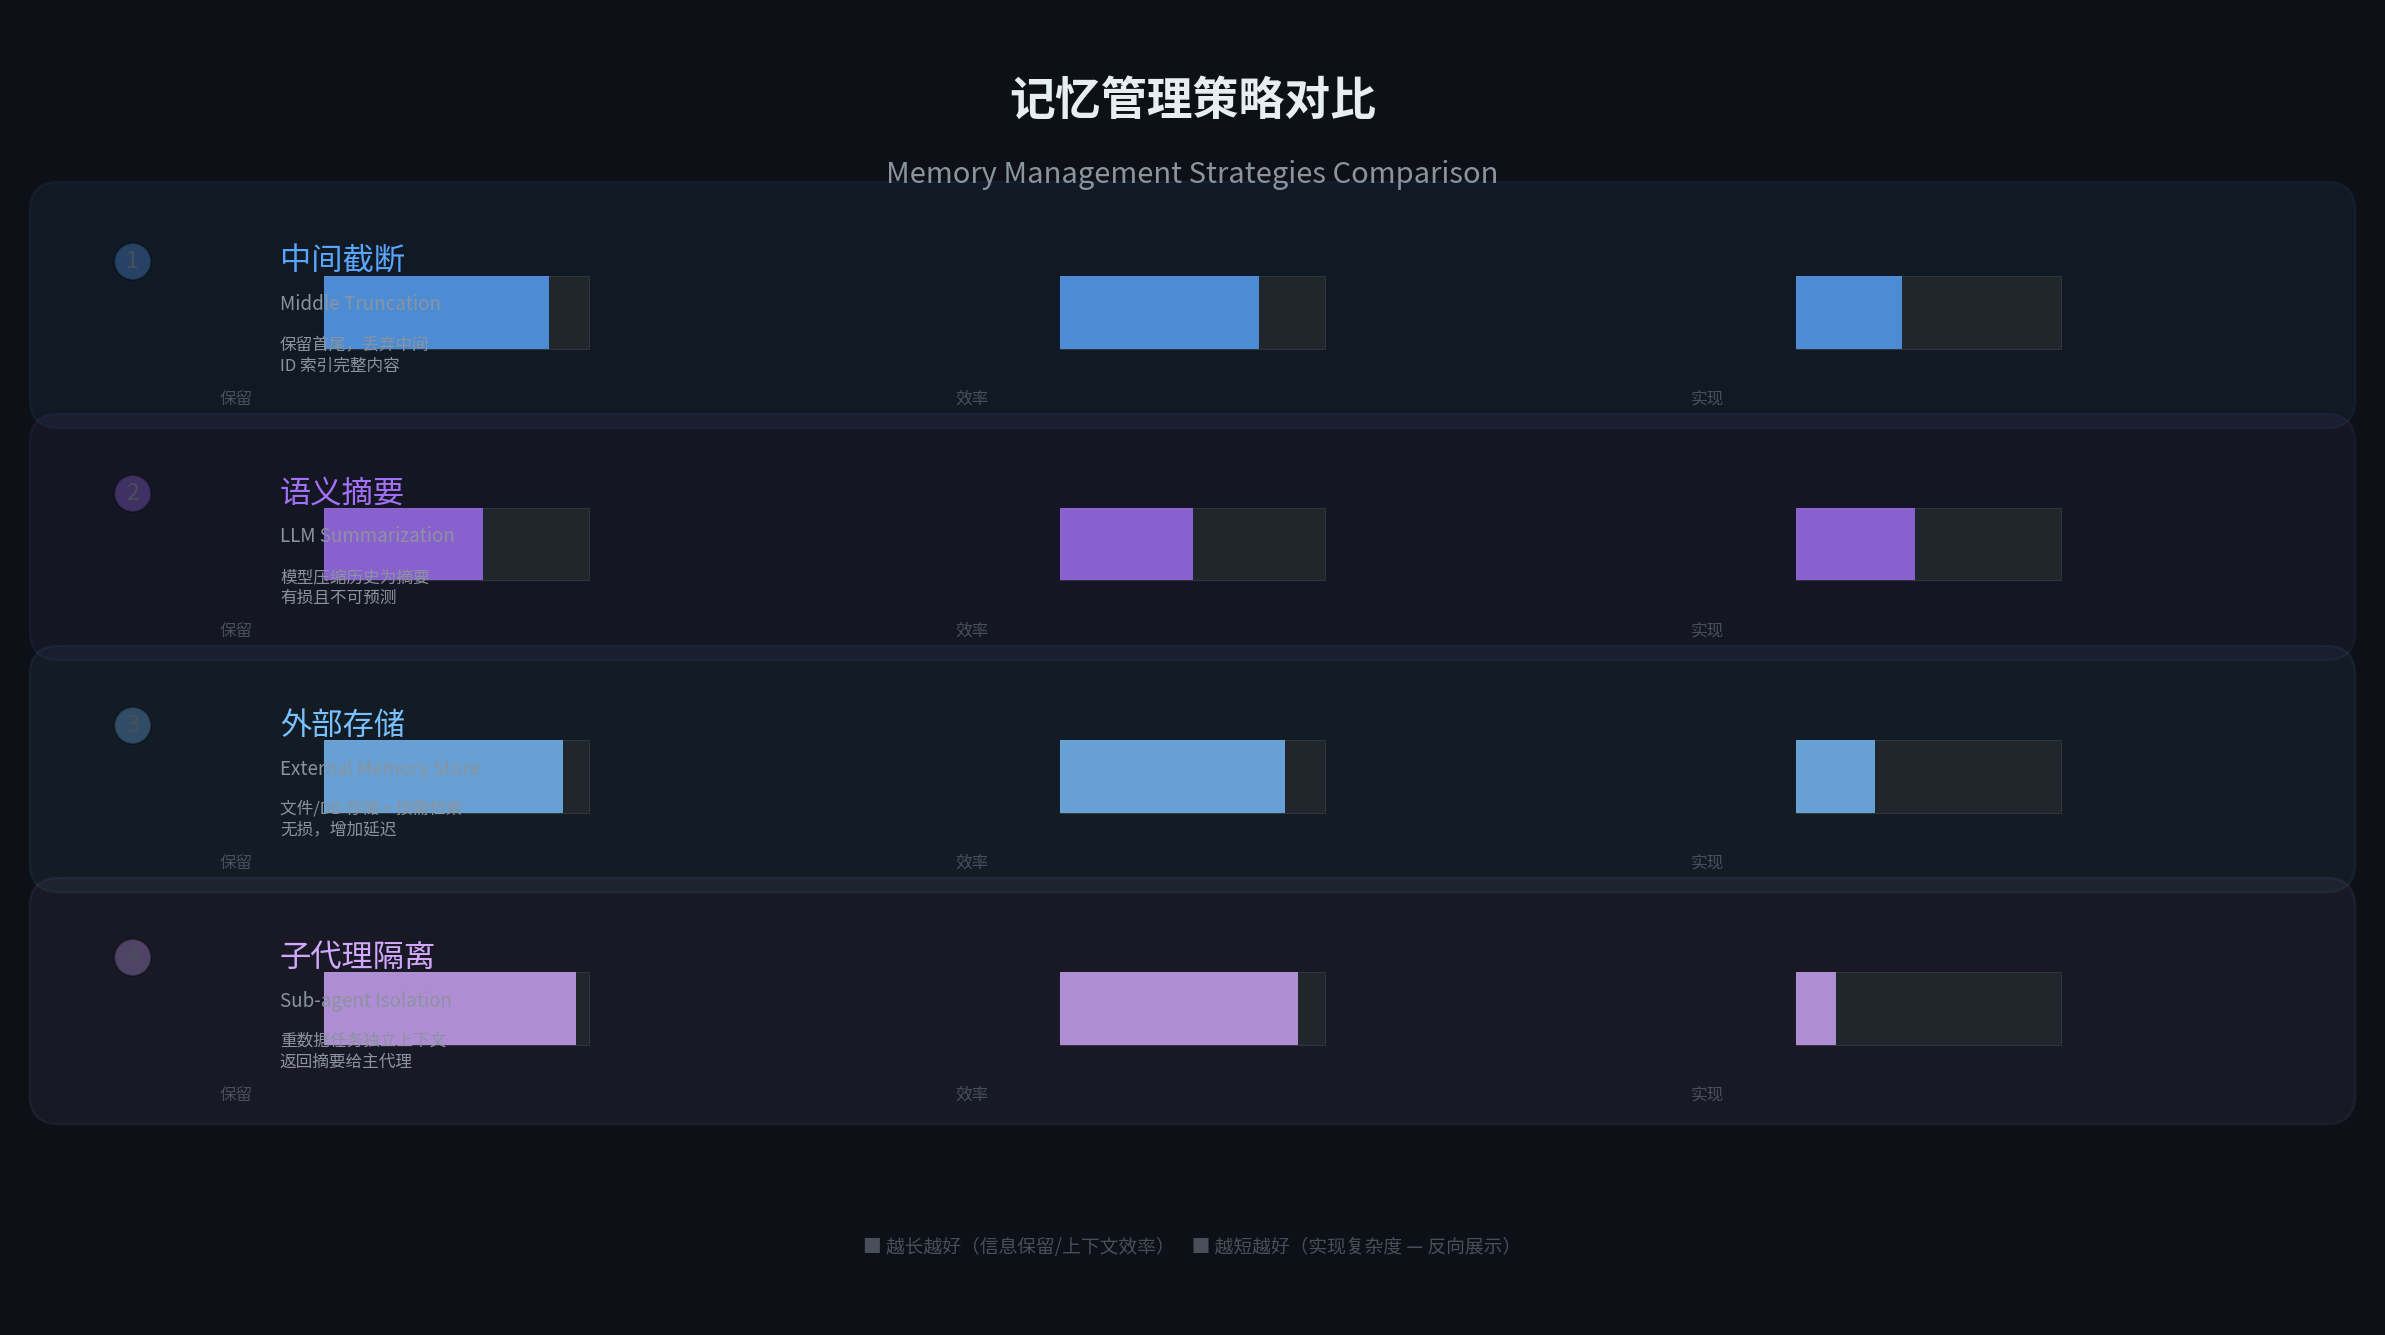
      <![CDATA[<p>2026 年，Agent 领域的瓶颈已经从「如何让模型答对」转移到了「如何让模型持续答对」。</p><p>多轮对话中，每一次工具调用、每一次检索结果、每一段用户追问都在累积消耗上下文窗口。当对话进入第 10 轮、第 20 轮，Token 预算耗尽、有效信息被噪声淹没、关键上下文消失在长序列中间——这些不是边缘情况，而是生产环境中每天都会遇到的现实问题。</p><p>Andrej Karpathy 在 2025 年 6 月给出了一个精辟的类比：<strong>LLM 是 CPU，上下文窗口是 RAM，工程师的工作就是操作系统，负责在每一步加载正确的信息。</strong> 当任务从单轮问答变成多轮 Agent 工作流时，真正决定成败的不再是提示词写得有多巧，而是整个上下文管道设计得有多好。</p><p><img src="/images/context-engineering-header.png" alt="上下文工程与长对话记忆管理"></p><h2 id="上下文工程：从-Prompt-Engineering-到-Context-Engineering"><a href="#上下文工程：从-Prompt-Engineering-到-Context-Engineering" class="headerlink" title="上下文工程：从 Prompt Engineering 到 Context Engineering"></a>上下文工程：从 Prompt Engineering 到 Context Engineering</h2><p>2026 年 AI 工程界出现了一个显著的概念迁移：<strong>从 Prompt Engineering（提示词工程）到 Context Engineering（上下文工程）</strong>。</p><p>Anthropic 工程团队将 Context Engineering 定义为：<strong>「在 LLM 推理过程中，精心策划和维护最优 Token 集合的策略，包括所有可能进入上下文的、提示词之外的信息。」</strong></p><table><thead><tr><th>维度</th><th>Prompt Engineering</th><th>Context Engineering</th></tr></thead><tbody><tr><td>范围</td><td>单个指令字符串</td><td>推理时的完整 Token 集合</td></tr><tr><td>状态</td><td>无状态 &#x2F; 单轮</td><td>有状态 &#x2F; 多轮 &#x2F; 持续数小时</td></tr><tr><td>优化目标</td><td>更好的措辞、更少的歧义</td><td>上下文窗口内的信噪比</td></tr><tr><td>失效模式</td><td>模型误解任务</td><td>信息太多、太少、或错误</td></tr></tbody></table><p>区分两者的最简单标准：<strong>如果你的改进来自改写措辞，你还在做 Prompt Engineering；如果你的改进来自改变 Agent 检索什么数据、以什么顺序、何时压缩、何时丢弃——你已经进入了 Context Engineering。</strong></p><h2 id="上下文工程的四大支柱"><a href="#上下文工程的四大支柱" class="headerlink" title="上下文工程的四大支柱"></a>上下文工程的四大支柱</h2><p>Sourcegraph 在 2026 年 5 月的实践中，将 Context Engineering 归纳为四个支柱，每个支柱回答一个不同问题：</p><h3 id="1-Instructions-System-Prompt"><a href="#1-Instructions-System-Prompt" class="headerlink" title="1. Instructions &#x2F; System Prompt"></a>1. Instructions &#x2F; System Prompt</h3><p>指令层是模型在见到用户第一条消息之前就知道的角色、约束和输出格式。核心技巧是找到「金发姑娘区」——既不够具体到变成僵化的 if-else 规则，也不至于模糊到让模型自由发挥。最常见的失效不是指令太长，而是与模型训练时的默认行为冲突。</p><h3 id="2-Retrieval"><a href="#2-Retrieval" class="headerlink" title="2. Retrieval"></a>2. Retrieval</h3><p>检索是外部数据进入上下文窗口的通道。包括经典 RAG（向量数据库）、结构化 SQL 查询、文件系统读取，以及 Anthropic 提出的 just-in-time retrieval——只有当需要时才将底层内容拉入上下文。生产环境中，检索质量通常是幻觉和非地面化回答的最大来源。</p><h3 id="3-Memory"><a href="#3-Memory" class="headerlink" title="3. Memory"></a>3. Memory</h3><p>Agent 记忆分为两个物种：</p><ul><li><strong>短期记忆</strong>：当前对话历史，包括工具调用和结果</li><li><strong>长期记忆</strong>：跨会话持久化的信息，如用户偏好、项目约定、历史对话摘要</li></ul><p>生产系统中的记忆通常两者兼具，并在上下文开始填满时执行压缩步骤，将旧轮次压缩为摘要。Anthropic 描述的 structured note-taking 模式让模型将草稿写到上下文窗口外的文件中作为持久记忆，需要时再读回。</p><h3 id="4-Tools"><a href="#4-Tools" class="headerlink" title="4. Tools"></a>4. Tools</h3><p>可用工具是 Agent 可调用的可执行表面。这是 Context Engineering 中最无情的层面——每个工具定义消耗 Token，每个工具调用返回结果消耗 Token，模糊的工具集让模型浪费轮次在几乎相同的工具之间做决定。Anthropic 的经典观察：<strong>「如果人类工程师无法明确判断在给定情况下应该用哪个工具，就不应该期望 AI Agent 做得更好。」</strong></p><h2 id="上下文失效的四大模式"><a href="#上下文失效的四大模式" class="headerlink" title="上下文失效的四大模式"></a>上下文失效的四大模式</h2><h3 id="Context-Rot（上下文腐败）"><a href="#Context-Rot（上下文腐败）" class="headerlink" title="Context Rot（上下文腐败）"></a>Context Rot（上下文腐败）</h3><p>Chroma 的研究团队在 2025 年发表的 Context Rot 论文表明：<strong>随着输入 Token 数量增加，模型准确召回信息的能力会下降。</strong> 即使使用稀疏注意力和 Flash Attention 优化，更大的上下文窗口仍然意味着更高的延迟、更高的成本，以及检索困难。这不是模型 bug，是 Transformer 架构的数学属性。</p><h3 id="Lost-in-the-Middle（中间迷失）"><a href="#Lost-in-the-Middle（中间迷失）" class="headerlink" title="Lost in the Middle（中间迷失）"></a>Lost in the Middle（中间迷失）</h3><p>Liu 等人 2023 年的经典论文发现：模型对上下文<strong>开头和结尾</strong>的信息表现最好，<strong>中间</strong>的信息显著退化——即使在专门训练为长上下文的模型中也如此。这意味着上下文组装的顺序至关重要：把高信号内容放在最前面或最后面，而不是埋在 30K Token 的检索块中间。</p><h3 id="Context-Distraction（上下文干扰）"><a href="#Context-Distraction（上下文干扰）" class="headerlink" title="Context Distraction（上下文干扰）"></a>Context Distraction（上下文干扰）</h3><p>太多无关材料挤占了重要上下文的空间。实践中的一个典型场景：Agent 在单轮中检索了 50 个候选块，把所有内容都塞进上下文，效果反而不如用重排序器精挑出 top-5。</p><h3 id="Budget-Exhaustion（预算耗尽）"><a href="#Budget-Exhaustion（预算耗尽）" class="headerlink" title="Budget Exhaustion（预算耗尽）"></a>Budget Exhaustion（预算耗尽）</h3><p>Token 预算耗尽是最直观的失效模式。但更危险的是「渐进式耗尽」——每次调用工具后都追加结果到历史中，从不裁剪。Arize AI 在构建其 Agent Alyx 时遇到的就是一个典型案例：当上下文超过 Provider 限制时，Agent 报错退出，但导致问题的 Span 仍然在会话中。下次运行时得到相同的超大上下文，加上新的内容，陷入死循环。</p><h2 id="记忆管理策略对比"><a href="#记忆管理策略对比" class="headerlink" title="记忆管理策略对比"></a>记忆管理策略对比</h2><p><img src="/images/memory-strategies-comparison.png" alt="记忆管理策略对比"></p><h3 id="中间截断-外部存储（推荐）"><a href="#中间截断-外部存储（推荐）" class="headerlink" title="中间截断 + 外部存储（推荐）"></a>中间截断 + 外部存储（推荐）</h3><p>Arize AI 在 Alyx 实践中落地的方案：<strong>截断中间而非边缘</strong>，保留有意义的首尾片段，同时为每个截断块分配 ID，将完整版本存储在外部内存中，并给 Agent 提供检索工具。</p><figure class="highlight plaintext"><table><tr><td class="gutter"><pre><span class="line">1</span><br><span class="line">2</span><br><span class="line">3</span><br></pre></td><td class="code"><pre><span class="line">原始：[首段 500 字符]...[中间 5000 字符]...[尾段 500 字符]</span><br><span class="line">截断后：[首段 500 字符]  [truncated: id=abc123, 5000 chars]  [尾段 500 字符]</span><br><span class="line">Agent 按需调用：fetch_full(id=abc123)</span><br></pre></td></tr></table></figure><p>这种方式的优点：大多数情况下首尾信息足够回答问题，少数需要详细信息时数据仍在，只是不在上下文中占位置。</p><h3 id="LLM-摘要压缩（理论好，实际差）"><a href="#LLM-摘要压缩（理论好，实际差）" class="headerlink" title="LLM 摘要压缩（理论好，实际差）"></a>LLM 摘要压缩（理论好，实际差）</h3><p>Arize AI 坦率承认：用 LLM 对消息历史进行摘要压缩<strong>看起来非常诱人，但实践中站不住脚</strong>。问题是它本质上有损，而且损失不可预测。模型并不能一致地识别出哪些信息之后会重要，做出看起来合理的判断，结果却是用户三轮后引用某个具体内容时 Agent 已经遗忘了。Arize 的结论：<strong>结构化的方法（中间截断、内存工具、子代理隔离）目前远比概率性压缩可靠。</strong></p><h3 id="子代理隔离（最干净方案）"><a href="#子代理隔离（最干净方案）" class="headerlink" title="子代理隔离（最干净方案）"></a>子代理隔离（最干净方案）</h3><p>Arize AI 认为这是他们找到的最强大的上下文管理技术：将重数据任务移到主对话之外。搜索子代理是一个典型案例——搜索任务可能涉及阅读十几个网页、运行多次关键词查询、抓取内容并评估相关性，这些数据几乎都不需要在主对话线程中留存。子代理完成工作后返回一个摘要，其上下文消失，不会在主线程中累积。</p><h2 id="立即可用的实践清单"><a href="#立即可用的实践清单" class="headerlink" title="立即可用的实践清单"></a>立即可用的实践清单</h2><p>对于正在构建或优化 Agent 的用户，以下是可以直接落地的做法：</p><ol><li><p><strong>不要在每次迭代中重发 System Prompt</strong>：System Prompt 只需在会话开始时发送一次，之后它已经在上下文中了。重复注入只是浪费 Token。</p></li><li><p><strong>工具调用去重</strong>：如果同一个工具用相同参数被调用两次，只保留最后一次结果。没必要把两份相同输出带到后续的每一个轮次中。</p></li><li><p><strong>工具结果用后即弃</strong>：一旦工具结果被整合进计划或回复中，原始响应不需要留在消息历史中——信息已经反映在 Agent 的后续行为里。</p></li><li><p><strong>截断中间，而非首尾</strong>：保留足够的开头和结尾作为信号，中间部分用 ID 索引到外部存储。这比简单地截取前 100 个字符有用得多。</p></li><li><p><strong>用文件系统思维管理大数据</strong>：当工具返回数十万 Token 的 traces 或 spans 时，不要在上下文中塞入完整数据。存储完整版本，给 Agent 一个预览和一个稳定句柄（如 <code>json_id</code>），让 Agent 按需拉取目标切片。这改变了 Agent 的工作模式：从「记住一切」到「知道如何检索」。</p></li><li><p><strong>评估上下文管理效果</strong>：上下文管理 bug 很难复现。一个会话刚开始工作正常，到第 11 轮就出问题了。Arize 的教训是：扩展评估框架以支持长会话模拟——预加载 10 轮对话，然后在第 11 轮运行评估。</p></li></ol><h2 id="总结"><a href="#总结" class="headerlink" title="总结"></a>总结</h2><p>Context Engineering 不是 Prompt Engineering 的升级版，而是不同的工程层次。Prompt Engineering 教你如何在单次 LLM 调用中说清楚一件事，Context Engineering 教你如何为持续运行的 Agent 构建信息管道。</p><p>当模型拥有 200 万 Token 的上下文窗口时（如 Gemini），更大的窗口缓解了部分压力，但并未消除根本问题——Context Rot、Lost in the Middle、Context Distraction 仍然存在。无论窗口多大，Agent 都应该只看到当前任务需要的信息，而不是把整个宇宙塞进去。</p><p>未来属于那些懂得设计上下文管道的人，而不仅仅是写得好的提示词。</p>]]>
    </content>
    <id>https://blog.deptrip.com/2026/07/07/context-engineering-memory-guide-2026/</id>
    <link href="https://blog.deptrip.com/2026/07/07/context-engineering-memory-guide-2026/"/>
    <published>2026-07-07T03:00:00.000Z</published>
    <summary>
      <![CDATA[<p>2026 年，Agent 领域的瓶颈已经从「如何让模型答对」转移到了「如何让模型持续答对」。</p>
<p>多轮对话中，每一次工具调用、每一次检索结果、每一段用户追问都在累积消耗上下文窗口。当对话进入第 10 轮、第 20 轮，Token 预算耗尽、有效信息被噪声淹没、关键上下文消失在长序列中间——这些不是边缘情况，而是生产环境中每天都会遇到的现实问题。</p>
<p>Andrej Karpathy 在 2025 年 6 月给出了一个精辟的类比：<strong>LLM 是 CPU，上下文窗口是 RAM，工程师的工作就是操作系统，负责在每一步加载正确的信息。</strong> 当任务从单轮问答变成多轮 Agent 工作流时，真正决定成败的不再是提示词写得有多巧，而是整个上下文管道设计得有多好。</p>
<p><img src="/images/context-engineering-header.png" alt="上下文工程与长对话记忆管理"></p>
<h2 id="上下文工程：从-Prompt-Engineering-到-Context-Engineering"><a href="#上下文工程：从-Prompt-Engineering-到-Context-Engineering" class="headerlink" title="上下文工程：从 Prompt Engineering 到 Context Engineering"></a>上下文工程：从 Prompt Engineering 到 Context Engineering</h2>]]>
    </summary>
    <title>长对话上下文工程与记忆管理实战指南</title>
    <updated>2026-07-28T14:35:47.263Z</updated>
  </entry>
  <entry>
    <author>
      <name>Golook</name>
    </author>
    <category term="AI工具对比评测" scheme="https://blog.deptrip.com/categories/AI%E5%B7%A5%E5%85%B7%E5%AF%B9%E6%AF%94%E8%AF%84%E6%B5%8B/"/>
    <category term="AI工具对比" scheme="https://blog.deptrip.com/tags/AI%E5%B7%A5%E5%85%B7%E5%AF%B9%E6%AF%94/"/>
    <category term="TTS" scheme="https://blog.deptrip.com/tags/TTS/"/>
    <category term="语音合成" scheme="https://blog.deptrip.com/tags/%E8%AF%AD%E9%9F%B3%E5%90%88%E6%88%90/"/>
    <category term="开源" scheme="https://blog.deptrip.com/tags/%E5%BC%80%E6%BA%90/"/>
    <category term="商业API" scheme="https://blog.deptrip.com/tags/%E5%95%86%E4%B8%9AAPI/"/>
    <content>
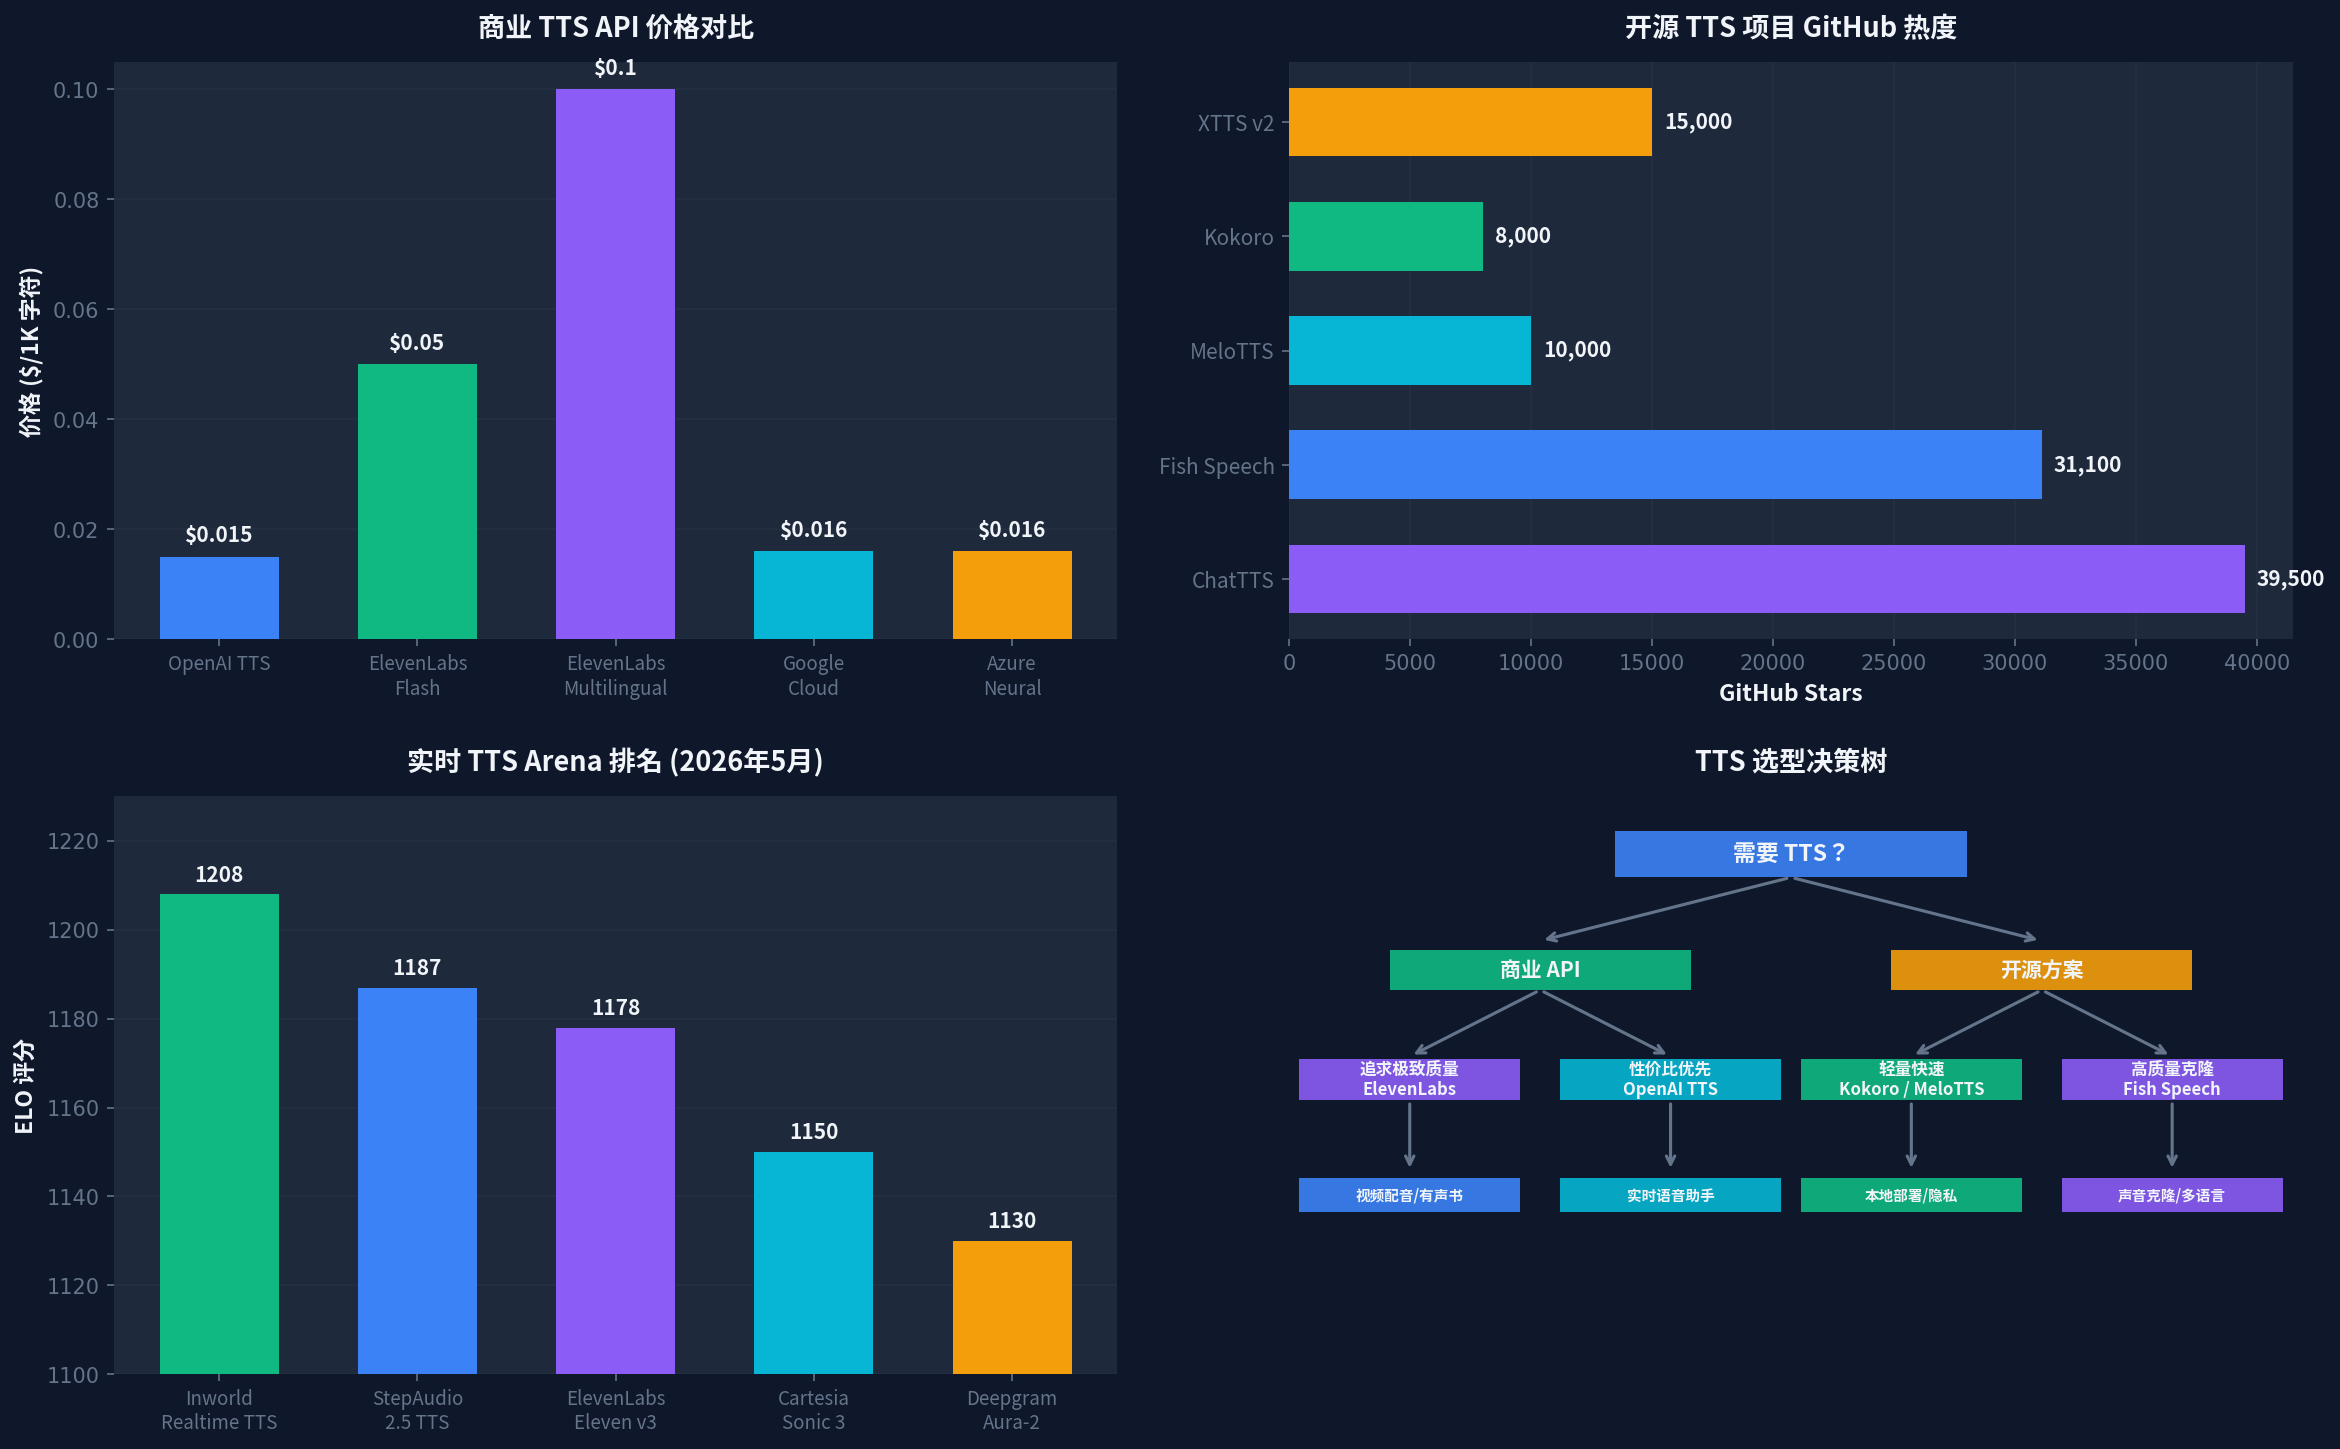
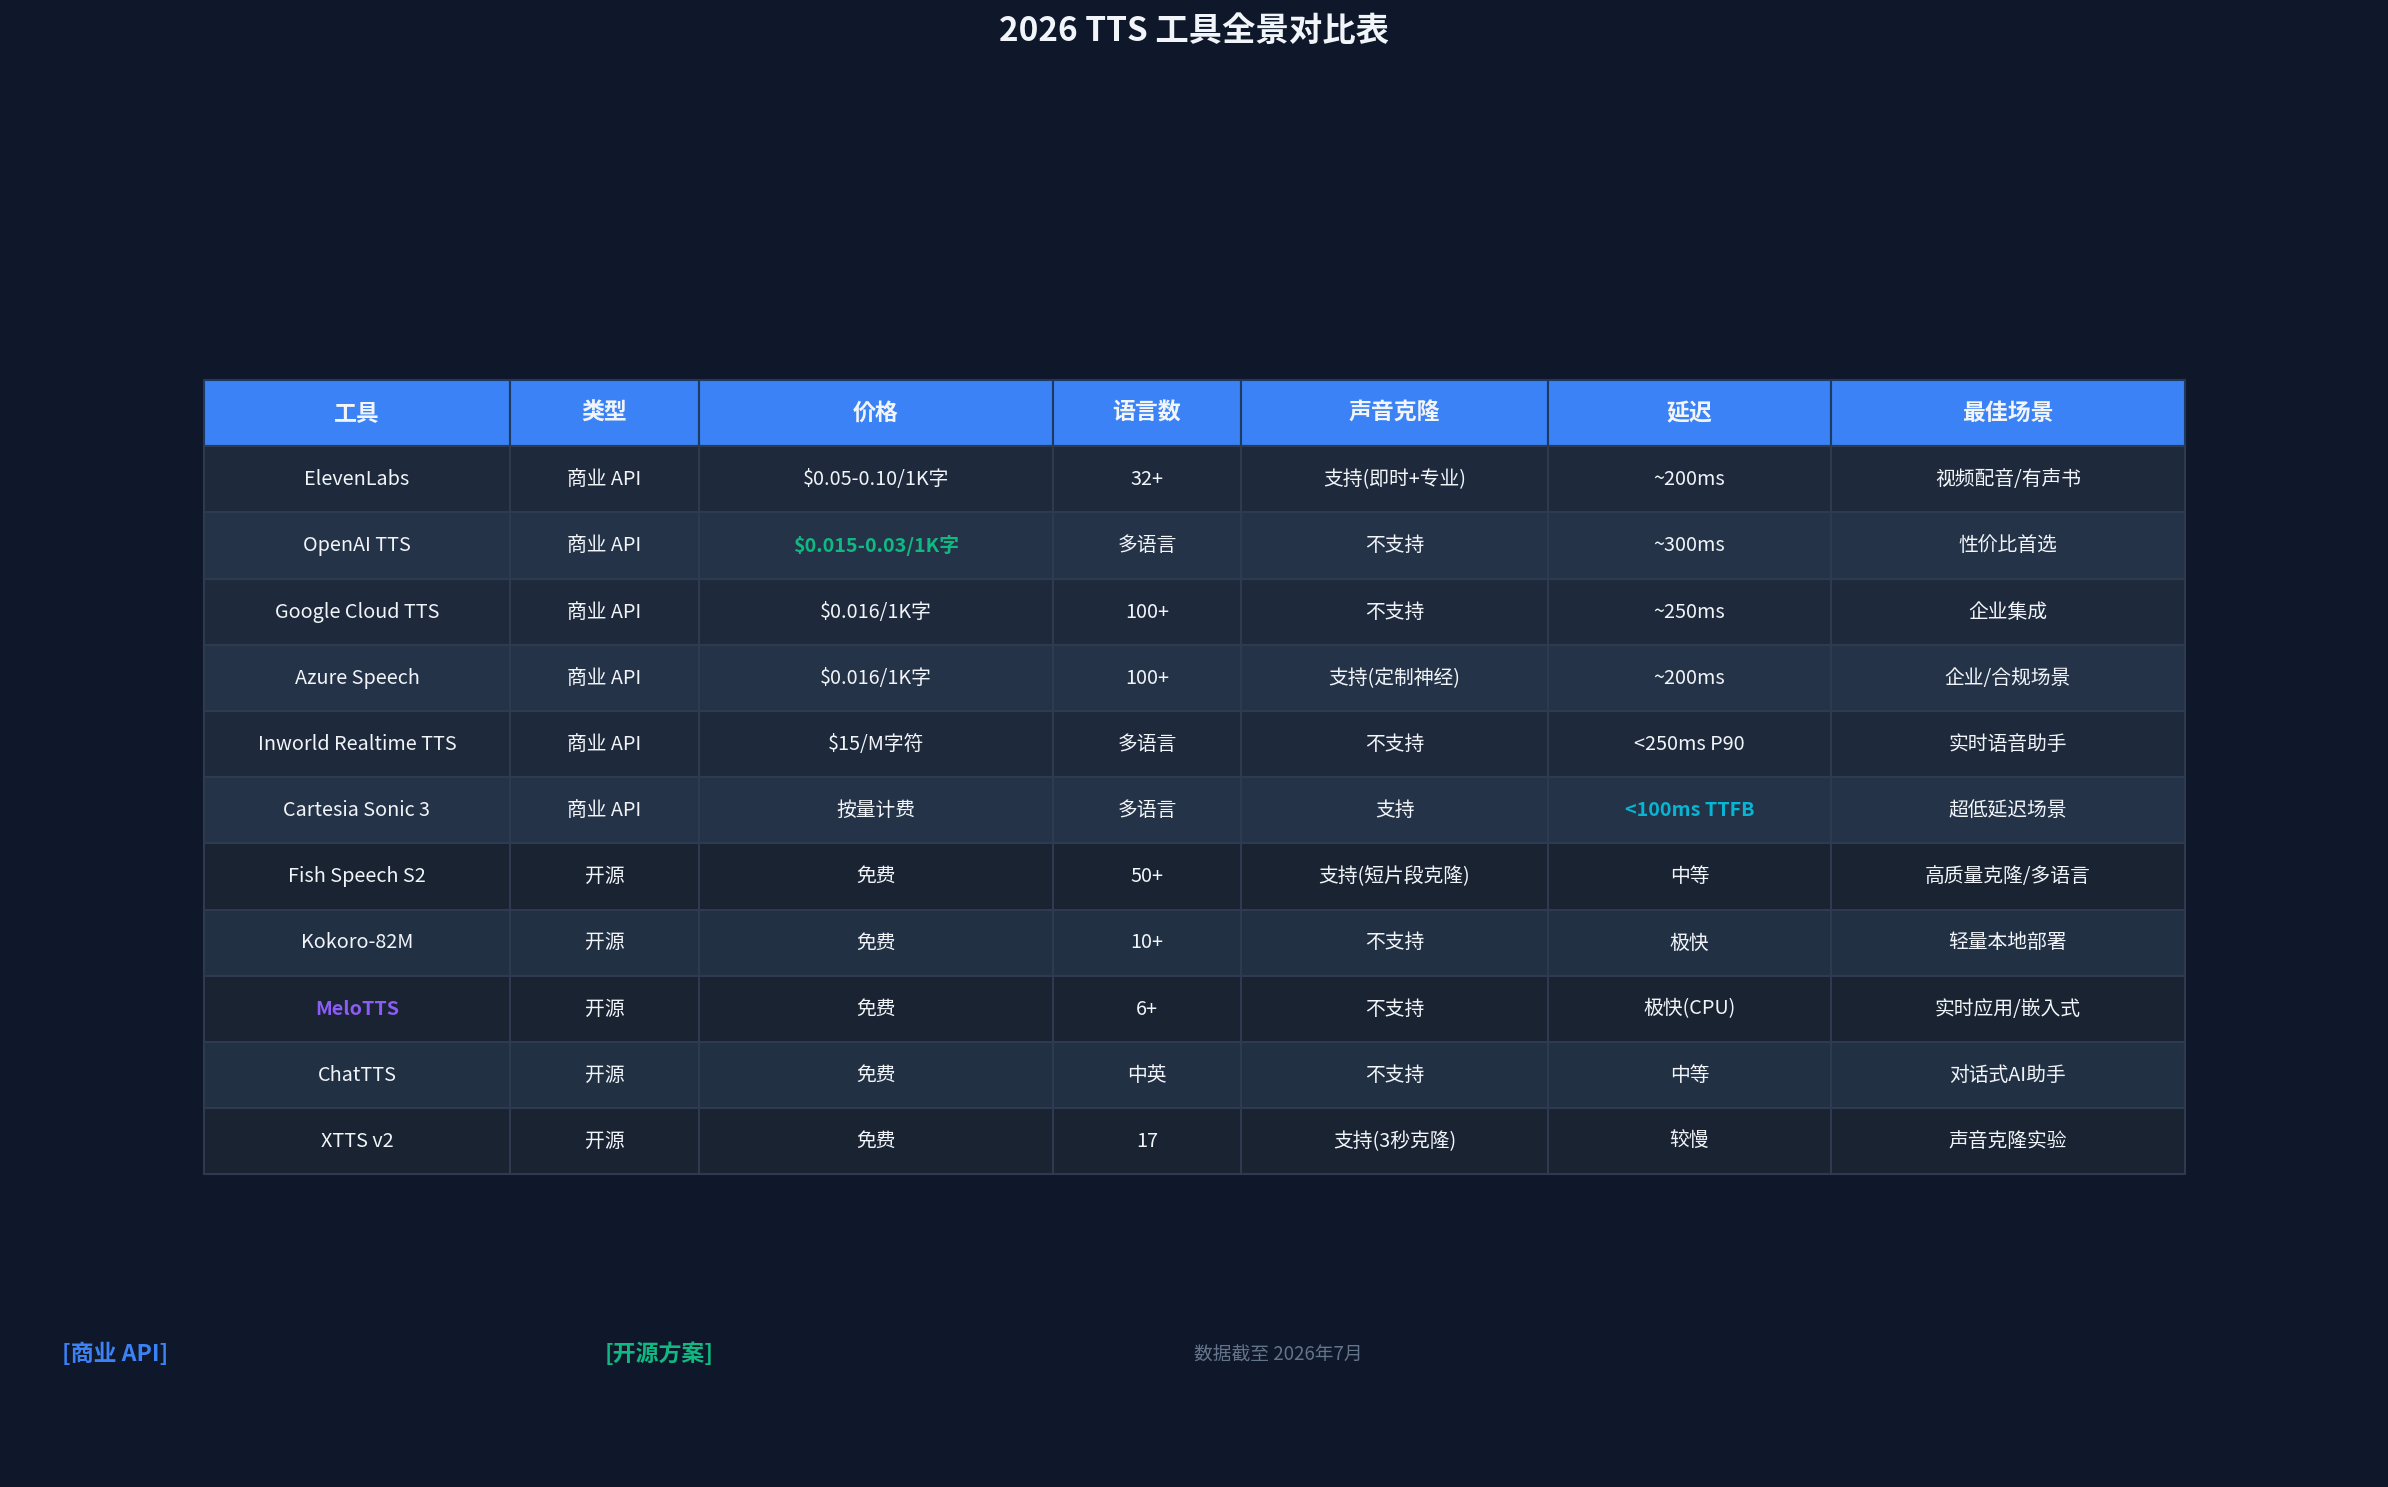
      <![CDATA[<p><img src="/images/tts-comparison-overview-2026.png" alt="2026 TTS 工具全景对比"></p><p>语音合成（Text-to-Speech, TTS）在 2026 年已经不再是”锦上添花”的功能，而是 AI 应用的基础设施。从实时语音助手到有声书制作，从视频配音到多语言本地化，TTS 的质量直接决定了用户体验的上限。</p><p>本文对比评测了当前市场上最值得关注的 11 款 TTS 工具，涵盖商业 API 和开源方案两大阵营，从价格、质量、延迟、语言支持、声音克隆等维度进行横向对比，帮助你找到最适合自己场景的方案。</p><hr><h2 id="一、商业-TTS-API：质量与成本的博弈"><a href="#一、商业-TTS-API：质量与成本的博弈" class="headerlink" title="一、商业 TTS API：质量与成本的博弈"></a>一、商业 TTS API：质量与成本的博弈</h2><h3 id="1-ElevenLabs-—-行业标杆"><a href="#1-ElevenLabs-—-行业标杆" class="headerlink" title="1. ElevenLabs — 行业标杆"></a>1. ElevenLabs — 行业标杆</h3><p><strong>定价</strong>：Flash 模型 $0.05&#x2F;1K 字符，Multilingual v2&#x2F;v3 $0.10&#x2F;1K 字符；订阅制从 $6&#x2F;月起（30K 字符&#x2F;月）</p><p><strong>核心优势</strong>：</p><ul><li>语音质量目前公认的行业最高水准，在 Artificial Analysis ELO 排行榜上 Eleven v3 以 1178 分位列第 4</li><li>即时声音克隆（Instant Voice Cloning）只需几分钟音频即可克隆新声音</li><li>支持 32+ 种语言，情感控制丰富</li><li>提供 Dubbing（配音）、Speech-to-Speech、Sound Effects 等扩展功能</li></ul><p><strong>适用场景</strong>：视频配音、有声书、需要极致语音质量的内容创作</p><p><strong>注意事项</strong>：价格偏高，大批量使用成本快速上升。商业授权需付费订阅（免费版无商用权）。</p><h3 id="2-OpenAI-TTS-—-性价比之王"><a href="#2-OpenAI-TTS-—-性价比之王" class="headerlink" title="2. OpenAI TTS — 性价比之王"></a>2. OpenAI TTS — 性价比之王</h3><p><strong>定价</strong>：标准版 $0.015&#x2F;1K 字符，HD 版 $0.030&#x2F;1K 字符</p><p><strong>核心优势</strong>：</p><ul><li>价格极具竞争力，仅为 ElevenLabs Flash 的 1&#x2F;3 到 1&#x2F;6</li><li>与 OpenAI 生态无缝集成，API 调用简单</li><li>支持流式输出，适合实时场景</li><li>11 种内置声音覆盖常见需求</li></ul><p><strong>适用场景</strong>：预算敏感的项目、快速原型验证、与 GPT 模型配合的对话系统</p><p><strong>注意事项</strong>：不支持声音克隆；语音质量略逊于 ElevenLabs，但在大多数场景下已足够好。</p><h3 id="3-Google-Cloud-TTS-Azure-Speech-—-企业级选择"><a href="#3-Google-Cloud-TTS-Azure-Speech-—-企业级选择" class="headerlink" title="3. Google Cloud TTS &amp; Azure Speech — 企业级选择"></a>3. Google Cloud TTS &amp; Azure Speech — 企业级选择</h3><p><strong>Google Cloud TTS</strong>：$0.016&#x2F;1K 字符，支持 100+ 语言，Neural2 模型质量稳定</p><p><strong>Azure Speech</strong>：$0.016&#x2F;1K 字符，支持 100+ 语言，提供 Custom Neural Voice（定制神经声音）</p><p><strong>核心优势</strong>：</p><ul><li>语言覆盖最广（100+），适合多语言全球化产品</li><li>企业级 SLA 和合规认证（SOC2、HIPAA 等）</li><li>与各自云平台深度集成（GCP &#x2F; Azure）</li><li>价格透明，按量计费无订阅门槛</li></ul><p><strong>适用场景</strong>：企业级应用、多语言产品、需要合规认证的场景</p><h3 id="4-实时-TTS-新势力：Inworld、Cartesia、Deepgram"><a href="#4-实时-TTS-新势力：Inworld、Cartesia、Deepgram" class="headerlink" title="4. 实时 TTS 新势力：Inworld、Cartesia、Deepgram"></a>4. 实时 TTS 新势力：Inworld、Cartesia、Deepgram</h3><p>2026 年实时 TTS 市场爆发，多家厂商将首字节延迟（TTFB）压到了 100ms 以内：</p><table><thead><tr><th>工具</th><th>TTFB</th><th>特点</th></tr></thead><tbody><tr><td><strong>Inworld Realtime TTS 1.5 Max</strong></td><td>&lt;250ms P90</td><td>Artificial Analysis Realtime TTS Arena 第 1 名（ELO 1208）</td></tr><tr><td><strong>Cartesia Sonic 3</strong></td><td>&lt;100ms</td><td>业界最低延迟，适合对话式 AI</td></tr><tr><td><strong>Deepgram Aura-2</strong></td><td>极低</td><td>与 Deepgram STT 形成完整语音流水线</td></tr><tr><td><strong>Rime Coda</strong></td><td>极低</td><td>新兴实时 TTS 方案</td></tr></tbody></table><p><strong>适用场景</strong>：实时语音助手、游戏 NPC 对话、客服机器人</p><hr><h2 id="二、开源-TTS：免费但各有取舍"><a href="#二、开源-TTS：免费但各有取舍" class="headerlink" title="二、开源 TTS：免费但各有取舍"></a>二、开源 TTS：免费但各有取舍</h2><h3 id="1-Fish-Speech-S2-—-开源质量天花板"><a href="#1-Fish-Speech-S2-—-开源质量天花板" class="headerlink" title="1. Fish Speech S2 — 开源质量天花板"></a>1. Fish Speech S2 — 开源质量天花板</h3><p><strong>GitHub</strong>：<a href="https://github.com/fishaudio/fish-speech">fishaudio&#x2F;fish-speech</a>（31.1k stars）</p><p><strong>核心优势</strong>：</p><ul><li>基于 DualAR（双自回归）架构，训练数据超过 1000 万小时、覆盖 50+ 语言</li><li>Audio Turing Test 得分 0.515，超越 Seed-TTS（0.417）24%、MiniMax-Speech（0.387）33%</li><li>支持自然语言标签进行细粒度控制：<code>[laugh]</code>、<code>[whispers]</code>、<code>[super happy]</code></li><li>原生多说话人生成和多轮对话</li><li>支持短片段声音克隆</li></ul><p><strong>资源需求</strong>：推荐 GPU 运行，模型较大</p><p><strong>适用场景</strong>：高质量声音克隆、多语言内容制作、需要情感控制的专业场景</p><h3 id="2-Kokoro-82M-—-轻量级首选"><a href="#2-Kokoro-82M-—-轻量级首选" class="headerlink" title="2. Kokoro-82M — 轻量级首选"></a>2. Kokoro-82M — 轻量级首选</h3><p><strong>GitHub</strong>：<a href="https://github.com/hexgrad/kokoro">hexgrad&#x2F;kokoro</a></p><p><strong>核心优势</strong>：</p><ul><li>仅 8200 万参数，Apache 2.0 开源协议（可商用）</li><li>可在 CPU 上运行，GPU 仅需 2-3GB 显存</li><li>推理速度极快，适合实时场景</li><li>支持 10+ 语言，11 种内置声音（7 美式、4 英式）</li><li>训练成本仅约 $1000（1000 小时 A100 80GB）</li></ul><p><strong>适用场景</strong>：本地部署、嵌入式设备、资源受限环境、需要快速响应的应用</p><p><strong>注意事项</strong>：不支持声音克隆；非英语语言质量不如英语。</p><h3 id="3-MeloTTS-—-多语言实时方案"><a href="#3-MeloTTS-—-多语言实时方案" class="headerlink" title="3. MeloTTS — 多语言实时方案"></a>3. MeloTTS — 多语言实时方案</h3><p><strong>GitHub</strong>：<a href="https://github.com/myshell-ai/MeloTTS">myshell-ai&#x2F;MeloTTS</a>（MIT 协议，可商用）</p><p><strong>核心优势</strong>：</p><ul><li>支持英语（多口音）、西班牙语、法语、中文、日语、韩语</li><li>CPU 实时推理，无需 GPU</li><li>基于 VITS&#x2F;VITS2 架构，音质稳定</li><li>英文变体是 Hugging Face 上下载量最高的 TTS 模型之一</li></ul><p><strong>适用场景</strong>：实时应用、嵌入式设备、多语言轻量部署</p><h3 id="4-ChatTTS-—-对话式-AI-专用"><a href="#4-ChatTTS-—-对话式-AI-专用" class="headerlink" title="4. ChatTTS — 对话式 AI 专用"></a>4. ChatTTS — 对话式 AI 专用</h3><p><strong>GitHub</strong>：<a href="https://github.com/2noise/ChatTTS">2noise&#x2F;ChatTTS</a>（39.5k stars）</p><p><strong>核心优势</strong>：</p><ul><li>专为日常对话设计，特别适合 LLM 助手的语音输出</li><li>支持中英文，对话自然度高</li><li>可控制说话节奏、停顿、笑声等副语言特征</li></ul><p><strong>适用场景</strong>：AI 对话助手、聊天机器人语音输出</p><h3 id="5-XTTS-v2-—-声音克隆实验首选"><a href="#5-XTTS-v2-—-声音克隆实验首选" class="headerlink" title="5. XTTS v2 — 声音克隆实验首选"></a>5. XTTS v2 — 声音克隆实验首选</h3><p><strong>核心优势</strong>：</p><ul><li>仅需 3 秒音频片段即可克隆声音</li><li>支持 17 种语言</li><li>开源社区活跃</li></ul><p><strong>注意事项</strong>：非商业授权；推理速度较慢</p><hr><h2 id="三、全景对比表"><a href="#三、全景对比表" class="headerlink" title="三、全景对比表"></a>三、全景对比表</h2><p><img src="/images/tts-full-comparison-table-2026.png" alt="TTS 工具全景对比表"></p><hr><h2 id="四、选型建议"><a href="#四、选型建议" class="headerlink" title="四、选型建议"></a>四、选型建议</h2><h3 id="按场景选择"><a href="#按场景选择" class="headerlink" title="按场景选择"></a>按场景选择</h3><table><thead><tr><th>场景</th><th>推荐方案</th><th>理由</th></tr></thead><tbody><tr><td>视频配音 &#x2F; 有声书</td><td><strong>ElevenLabs</strong></td><td>质量最高，情感丰富</td></tr><tr><td>实时语音助手</td><td><strong>Cartesia &#x2F; Inworld</strong></td><td>延迟最低，&lt;100ms TTFB</td></tr><tr><td>预算敏感项目</td><td><strong>OpenAI TTS</strong></td><td>价格最低，质量够用</td></tr><tr><td>本地部署 &#x2F; 隐私敏感</td><td><strong>Kokoro-82M</strong></td><td>轻量、可 CPU 运行、Apache 2.0</td></tr><tr><td>多语言全球化</td><td><strong>Google Cloud &#x2F; Azure</strong></td><td>100+ 语言覆盖</td></tr><tr><td>声音克隆</td><td><strong>Fish Speech S2</strong></td><td>开源方案中克隆质量最高</td></tr><tr><td>对话式 AI</td><td><strong>ChatTTS</strong></td><td>专为对话设计</td></tr><tr><td>嵌入式 &#x2F; 边缘设备</td><td><strong>MeloTTS</strong></td><td>CPU 实时，MIT 协议</td></tr></tbody></table><h3 id="按预算选择"><a href="#按预算选择" class="headerlink" title="按预算选择"></a>按预算选择</h3><ul><li><strong>零预算</strong>：Kokoro-82M、MeloTTS、ChatTTS（全部免费开源）</li><li><strong>每月 $5-20</strong>：OpenAI TTS（按量计费）或 ElevenLabs Starter（$6&#x2F;月）</li><li><strong>每月 $50-200</strong>：ElevenLabs Creator（$22&#x2F;月）+ 商业 API 按量</li><li><strong>企业级</strong>：Azure Speech &#x2F; Google Cloud TTS + 定制神经声音</li></ul><h3 id="按技术栈选择"><a href="#按技术栈选择" class="headerlink" title="按技术栈选择"></a>按技术栈选择</h3><ul><li><strong>Python 项目</strong>：所有方案都有 Python SDK</li><li><strong>JavaScript&#x2F;Node.js</strong>：商业 API 均有 REST API；开源方案可通过 subprocess 调用</li><li><strong>移动端</strong>：Kokoro（ONNX 模型可移植）、MeloTTS</li><li><strong>边缘设备</strong>：MeloTTS（CPU 实时）、Kokoro</li></ul><hr><h2 id="五、总结"><a href="#五、总结" class="headerlink" title="五、总结"></a>五、总结</h2><p>2026 年的 TTS 市场呈现出清晰的三层分化：</p><ol><li><p><strong>商业 API 层</strong>：以 ElevenLabs 为质量标杆，OpenAI TTS 为性价比首选，Cartesia&#x2F;Inworld 在实时场景形成差异化竞争。价格从 $0.015&#x2F;1K 字符到 $0.10&#x2F;1K 字符不等，质量与成本基本成正比。</p></li><li><p><strong>开源高质量层</strong>：Fish Speech S2 在 Audio Turing Test 上已经超越部分闭源方案，是开源阵营的质量天花板。适合对质量有要求但不想支付 API 费用的场景。</p></li><li><p><strong>开源轻量层</strong>：Kokoro-82M 和 MeloTTS 以极低的资源需求实现了可用的语音质量，是本地部署和边缘设备的最佳选择。</p></li></ol><p><strong>核心建议</strong>：不要盲目追求最高质量。先明确你的场景（实时 vs 离线、质量 vs 成本、本地 vs 云端），再选择对应的方案。对于大多数项目，OpenAI TTS（商业）或 Kokoro-82M（开源）是最佳的起点。</p><p>over</p>]]>
    </content>
    <id>https://blog.deptrip.com/2026/07/03/tts-tools-comparison-2026/</id>
    <link href="https://blog.deptrip.com/2026/07/03/tts-tools-comparison-2026/"/>
    <published>2026-07-03T03:00:00.000Z</published>
    <summary>
      <![CDATA[<p><img src="/images/tts-comparison-overview-2026.png" alt="2026 TTS 工具全景对比"></p>
<p>语音合成（Text-to-Speech, TTS）在 2026 年已经不再是”锦上添花”的功能，而是 AI 应用的基础设施。从实时语音助手到有声书制作，从视频配音到多语言本地化，TTS 的质量直接决定了用户体验的上限。</p>
<p>本文对比评测了当前市场上最值得关注的 11 款 TTS 工具，涵盖商业 API 和开源方案两大阵营，从价格、质量、延迟、语言支持、声音克隆等维度进行横向对比，帮助你找到最适合自己场景的方案。</p>
<hr>
<h2 id="一、商业-TTS-API：质量与成本的博弈"><a href="#一、商业-TTS-API：质量与成本的博弈" class="headerlink" title="一、商业 TTS API：质量与成本的博弈"></a>一、商业 TTS API：质量与成本的博弈</h2>]]>
    </summary>
    <title>2026 年 TTS 工具全景对比：商业 API vs 开源方案深度评测</title>
    <updated>2026-07-28T14:35:47.264Z</updated>
  </entry>
  <entry>
    <author>
      <name>Golook</name>
    </author>
    <category term="AI技术深度分析" scheme="https://blog.deptrip.com/categories/AI%E6%8A%80%E6%9C%AF%E6%B7%B1%E5%BA%A6%E5%88%86%E6%9E%90/"/>
    <category term="MCP" scheme="https://blog.deptrip.com/tags/MCP/"/>
    <category term="Model Context Protocol" scheme="https://blog.deptrip.com/tags/Model-Context-Protocol/"/>
    <category term="AI开发" scheme="https://blog.deptrip.com/tags/AI%E5%BC%80%E5%8F%91/"/>
    <category term="工具链" scheme="https://blog.deptrip.com/tags/%E5%B7%A5%E5%85%B7%E9%93%BE/"/>
    <category term="协议解析" scheme="https://blog.deptrip.com/tags/%E5%8D%8F%E8%AE%AE%E8%A7%A3%E6%9E%90/"/>
    <content>
      <![CDATA[<p><img src="/images/mcp-header.png" alt="MCP 协议实战：从零构建 AI 的&quot;USB-C&quot;接口"></p><blockquote><p>2024 年 11 月，Anthropic 开源了 Model Context Protocol（MCP）——一个让 AI 应用与外部工具”即插即用”的开放协议。一年后的今天，MCP 已经从概念验证演变为 AI 工具生态的基础设施。本文将带你从零理解 MCP 架构，亲手写一个 MCP Server，并部署到云端。</p></blockquote><h2 id="为什么需要-MCP？"><a href="#为什么需要-MCP？" class="headerlink" title="为什么需要 MCP？"></a>为什么需要 MCP？</h2><p>在 MCP 出现之前，AI 应用与外部系统的集成是一片混乱：</p><ul><li><strong>Claude Desktop</strong> 有自己的插件配置格式</li><li><strong>Cursor</strong> 有自己的 MCP 集成方式</li><li><strong>Cline</strong> 有自己的连接协议</li><li><strong>Cherry Studio</strong> 又有自己的配置语法</li></ul><p>每个 AI 客户端都需要为每个工具写一套专属的集成代码。开发者想让自己的数据库、API 或文件服务被 AI 调用，需要为每个客户端分别适配。这种”烟囱式”的集成方式在 AI 工具爆发式增长的 2025 年已经不可持续。</p><p>MCP 的灵感来自 <strong>LSP（Language Server Protocol）</strong>——正如 LSP 让 VS Code、Vim、Sublime 等编辑器都能无缝支持 Python、Go、Rust 等语言，MCP 让 Claude、Cursor、Cline 等 AI 客户端都能无缝调用同一个 MCP Server。</p><p><strong>一句话总结：MCP 是 AI 应用与外部工具之间的 USB-C 接口。</strong></p><h2 id="MCP-三层架构"><a href="#MCP-三层架构" class="headerlink" title="MCP 三层架构"></a>MCP 三层架构</h2><p>MCP 基于 <strong>JSON-RPC 2.0</strong> 构建，定义了三个角色：</p><p><img src="/images/mcp-architecture.png" alt="MCP 三层架构示意图"></p><h3 id="1-MCP-Host（宿主应用）"><a href="#1-MCP-Host（宿主应用）" class="headerlink" title="1. MCP Host（宿主应用）"></a>1. MCP Host（宿主应用）</h3><p>AI 应用本身，如 Claude Desktop、Cursor、Cline、Cherry Studio 等。Host 负责：</p><ul><li>管理用户界面和交互</li><li>聚合多个 MCP Client 返回的 context</li><li>向用户提供工具授权和确认</li></ul><h3 id="2-MCP-Client（连接器）"><a href="#2-MCP-Client（连接器）" class="headerlink" title="2. MCP Client（连接器）"></a>2. MCP Client（连接器）</h3><p>由 Host 创建，与单个 MCP Server 维持一个 JSON-RPC session。Client 负责：</p><ul><li>与服务端协商能力（capabilities negotiation）</li><li>路由消息和通知</li><li>管理连接生命周期</li></ul><h3 id="3-MCP-Server（服务端）"><a href="#3-MCP-Server（服务端）" class="headerlink" title="3. MCP Server（服务端）"></a>3. MCP Server（服务端）</h3><p>轻量级服务，按 MCP 规范向 Client 公开三种能力：</p><table><thead><tr><th>能力</th><th>说明</th><th>示例</th></tr></thead><tbody><tr><td><strong>Tools</strong></td><td>可执行函数，AI 模型可调用</td><td>查询数据库、发送消息、调用 API</td></tr><tr><td><strong>Resources</strong></td><td>上下文数据，供用户或模型使用</td><td>文件内容、API 文档、实时数据</td></tr><tr><td><strong>Prompts</strong></td><td>提示模板，预定义工作流</td><td>代码审查模板、日报生成模板</td></tr></tbody></table><p>此外，Client 还可以向 Server 提供 <strong>Sampling</strong> 能力，允许 Server 发起 LLM 调用（如自动补全、代码生成）。</p><h2 id="MCP-Server-实战：开发一个-Web-Search-工具"><a href="#MCP-Server-实战：开发一个-Web-Search-工具" class="headerlink" title="MCP Server 实战：开发一个 Web Search 工具"></a>MCP Server 实战：开发一个 Web Search 工具</h2><p>我们以 Python 为例，使用官方推荐的 <code>FastMCP</code> 高级封装。</p><h3 id="环境准备"><a href="#环境准备" class="headerlink" title="环境准备"></a>环境准备</h3><figure class="highlight bash"><table><tr><td class="gutter"><pre><span class="line">1</span><br><span class="line">2</span><br><span class="line">3</span><br><span class="line">4</span><br><span class="line">5</span><br><span class="line">6</span><br><span class="line">7</span><br></pre></td><td class="code"><pre><span class="line"><span class="comment"># 创建项目</span></span><br><span class="line"><span class="built_in">mkdir</span> mcp-web-search &amp;&amp; <span class="built_in">cd</span> mcp-web-search</span><br><span class="line">uv init</span><br><span class="line">uv add mcp</span><br><span class="line"></span><br><span class="line"><span class="comment"># 安装依赖</span></span><br><span class="line">uv pip install mcp</span><br></pre></td></tr></table></figure><h3 id="编写-MCP-Server"><a href="#编写-MCP-Server" class="headerlink" title="编写 MCP Server"></a>编写 MCP Server</h3><figure class="highlight python"><table><tr><td class="gutter"><pre><span class="line">1</span><br><span class="line">2</span><br><span class="line">3</span><br><span class="line">4</span><br><span class="line">5</span><br><span class="line">6</span><br><span class="line">7</span><br><span class="line">8</span><br><span class="line">9</span><br><span class="line">10</span><br><span class="line">11</span><br><span class="line">12</span><br><span class="line">13</span><br><span class="line">14</span><br><span class="line">15</span><br><span class="line">16</span><br><span class="line">17</span><br><span class="line">18</span><br><span class="line">19</span><br><span class="line">20</span><br><span class="line">21</span><br><span class="line">22</span><br><span class="line">23</span><br><span class="line">24</span><br><span class="line">25</span><br><span class="line">26</span><br><span class="line">27</span><br><span class="line">28</span><br><span class="line">29</span><br><span class="line">30</span><br><span class="line">31</span><br><span class="line">32</span><br><span class="line">33</span><br><span class="line">34</span><br><span class="line">35</span><br></pre></td><td class="code"><pre><span class="line"><span class="comment"># server.py</span></span><br><span class="line"><span class="keyword">from</span> mcp.server.fastmcp <span class="keyword">import</span> FastMCP</span><br><span class="line"><span class="keyword">import</span> httpx</span><br><span class="line"></span><br><span class="line">mcp = FastMCP(<span class="string">&quot;web_search&quot;</span>, description=<span class="string">&quot;网络搜索工具&quot;</span>)</span><br><span class="line"></span><br><span class="line"><span class="meta">@mcp.tool()</span></span><br><span class="line"><span class="keyword">async</span> <span class="keyword">def</span> <span class="title function_">web_search</span>(<span class="params">query: <span class="built_in">str</span>, max_results: <span class="built_in">int</span> = <span class="number">5</span></span>) -&gt; <span class="built_in">str</span>:</span><br><span class="line">    <span class="string">&quot;&quot;&quot;</span></span><br><span class="line"><span class="string">    使用搜索引擎进行网络搜索。</span></span><br><span class="line"><span class="string">    </span></span><br><span class="line"><span class="string">    Args:</span></span><br><span class="line"><span class="string">        query: 搜索关键词</span></span><br><span class="line"><span class="string">        max_results: 返回结果数量，默认 5</span></span><br><span class="line"><span class="string">    &quot;&quot;&quot;</span></span><br><span class="line">    <span class="comment"># 这里可以接入任意搜索引擎 API</span></span><br><span class="line">    <span class="comment"># 示例使用 Serper.dev 的免费额度</span></span><br><span class="line">    <span class="keyword">async</span> <span class="keyword">with</span> httpx.AsyncClient() <span class="keyword">as</span> client:</span><br><span class="line">        response = <span class="keyword">await</span> client.post(</span><br><span class="line">            <span class="string">&quot;https://google.serper.dev/search&quot;</span>,</span><br><span class="line">            json=&#123;<span class="string">&quot;q&quot;</span>: query, <span class="string">&quot;num&quot;</span>: max_results&#125;,</span><br><span class="line">            headers=&#123;<span class="string">&quot;X-API-KEY&quot;</span>: <span class="string">&quot;YOUR_API_KEY&quot;</span>&#125;</span><br><span class="line">        )</span><br><span class="line">        results = response.json().get(<span class="string">&quot;organic&quot;</span>, [])</span><br><span class="line">    </span><br><span class="line">    output = <span class="string">f&quot;搜索 &#x27;<span class="subst">&#123;query&#125;</span>&#x27; 的结果：\n\n&quot;</span></span><br><span class="line">    <span class="keyword">for</span> i, r <span class="keyword">in</span> <span class="built_in">enumerate</span>(results, <span class="number">1</span>):</span><br><span class="line">        output += <span class="string">f&quot;<span class="subst">&#123;i&#125;</span>. <span class="subst">&#123;r.get(<span class="string">&#x27;title&#x27;</span>, <span class="string">&#x27;无标题&#x27;</span>)&#125;</span>\n&quot;</span></span><br><span class="line">        output += <span class="string">f&quot;   <span class="subst">&#123;r.get(<span class="string">&#x27;link&#x27;</span>, <span class="string">&#x27;无链接&#x27;</span>)&#125;</span>\n&quot;</span></span><br><span class="line">        output += <span class="string">f&quot;   <span class="subst">&#123;r.get(<span class="string">&#x27;snippet&#x27;</span>, <span class="string">&#x27;无摘要&#x27;</span>)&#125;</span>\n\n&quot;</span></span><br><span class="line">    </span><br><span class="line">    <span class="keyword">return</span> output</span><br><span class="line"></span><br><span class="line"><span class="keyword">if</span> __name__ == <span class="string">&quot;__main__&quot;</span>:</span><br><span class="line">    mcp.run(transport=<span class="string">&quot;stdio&quot;</span>)</span><br></pre></td></tr></table></figure><h3 id="调试：使用官方-Inspector"><a href="#调试：使用官方-Inspector" class="headerlink" title="调试：使用官方 Inspector"></a>调试：使用官方 Inspector</h3><p>MCP 官方提供了一个可视化调试工具 Inspector：</p><figure class="highlight bash"><table><tr><td class="gutter"><pre><span class="line">1</span><br><span class="line">2</span><br><span class="line">3</span><br><span class="line">4</span><br><span class="line">5</span><br></pre></td><td class="code"><pre><span class="line"><span class="comment"># 方法 1：通过 npx 运行</span></span><br><span class="line">npx @modelcontextprotocol/inspector uv run server.py</span><br><span class="line"></span><br><span class="line"><span class="comment"># 方法 2：通过 mcp CLI</span></span><br><span class="line">mcp dev server.py</span><br></pre></td></tr></table></figure><p>Inspector 会打开一个 Web 界面，你可以在 Tools 栏点击 “List Tools” 查看可用工具，并直接测试调用。</p><h2 id="MCP-Client-实战：让大模型调用工具"><a href="#MCP-Client-实战：让大模型调用工具" class="headerlink" title="MCP Client 实战：让大模型调用工具"></a>MCP Client 实战：让大模型调用工具</h2><p>要让大模型真正”使用”MCP Server，需要编写一个 Client 程序。以下是核心流程：</p><figure class="highlight python"><table><tr><td class="gutter"><pre><span class="line">1</span><br><span class="line">2</span><br><span class="line">3</span><br><span class="line">4</span><br><span class="line">5</span><br><span class="line">6</span><br><span class="line">7</span><br><span class="line">8</span><br><span class="line">9</span><br><span class="line">10</span><br><span class="line">11</span><br><span class="line">12</span><br><span class="line">13</span><br><span class="line">14</span><br><span class="line">15</span><br><span class="line">16</span><br><span class="line">17</span><br><span class="line">18</span><br><span class="line">19</span><br><span class="line">20</span><br><span class="line">21</span><br><span class="line">22</span><br><span class="line">23</span><br><span class="line">24</span><br><span class="line">25</span><br><span class="line">26</span><br><span class="line">27</span><br><span class="line">28</span><br><span class="line">29</span><br><span class="line">30</span><br><span class="line">31</span><br><span class="line">32</span><br><span class="line">33</span><br><span class="line">34</span><br><span class="line">35</span><br><span class="line">36</span><br><span class="line">37</span><br><span class="line">38</span><br><span class="line">39</span><br><span class="line">40</span><br><span class="line">41</span><br><span class="line">42</span><br><span class="line">43</span><br><span class="line">44</span><br><span class="line">45</span><br><span class="line">46</span><br><span class="line">47</span><br><span class="line">48</span><br><span class="line">49</span><br><span class="line">50</span><br><span class="line">51</span><br><span class="line">52</span><br><span class="line">53</span><br><span class="line">54</span><br><span class="line">55</span><br><span class="line">56</span><br><span class="line">57</span><br><span class="line">58</span><br><span class="line">59</span><br><span class="line">60</span><br><span class="line">61</span><br><span class="line">62</span><br><span class="line">63</span><br><span class="line">64</span><br><span class="line">65</span><br><span class="line">66</span><br><span class="line">67</span><br><span class="line">68</span><br><span class="line">69</span><br><span class="line">70</span><br><span class="line">71</span><br><span class="line">72</span><br><span class="line">73</span><br><span class="line">74</span><br><span class="line">75</span><br><span class="line">76</span><br><span class="line">77</span><br><span class="line">78</span><br><span class="line">79</span><br></pre></td><td class="code"><pre><span class="line"><span class="comment"># client.py</span></span><br><span class="line"><span class="keyword">import</span> asyncio</span><br><span class="line"><span class="keyword">from</span> mcp <span class="keyword">import</span> ClientSession, StdioServerParameters</span><br><span class="line"><span class="keyword">from</span> mcp.client.stdio <span class="keyword">import</span> stdio_client</span><br><span class="line"><span class="keyword">from</span> openai <span class="keyword">import</span> AsyncOpenAI</span><br><span class="line"></span><br><span class="line"><span class="keyword">async</span> <span class="keyword">def</span> <span class="title function_">connect_to_server</span>(<span class="params">server_script: <span class="built_in">str</span></span>):</span><br><span class="line">    <span class="string">&quot;&quot;&quot;连接到 MCP Server 并获取工具列表&quot;&quot;&quot;</span></span><br><span class="line">    server_params = StdioServerParameters(</span><br><span class="line">        command=<span class="string">&quot;uv&quot;</span>, args=[<span class="string">&quot;run&quot;</span>, server_script]</span><br><span class="line">    )</span><br><span class="line">    stdio = stdio_client(server_params)</span><br><span class="line">    read, write = <span class="keyword">await</span> stdio.__aenter__()</span><br><span class="line">    session = ClientSession(read, write)</span><br><span class="line">    <span class="keyword">await</span> session.__aenter__()</span><br><span class="line">    </span><br><span class="line">    <span class="comment"># 获取工具列表</span></span><br><span class="line">    result = <span class="keyword">await</span> session.list_tools()</span><br><span class="line">    <span class="keyword">return</span> session, result.tools</span><br><span class="line"></span><br><span class="line"><span class="keyword">async</span> <span class="keyword">def</span> <span class="title function_">chat_with_tools</span>(<span class="params">session, tools, query: <span class="built_in">str</span></span>):</span><br><span class="line">    <span class="string">&quot;&quot;&quot;带工具调用的大模型对话&quot;&quot;&quot;</span></span><br><span class="line">    client = AsyncOpenAI()</span><br><span class="line">    </span><br><span class="line">    <span class="comment"># 将 MCP 工具转换为 OpenAI 格式</span></span><br><span class="line">    openai_tools = []</span><br><span class="line">    <span class="keyword">for</span> tool <span class="keyword">in</span> tools:</span><br><span class="line">        openai_tools.append(&#123;</span><br><span class="line">            <span class="string">&quot;type&quot;</span>: <span class="string">&quot;function&quot;</span>,</span><br><span class="line">            <span class="string">&quot;function&quot;</span>: &#123;</span><br><span class="line">                <span class="string">&quot;name&quot;</span>: tool.name,</span><br><span class="line">                <span class="string">&quot;description&quot;</span>: tool.description,</span><br><span class="line">                <span class="string">&quot;parameters&quot;</span>: tool.inputSchema</span><br><span class="line">            &#125;</span><br><span class="line">        &#125;)</span><br><span class="line">    </span><br><span class="line">    messages = [&#123;<span class="string">&quot;role&quot;</span>: <span class="string">&quot;user&quot;</span>, <span class="string">&quot;content&quot;</span>: query&#125;]</span><br><span class="line">    </span><br><span class="line">    <span class="comment"># 第一轮：让模型决定是否调用工具</span></span><br><span class="line">    response = <span class="keyword">await</span> client.chat.completions.create(</span><br><span class="line">        model=<span class="string">&quot;gpt-4o&quot;</span>,</span><br><span class="line">        messages=messages,</span><br><span class="line">        tools=openai_tools</span><br><span class="line">    )</span><br><span class="line">    </span><br><span class="line">    msg = response.choices[<span class="number">0</span>].message</span><br><span class="line">    </span><br><span class="line">    <span class="keyword">if</span> msg.tool_calls:</span><br><span class="line">        <span class="comment"># 模型决定调用工具</span></span><br><span class="line">        <span class="keyword">for</span> tc <span class="keyword">in</span> msg.tool_calls:</span><br><span class="line">            func_name = tc.function.name</span><br><span class="line">            args = json.loads(tc.function.arguments)</span><br><span class="line">            </span><br><span class="line">            <span class="comment"># 通过 MCP session 调用工具</span></span><br><span class="line">            result = <span class="keyword">await</span> session.call_tool(func_name, args)</span><br><span class="line">            </span><br><span class="line">            messages.append(&#123;</span><br><span class="line">                <span class="string">&quot;role&quot;</span>: <span class="string">&quot;tool&quot;</span>,</span><br><span class="line">                <span class="string">&quot;tool_call_id&quot;</span>: tc.<span class="built_in">id</span>,</span><br><span class="line">                <span class="string">&quot;content&quot;</span>: <span class="built_in">str</span>(result)</span><br><span class="line">            &#125;)</span><br><span class="line">        </span><br><span class="line">        <span class="comment"># 第二轮：模型根据工具结果生成回答</span></span><br><span class="line">        response2 = <span class="keyword">await</span> client.chat.completions.create(</span><br><span class="line">            model=<span class="string">&quot;gpt-4o&quot;</span>,</span><br><span class="line">            messages=messages</span><br><span class="line">        )</span><br><span class="line">        <span class="keyword">return</span> response2.choices[<span class="number">0</span>].message.content</span><br><span class="line">    </span><br><span class="line">    <span class="keyword">return</span> msg.content</span><br><span class="line"></span><br><span class="line"><span class="comment"># 使用</span></span><br><span class="line"><span class="keyword">async</span> <span class="keyword">def</span> <span class="title function_">main</span>():</span><br><span class="line">    session, tools = <span class="keyword">await</span> connect_to_server(<span class="string">&quot;server.py&quot;</span>)</span><br><span class="line">    result = <span class="keyword">await</span> chat_with_tools(session, tools, <span class="string">&quot;搜索最新的 MCP 协议更新&quot;</span>)</span><br><span class="line">    <span class="built_in">print</span>(result)</span><br><span class="line">    <span class="keyword">await</span> session.__aexit__(<span class="literal">None</span>, <span class="literal">None</span>, <span class="literal">None</span>)</span><br><span class="line"></span><br><span class="line">asyncio.run(main())</span><br></pre></td></tr></table></figure><p><strong>核心要点</strong>：</p><ol><li>通过 <code>StdioServerParameters</code> 启动 MCP Server（子进程）</li><li>建立 <code>ClientSession</code> 并获取工具列表</li><li>将 MCP 工具格式转换为 OpenAI 函数调用格式</li><li>模型返回 <code>tool_calls</code> 时，通过 <code>session.call_tool()</code> 执行</li><li>将工具结果作为 <code>tool</code> 角色消息返回给模型</li></ol><h2 id="部署场景"><a href="#部署场景" class="headerlink" title="部署场景"></a>部署场景</h2><h3 id="场景-1：本地-Claude-Desktop"><a href="#场景-1：本地-Claude-Desktop" class="headerlink" title="场景 1：本地 Claude Desktop"></a>场景 1：本地 Claude Desktop</h3><p>在 Claude Desktop 中使用自定义 MCP Server 只需编辑配置文件：</p><figure class="highlight json"><table><tr><td class="gutter"><pre><span class="line">1</span><br><span class="line">2</span><br><span class="line">3</span><br><span class="line">4</span><br><span class="line">5</span><br><span class="line">6</span><br><span class="line">7</span><br><span class="line">8</span><br><span class="line">9</span><br></pre></td><td class="code"><pre><span class="line"><span class="comment">// ~/.claude/claude_desktop_config.json</span></span><br><span class="line"><span class="punctuation">&#123;</span></span><br><span class="line">  <span class="attr">&quot;mcpServers&quot;</span><span class="punctuation">:</span> <span class="punctuation">&#123;</span></span><br><span class="line">    <span class="attr">&quot;web_search&quot;</span><span class="punctuation">:</span> <span class="punctuation">&#123;</span></span><br><span class="line">      <span class="attr">&quot;command&quot;</span><span class="punctuation">:</span> <span class="string">&quot;uv&quot;</span><span class="punctuation">,</span></span><br><span class="line">      <span class="attr">&quot;args&quot;</span><span class="punctuation">:</span> <span class="punctuation">[</span><span class="string">&quot;run&quot;</span><span class="punctuation">,</span> <span class="string">&quot;/path/to/server.py&quot;</span><span class="punctuation">]</span></span><br><span class="line">    <span class="punctuation">&#125;</span></span><br><span class="line">  <span class="punctuation">&#125;</span></span><br><span class="line"><span class="punctuation">&#125;</span></span><br></pre></td></tr></table></figure><p>重启 Claude Desktop 后，右下角会出现工具图标，即可在对话中使用。</p><h3 id="场景-2：云端-SSE-部署"><a href="#场景-2：云端-SSE-部署" class="headerlink" title="场景 2：云端 SSE 部署"></a>场景 2：云端 SSE 部署</h3><p>要让 MCP Server 通过 HTTP 远程访问，使用 <strong>SSE（Server-Sent Events）</strong> 传输：</p><figure class="highlight python"><table><tr><td class="gutter"><pre><span class="line">1</span><br><span class="line">2</span><br><span class="line">3</span><br><span class="line">4</span><br><span class="line">5</span><br><span class="line">6</span><br><span class="line">7</span><br><span class="line">8</span><br><span class="line">9</span><br><span class="line">10</span><br><span class="line">11</span><br><span class="line">12</span><br><span class="line">13</span><br><span class="line">14</span><br></pre></td><td class="code"><pre><span class="line"><span class="comment"># server_sse.py</span></span><br><span class="line"><span class="keyword">from</span> mcp.server.fastmcp <span class="keyword">import</span> FastMCP</span><br><span class="line"></span><br><span class="line">mcp = FastMCP(<span class="string">&quot;web_search&quot;</span>, description=<span class="string">&quot;网络搜索工具&quot;</span>)</span><br><span class="line"></span><br><span class="line"><span class="comment"># ... 工具定义同上 ...</span></span><br><span class="line"></span><br><span class="line"><span class="keyword">if</span> __name__ == <span class="string">&quot;__main__&quot;</span>:</span><br><span class="line">    mcp.run(</span><br><span class="line">        transport=<span class="string">&quot;sse&quot;</span>,</span><br><span class="line">        host=<span class="string">&quot;0.0.0.0&quot;</span>,</span><br><span class="line">        port=<span class="number">8080</span>,</span><br><span class="line">        sse_path=<span class="string">&quot;/sse&quot;</span></span><br><span class="line">    )</span><br></pre></td></tr></table></figure><p>部署到 <strong>阿里云函数计算 FC 3.0</strong>：</p><ol><li>创建 Web 函数，环境 Python 10</li><li>添加官方公共层 <code>mcp</code>（包含全部依赖）</li><li>设置启动命令和监听端口</li><li>部署后获得 URL，在任意客户端通过 SSE 配置使用</li></ol><h3 id="场景-3：LangChain-集成"><a href="#场景-3：LangChain-集成" class="headerlink" title="场景 3：LangChain 集成"></a>场景 3：LangChain 集成</h3><p>通过 <code>langchain-mcp-adapters</code> 开源项目，可以轻松将 MCP Server 集成到 LangChain 链中：</p><figure class="highlight python"><table><tr><td class="gutter"><pre><span class="line">1</span><br><span class="line">2</span><br><span class="line">3</span><br><span class="line">4</span><br><span class="line">5</span><br><span class="line">6</span><br><span class="line">7</span><br><span class="line">8</span><br></pre></td><td class="code"><pre><span class="line"><span class="keyword">from</span> langchain_mcp_adapters.client <span class="keyword">import</span> MultiServerClient</span><br><span class="line"></span><br><span class="line"><span class="keyword">async</span> <span class="keyword">with</span> MultiServerClient(&#123;</span><br><span class="line">    <span class="string">&quot;web_search&quot;</span>: &#123;<span class="string">&quot;command&quot;</span>: <span class="string">&quot;uv&quot;</span>, <span class="string">&quot;args&quot;</span>: [<span class="string">&quot;run&quot;</span>, <span class="string">&quot;server.py&quot;</span>]&#125;</span><br><span class="line">&#125;) <span class="keyword">as</span> client:</span><br><span class="line">    tools = client.get_tools()</span><br><span class="line">    <span class="comment"># 直接用于 LangChain Agent</span></span><br><span class="line">    agent = create_agent(model, tools=tools)</span><br></pre></td></tr></table></figure><h2 id="生态系统"><a href="#生态系统" class="headerlink" title="生态系统"></a>生态系统</h2><p>MCP 生态已经相当活跃，以下是关键资源：</p><table><thead><tr><th>资源</th><th>用途</th></tr></thead><tbody><tr><td><a href="https://modelcontextprotocol.io/">MCP 官方文档</a></td><td>完整规范、快速入门、最佳实践</td></tr><tr><td><a href="https://github.com/modelcontextprotocol/inspector">MCP Inspector</a></td><td>官方可视化工具，调试 Server</td></tr><tr><td><a href="https://glama.ai/mcp">Glama.ai MCP Directory</a></td><td>按类别分类的 MCP 工具目录</td></tr><tr><td><a href="https://smithery.ai/">Smithery.ai</a></td><td>MCP 中介平台，可在线体验</td></tr><tr><td><a href="https://cursor.directory/">Cursor MCP Directory</a></td><td>Cursor 官方精选 MCP 工具</td></tr><tr><td><a href="https://github.com/langchain-ai/langchain-mcp-adapters">langchain-mcp-adapters</a></td><td>LangChain 集成适配器</td></tr></tbody></table><h2 id="安全注意事项"><a href="#安全注意事项" class="headerlink" title="安全注意事项"></a>安全注意事项</h2><p>MCP 协议本身不提供角色访问控制（RBAC），安全性依赖实现者：</p><ol><li><strong>用户授权</strong>：Host 必须在调用任何工具前获得用户明确同意</li><li><strong>工具描述不可信</strong>：工具描述（annotations）来自 Server，未经认证不应直接信任</li><li><strong>数据隐私</strong>：Host 不得在未获用户同意的情况下将资源数据发送给 Server</li><li><strong>Sampling 控制</strong>：用户必须明确批准任何 LLM 采样请求，控制 prompt 内容和结果可见性</li></ol><p>社区工具 <strong>MCPSafetyScanner</strong>（<a href="https://github.com/johnhalloran321/mcpSafetyScanner">GitHub</a>）可以模拟攻击者行为，对 MCP 工具清单进行安全扫描。</p><h2 id="总结"><a href="#总结" class="headerlink" title="总结"></a>总结</h2><p>MCP 协议在短短一年内从概念验证成长为 AI 工具生态的事实标准。它的价值在于：</p><ul><li><strong>对开发者</strong>：一次编写，所有 AI 客户端可用——像写 LSP 服务器一样简单</li><li><strong>对用户</strong>：在 Claude、Cursor、Cline 等不同客户端间无缝切换，工具配置不丢失</li><li><strong>对生态</strong>：打破”烟囱式”集成，让 AI 工具真正可组合</li></ul><p>MCP 不是终点，而是 AI 应用从”聊天机器人”走向”操作系统”的关键一步。当每个工具都可以通过标准协议被 AI 调用时，AI 将不再只是一个对话框，而是一个能真正操作你数字世界的智能代理。</p><hr><p><strong>参考链接</strong>：</p><ul><li><a href="https://modelcontextprotocol.io/specification/2025-03-26">MCP 官方规范</a></li><li><a href="https://www.anthropic.com/news/model-context-protocol">Anthropic 发布博客</a></li><li><a href="https://github.com/liaokongVFX/MCP-Chinese-Getting-Started-Guide">MCP 中文入门指南</a></li><li><a href="https://github.com/modelcontextprotocol/inspector">MCP Inspector 调试工具</a></li></ul>]]>
    </content>
    <id>https://blog.deptrip.com/2026/06/30/mcp-protocol-guide-2026/</id>
    <link href="https://blog.deptrip.com/2026/06/30/mcp-protocol-guide-2026/"/>
    <published>2026-06-30T03:00:00.000Z</published>
    <summary>
      <![CDATA[<p><img src="/images/mcp-header.png" alt="MCP 协议实战：从零构建 AI 的&quot;USB-C&quot;接口"></p>
<blockquote>
<p>2024 年 11 月，Anthropic 开源了 Model Context Protocol（MCP）——一个让 AI 应用与外部工具”即插即用”的开放协议。一年后的今天，MCP 已经从概念验证演变为 AI 工具生态的基础设施。本文将带你从零理解 MCP 架构，亲手写一个 MCP Server，并部署到云端。</p>
</blockquote>
<h2 id="为什么需要-MCP？"><a href="#为什么需要-MCP？" class="headerlink" title="为什么需要 MCP？"></a>为什么需要 MCP？</h2><p>在 MCP 出现之前，AI 应用与外部系统的集成是一片混乱：</p>
<ul>
<li><strong>Claude Desktop</strong> 有自己的插件配置格式</li>
<li><strong>Cursor</strong> 有自己的 MCP 集成方式</li>
<li><strong>Cline</strong> 有自己的连接协议</li>
<li><strong>Cherry Studio</strong> 又有自己的配置语法</li>
</ul>]]>
    </summary>
    <title>MCP 协议实战：从零构建 AI 的&quot;USB-C&quot;接口</title>
    <updated>2026-07-28T14:35:47.263Z</updated>
  </entry>
  <entry>
    <author>
      <name>Golook</name>
    </author>
    <category term="AI工具对比评测" scheme="https://blog.deptrip.com/categories/AI%E5%B7%A5%E5%85%B7%E5%AF%B9%E6%AF%94%E8%AF%84%E6%B5%8B/"/>
    <category term="STT" scheme="https://blog.deptrip.com/tags/STT/"/>
    <category term="语音识别" scheme="https://blog.deptrip.com/tags/%E8%AF%AD%E9%9F%B3%E8%AF%86%E5%88%AB/"/>
    <category term="AI工具对比" scheme="https://blog.deptrip.com/tags/AI%E5%B7%A5%E5%85%B7%E5%AF%B9%E6%AF%94/"/>
    <category term="Deepgram" scheme="https://blog.deptrip.com/tags/Deepgram/"/>
    <category term="Whisper" scheme="https://blog.deptrip.com/tags/Whisper/"/>
    <category term="AssemblyAI" scheme="https://blog.deptrip.com/tags/AssemblyAI/"/>
    <category term="GPT-4o" scheme="https://blog.deptrip.com/tags/GPT-4o/"/>
    <content>
      <![CDATA[<p><img src="/images/stt-comparison-overview.png" alt="STT 工具对比概览"></p><p>2026 年的语音转文字（STT）市场已经发生了翻天覆地的变化。从 OpenAI Whisper 的开源崛起，到 Deepgram、AssemblyAI 的商业 API 军备竞赛，再到 GPT-4o-transcribe 和微软 MAI-Transcribe-1 的入场——选择困难症已经成了开发者最头疼的问题之一。</p><p>这篇文章基于 Coval.ai、HuggingFace Open ASR Leaderboard、各厂商官方数据以及社区实测，对 2026 年主流 STT 工具进行全方位对比，帮你找到最适合的方案。</p><h2 id="一、市场格局速览"><a href="#一、市场格局速览" class="headerlink" title="一、市场格局速览"></a>一、市场格局速览</h2><p>全球 STT API 市场规模从 2024 年的 38 亿美元预计增长到 2030 年的 86 亿美元（CAGR 14.4%）。2026 年最显著的变化是：</p><ul><li><strong>精度天花板已接近人类水平</strong>：顶级模型在干净英语上的 WER（词错误率）已低至 3-5%，接近人类听写员水平</li><li><strong>实时流式成为标配</strong>：Deepgram Flux 内置对话结束检测（&lt;300ms），ElevenLabs Scribe v2 实现”负延迟”预测流式</li><li><strong>开源模型经济持续下降</strong>：Groq 上的 Whisper-v3 每小时仅 $0.04，比 OpenAI 官方端点便宜 10-30 倍</li><li><strong>多语言深度分化</strong>：从”支持 100 种语言”转向”支持 6 种语言但代码切换（code-switching）表现卓越”</li></ul><h2 id="二、关键指标解读"><a href="#二、关键指标解读" class="headerlink" title="二、关键指标解读"></a>二、关键指标解读</h2><p>在对比之前，先理解几个核心指标：</p><table><thead><tr><th>指标</th><th>含义</th><th>好标准</th></tr></thead><tbody><tr><td><strong>WER（词错误率）</strong></td><td>(插入+删除+替换) &#x2F; 总词数</td><td>&lt;5% 优秀，&lt;10% 可用</td></tr><tr><td><strong>RTF（实时率）</strong></td><td>音频时长 &#x2F; 处理时间</td><td>&gt;10x 可用，&gt;100x 优秀</td></tr><tr><td><strong>延迟（Latency）</strong></td><td>从音频输入到文本输出的时间</td><td>流式 &lt;300ms 优秀</td></tr><tr><td><strong>语种数</strong></td><td>支持的语言数量</td><td>看质量而非数量</td></tr><tr><td><strong>价格</strong></td><td>通常按小时或分钟计费</td><td>考虑总拥有成本</td></tr></tbody></table><p><strong>⚠️ 重要提醒</strong>：厂商公布的 WER 数据通常基于”干净录音室音频”，实际生产环境中（噪音、口音、多人对话）表现可能差 2-3 倍。最可靠的方法是<strong>用你自己的生产音频做 A&#x2F;B 测试</strong>。</p><h2 id="三、开源模型对比"><a href="#三、开源模型对比" class="headerlink" title="三、开源模型对比"></a>三、开源模型对比</h2><h3 id="1-Canary-Qwen-2-5B-—-当前精度之王"><a href="#1-Canary-Qwen-2-5B-—-当前精度之王" class="headerlink" title="1. Canary Qwen 2.5B — 当前精度之王"></a>1. Canary Qwen 2.5B — 当前精度之王</h3><ul><li><strong>WER</strong>：5.63%（Open ASR Leaderboard），1.6%（LibriSpeech Clean）</li><li><strong>架构</strong>：FastConformer 编码器 + Qwen3-1.7B LLM 解码器（SALM）</li><li><strong>训练数据</strong>：23.4 万小时英语语音（YouTube、YODAS2、LibriLight 等）</li><li><strong>噪音容忍</strong>：10dB SNR 下 WER 仅 2.41%</li><li><strong>部署</strong>：需要 NVIDIA NeMo 工具链；建议对 &gt;10s 音频做分块处理</li><li><strong>许可证</strong>：CC-BY-4.0</li><li><strong>适用场景</strong>：对精度要求极高的英语转录，如法律、医疗文档</li></ul><h3 id="2-Whisper-Large-V3-—-多语言标杆"><a href="#2-Whisper-Large-V3-—-多语言标杆" class="headerlink" title="2. Whisper Large V3 — 多语言标杆"></a>2. Whisper Large V3 — 多语言标杆</h3><ul><li><strong>WER</strong>：7.4%（平均），高资源语言更优</li><li><strong>语种</strong>：99+ 语言，零样本能力</li><li><strong>训练数据</strong>：68 万小时多语言网络音频</li><li><strong>架构</strong>：Transformer 编码器-解码器（32 层解码器）</li><li><strong>许可证</strong>：MIT</li><li><strong>适用场景</strong>：多语言转录，需要零样本语言检测的场景</li></ul><h3 id="3-Whisper-Large-V3-Turbo-—-速度与精度平衡"><a href="#3-Whisper-Large-V3-Turbo-—-速度与精度平衡" class="headerlink" title="3. Whisper Large V3 Turbo — 速度与精度平衡"></a>3. Whisper Large V3 Turbo — 速度与精度平衡</h3><ul><li><strong>WER</strong>：7.75%（接近 Large V2 水平）</li><li><strong>速度</strong>：比 Large V3 快 6 倍（Groq 上 RTF 达 216x）</li><li><strong>参数量</strong>：809M（解码器从 32 层减到 4 层）</li><li><strong>VRAM</strong>：约 6GB</li><li><strong>缺点</strong>：翻译性能下降（被排除在微调之外）</li><li><strong>适用场景</strong>：多语言转录且速度优先</li></ul><h3 id="4-Distil-Whisper-—-蒸馏效率"><a href="#4-Distil-Whisper-—-蒸馏效率" class="headerlink" title="4. Distil-Whisper — 蒸馏效率"></a>4. Distil-Whisper — 蒸馏效率</h3><ul><li><strong>WER</strong>：与 Large V3 差距 &lt;1%</li><li><strong>速度</strong>：比 Large V3 快约 6 倍</li><li><strong>参数量</strong>：756M（编码器来自 Large V3，2 层解码器）</li><li><strong>优势</strong>：重复短语更少，插入错误率低 2.1%</li><li><strong>限制</strong>：<strong>仅支持英语</strong>（多语言请用 Whisper Turbo）</li><li><strong>适用场景</strong>：英语转录且需要高效率</li></ul><h3 id="5-NVIDIA-Parakeet-TDT-—-超低延迟流式"><a href="#5-NVIDIA-Parakeet-TDT-—-超低延迟流式" class="headerlink" title="5. NVIDIA Parakeet TDT — 超低延迟流式"></a>5. NVIDIA Parakeet TDT — 超低延迟流式</h3><ul><li><strong>WER</strong>：约 8.0%</li><li><strong>RTF</strong>：&gt;2,000x（Open ASR 最快）</li><li><strong>架构</strong>：RNN-Transducer（流式最优架构）</li><li><strong>参数量</strong>：1.1B</li><li><strong>训练数据</strong>：6.5 万小时多样化英语音频</li><li><strong>适用场景</strong>：实时字幕、电话系统、需要极低延迟的场景</li></ul><h3 id="6-IBM-Granite-Speech-3-3-8B-—-企业级精度"><a href="#6-IBM-Granite-Speech-3-3-8B-—-企业级精度" class="headerlink" title="6. IBM Granite Speech 3.3 8B — 企业级精度"></a>6. IBM Granite Speech 3.3 8B — 企业级精度</h3><ul><li><strong>WER</strong>：约 5.85%（Open ASR）</li><li><strong>语种</strong>：英语、法语、德语、西班牙语；支持英→日、英→中文翻译</li><li><strong>噪音韧性</strong>：从干净到噪音仅 7.54% 性能下降</li><li><strong>许可证</strong>：Apache 2.0</li><li><strong>适用场景</strong>：企业级多语言转录+翻译</li></ul><h2 id="四、商业-API-对比"><a href="#四、商业-API-对比" class="headerlink" title="四、商业 API 对比"></a>四、商业 API 对比</h2><h3 id="1-Deepgram-Nova-3-Flux"><a href="#1-Deepgram-Nova-3-Flux" class="headerlink" title="1. Deepgram Nova-3 + Flux"></a>1. Deepgram Nova-3 + Flux</h3><ul><li><strong>WER</strong>：5.26%（批处理）</li><li><strong>延迟</strong>：流式 &lt;300ms</li><li><strong>Flux 特色</strong>：内置对话结束检测（EOT），中位数 &lt;300ms，节省 200-600ms 代理响应时间</li><li><strong>语种</strong>：Nova-3 支持 30+ 语言；Flux 支持 10 种语言+代码切换</li><li><strong>定价</strong>：流式 $0.0048-0.0078&#x2F;分钟；语音代理 API $0.075&#x2F;分钟</li><li><strong>适用场景</strong>：语音代理、呼叫中心、需要低延迟+高准确的场景</li></ul><h3 id="2-AssemblyAI-Universal-3-Pro"><a href="#2-AssemblyAI-Universal-3-Pro" class="headerlink" title="2. AssemblyAI Universal-3 Pro"></a>2. AssemblyAI Universal-3 Pro</h3><ul><li><strong>WER</strong>：5.6%</li><li><strong>特色</strong>：引入”语音语言模型”，支持自然语言关键词提示（最多 1,500 词）</li><li><strong>语种</strong>：U-3 Pro 支持 6 种语言+代码切换；U-2 支持 99 种语言</li><li><strong>定价</strong>：异步 $0.21&#x2F;小时；流式 $0.45&#x2F;小时</li><li><strong>适用场景</strong>：需要 NLU + 转录一体化的应用</li></ul><h3 id="3-OpenAI-GPT-4o-transcribe"><a href="#3-OpenAI-GPT-4o-transcribe" class="headerlink" title="3. OpenAI GPT-4o-transcribe"></a>3. OpenAI GPT-4o-transcribe</h3><ul><li><strong>WER</strong>：约 4.5%（社区实测最佳）</li><li><strong>特色</strong>：基于 GPT-4o 的转录能力，对技术术语、口音、噪音有出色表现</li><li><strong>语种</strong>：50+ 语言</li><li><strong>定价</strong>：$0.006&#x2F;分钟（$0.36&#x2F;小时）</li><li><strong>缺点</strong>：无原生实时流式（需单独使用 Realtime API），25MB 文件大小限制</li><li><strong>适用场景</strong>：综合精度要求最高的场景</li></ul><h3 id="4-GPT-Realtime-Whisper（2026-年-5-月发布）"><a href="#4-GPT-Realtime-Whisper（2026-年-5-月发布）" class="headerlink" title="4. GPT-Realtime-Whisper（2026 年 5 月发布）"></a>4. GPT-Realtime-Whisper（2026 年 5 月发布）</h3><ul><li><strong>定价</strong>：流式 $0.017&#x2F;分钟</li><li><strong>特色</strong>：OpenAI 首次将流式优化 STT 与批处理 Whisper 分离</li><li><strong>适用场景</strong>：需要 OpenAI 生态内实时转录</li></ul><h3 id="5-ElevenLabs-Scribe-v2-Realtime"><a href="#5-ElevenLabs-Scribe-v2-Realtime" class="headerlink" title="5. ElevenLabs Scribe v2 Realtime"></a>5. ElevenLabs Scribe v2 Realtime</h3><ul><li><strong>延迟</strong>：亚 150ms</li><li><strong>语种</strong>：90+ 语言</li><li><strong>特色</strong>：”负延迟”预测流式（在说话者说完之前就开始输出）</li><li><strong>定价</strong>：约 $0.70&#x2F;小时</li><li><strong>适用场景</strong>：对延迟极度敏感的实时应用</li></ul><h3 id="6-Microsoft-MAI-Transcribe-1（2026-年-4-月发布）"><a href="#6-Microsoft-MAI-Transcribe-1（2026-年-4-月发布）" class="headerlink" title="6. Microsoft MAI-Transcribe-1（2026 年 4 月发布）"></a>6. Microsoft MAI-Transcribe-1（2026 年 4 月发布）</h3><ul><li><strong>WER</strong>：3.8%（FLEURS 25 语言平均）</li><li><strong>特色</strong>：微软首个自研 STT 模型，击败 Whisper Large v3 在所有 25 种语言上</li><li><strong>GPU 成本</strong>：比竞品低约 50%</li><li><strong>定价</strong>：约 $0.50&#x2F;小时</li><li><strong>适用场景</strong>：Azure 生态用户，多语言高精度需求</li></ul><h3 id="7-Gladia-Solaria-1"><a href="#7-Gladia-Solaria-1" class="headerlink" title="7. Gladia Solaria-1"></a>7. Gladia Solaria-1</h3><ul><li><strong>WER</strong>：比竞品低 29%（Gladia 公开基准测试）</li><li><strong>语种</strong>：100+ 语言，包含 42 种其他 API 不支持的语言（孟加拉语、旁遮普语、他加禄语等）</li><li><strong>说话人分离</strong>：捆绑在基础价格中（pyannoteAI Precision-2）</li><li><strong>定价</strong>：异步 $0.20-0.61&#x2F;小时；实时 $0.25-0.75&#x2F;小时</li><li><strong>适用场景</strong>：多语言、嘈杂环境、多人对话转录</li></ul><h3 id="8-其他值得关注的选项"><a href="#8-其他值得关注的选项" class="headerlink" title="8. 其他值得关注的选项"></a>8. 其他值得关注的选项</h3><table><thead><tr><th>工具</th><th>特色</th><th>定价</th></tr></thead><tbody><tr><td><strong>Google Cloud Speech-to-Text (Chirp 3)</strong></td><td>100+ 语言，专业模型（医疗&#x2F;电话）</td><td>$0.006&#x2F;15秒起</td></tr><tr><td><strong>Amazon Transcribe</strong></td><td>AWS 生态集成，呼叫分析</td><td>$0.024&#x2F;分钟</td></tr><tr><td><strong>Speechmatics Ursa 2</strong></td><td>口音&#x2F;方言处理领先，代码切换比竞品好 35%</td><td>企业定价</td></tr><tr><td><strong>Krisp VIVA 2.0</strong></td><td>语音隔离层，噪音环境下 WER 降低 10-30%</td><td>按量计费</td></tr></tbody></table><h2 id="五、选型决策指南"><a href="#五、选型决策指南" class="headerlink" title="五、选型决策指南"></a>五、选型决策指南</h2><p><img src="/images/stt-selection-guide.png" alt="STT 工具选型决策树"></p><h3 id="场景-A：自托管-开源优先"><a href="#场景-A：自托管-开源优先" class="headerlink" title="场景 A：自托管 &#x2F; 开源优先"></a>场景 A：自托管 &#x2F; 开源优先</h3><ul><li><strong>精度第一</strong> → Canary Qwen 2.5B（英语）或 Whisper Large V3（多语言）</li><li><strong>速度第一</strong> → Whisper Large V3 Turbo 或 Distil-Whisper</li><li><strong>超低延迟</strong> → NVIDIA Parakeet TDT</li><li><strong>边缘部署</strong> → Moonshine（27M 参数，可在手机运行）</li></ul><h3 id="场景-B：商业-API-优先"><a href="#场景-B：商业-API-优先" class="headerlink" title="场景 B：商业 API 优先"></a>场景 B：商业 API 优先</h3><ul><li><strong>综合最佳</strong> → GPT-4o-transcribe（4.5% WER）</li><li><strong>性价比</strong> → Deepgram Nova-3（5.26% WER，$0.46&#x2F;小时）</li><li><strong>多语言深度</strong> → Gladia Solaria-1（100+ 语言，含小众语言）</li><li><strong>Azure 生态</strong> → Microsoft MAI-Transcribe-1</li></ul><h3 id="场景-C：实时语音代理"><a href="#场景-C：实时语音代理" class="headerlink" title="场景 C：实时语音代理"></a>场景 C：实时语音代理</h3><ul><li><strong>首选</strong> → Deepgram Flux（内置对话结束检测，&lt;300ms）</li><li><strong>备选</strong> → ElevenLabs Scribe v2（亚 150ms 预测流式）</li><li><strong>OpenAI 生态</strong> → GPT-Realtime-Whisper</li></ul><h2 id="六、2026-年值得关注的趋势"><a href="#六、2026-年值得关注的趋势" class="headerlink" title="六、2026 年值得关注的趋势"></a>六、2026 年值得关注的趋势</h2><ol><li><strong>对话式语音识别（Conversational Speech Recognition）</strong>：从单纯的”听写”转向理解对话上下文、处理打断和交叉对话</li><li><strong>LLM 增强转录</strong>：用大语言模型后处理转录结果，修正专业术语、统一格式、提取实体</li><li><strong>端侧部署</strong>：随着模型压缩技术进步，STT 正在从云端走向设备端（隐私、延迟、成本三重优势）</li><li><strong>多模态融合</strong>：STT + 视觉（唇读辅助）+ 上下文理解的融合方案正在兴起</li></ol><h2 id="七、总结"><a href="#七、总结" class="headerlink" title="七、总结"></a>七、总结</h2><p>2026 年的 STT 市场已经非常成熟，顶级模型在干净英语上的 WER 已接近人类水平。选择的关键不再是”哪个最准确”，而是”哪个最适合你的场景”：</p><ul><li><strong>精度为王</strong> → GPT-4o-transcribe 或 Canary Qwen 2.5B</li><li><strong>速度为王</strong> → Whisper Turbo 或 Parakeet TDT</li><li><strong>实时代理</strong> → Deepgram Flux 或 ElevenLabs Scribe v2</li><li><strong>多语言深度</strong> → Gladia Solaria-1 或 Whisper Large V3</li><li><strong>自托管省钱</strong> → Whisper 系列（Groq 部署每小时仅 $0.04）</li></ul><p>最重要的是：<strong>用你自己的生产音频做 A&#x2F;B 测试</strong>。厂商基准测试无法替代真实场景验证。</p><hr><p><em>数据来源：Coval.ai (2026.06), HuggingFace Open ASR Leaderboard, Deepgram, AssemblyAI, OpenAI, Microsoft, ElevenLabs, Gladia 官方发布。所有数据截至 2026 年 6 月，价格可能随时间变化。</em></p>]]>
    </content>
    <id>https://blog.deptrip.com/2026/06/26/stt-tools-comparison-2026/</id>
    <link href="https://blog.deptrip.com/2026/06/26/stt-tools-comparison-2026/"/>
    <published>2026-06-26T03:00:00.000Z</published>
    <summary>
      <![CDATA[<p><img src="/images/stt-comparison-overview.png" alt="STT 工具对比概览"></p>
<p>2026 年的语音转文字（STT）市场已经发生了翻天覆地的变化。从 OpenAI Whisper 的开源崛起，到 Deepgram、AssemblyAI 的商业 API 军备竞赛，再到 GPT-4o-transcribe 和微软 MAI-Transcribe-1 的入场——选择困难症已经成了开发者最头疼的问题之一。</p>
<p>这篇文章基于 Coval.ai、HuggingFace Open ASR Leaderboard、各厂商官方数据以及社区实测，对 2026 年主流 STT 工具进行全方位对比，帮你找到最适合的方案。</p>
<h2 id="一、市场格局速览"><a href="#一、市场格局速览" class="headerlink" title="一、市场格局速览"></a>一、市场格局速览</h2><p>全球 STT API 市场规模从 2024 年的 38 亿美元预计增长到 2030 年的 86 亿美元（CAGR 14.4%）。2026 年最显著的变化是：</p>]]>
    </summary>
    <title>AI 语音转文字（STT）工具深度对比（2026年版）</title>
    <updated>2026-07-28T14:35:47.264Z</updated>
  </entry>
  <entry>
    <author>
      <name>Golook</name>
    </author>
    <category term="Hermes 实战" scheme="https://blog.deptrip.com/categories/Hermes-%E5%AE%9E%E6%88%98/"/>
    <category term="AI-Agent" scheme="https://blog.deptrip.com/tags/AI-Agent/"/>
    <category term="Hermes" scheme="https://blog.deptrip.com/tags/Hermes/"/>
    <category term="Cron Job" scheme="https://blog.deptrip.com/tags/Cron-Job/"/>
    <category term="自动化" scheme="https://blog.deptrip.com/tags/%E8%87%AA%E5%8A%A8%E5%8C%96/"/>
    <category term="博客运维" scheme="https://blog.deptrip.com/tags/%E5%8D%9A%E5%AE%A2%E8%BF%90%E7%BB%B4/"/>
    <content>
      <![CDATA[<p><img src="/images/cron-job-workflow-overview.png" alt="Hermes Agent Cron Job 自动化工作流架构图"></p><p>如果你运营着一个技术博客，这篇文章就是为你写的。</p><p>传统的博客运营流程是：写文章 → 配图 → 检查格式 → 部署 → 推送通知。这套流程每周走一遍，看似简单，但每一轮都会消耗认知资源——你要构思选题、要手动配图、要记得执行部署命令。更关键的是，<strong>你很难保持固定的发布节奏</strong>，一旦忙起来断更，博客就慢慢变成了”年更”状态。</p><p>Hermes Agent 的 Cron Job 系统正是为了解决这个问题而设计的。它不是一个简单的定时脚本，而是一套完整的自动化工作流引擎：支持 Skill 感知的任务路由、工具集权限控制、多 Profile 分发，以及将交付结果推送到任意渠道。</p><p>本文基于 Golook 博客（本博客）的实战运营经验，深入拆解 Cron Job 的架构设计、配置方法和最佳实践。</p><span id="more"></span><h2 id="什么是-Hermes-Agent-Cron-Job？"><a href="#什么是-Hermes-Agent-Cron-Job？" class="headerlink" title="什么是 Hermes Agent Cron Job？"></a>什么是 Hermes Agent Cron Job？</h2><p>Cron Job 是 Hermes Agent 内置的定时任务系统。与传统 Linux cron 不同，Hermes 的 Cron Job 有四个核心特性：</p><ol><li><strong>Skill 感知调度</strong> — 每个 Job 可以绑定一个 Skill（如 <code>hexo-blog-management</code>），Hermes 在任务启动时自动加载对应的 Skill 指令集，无需你在 prompt 中重复描述</li><li><strong>Toolset 权限控制</strong> — 你可以精确配置任务能使用的工具集：<code>terminal</code>、<code>file</code>、<code>web</code>、<code>search</code>、<code>image_gen</code> 等。任务执行时的工具边界完全由配置决定</li><li><strong>多 Profile 分发</strong> — 支持将任务路由到不同 Hermes Profile（<code>default</code>、<code>config</code>、<code>no_agent</code>），实现任务隔离</li><li><strong>交付链完整</strong> — 任务完成后，结果自动投递到 Telegram &#x2F; 邮件 &#x2F; 其他渠道</li></ol><p>这四条特性加在一起，意味着 Cron Job 不是”定时跑脚本”，而是”定时启动一个全功能的 Hermes Agent 会话，配备完整的工具和知识，执行完后把结果送给你”。</p><h2 id="架构拆解：从触发到交付的五层链路"><a href="#架构拆解：从触发到交付的五层链路" class="headerlink" title="架构拆解：从触发到交付的五层链路"></a>架构拆解：从触发到交付的五层链路</h2><p>上方的架构图展示了 Cron Job 的完整执行链路，分五层：</p><h3 id="①-调度触发"><a href="#①-调度触发" class="headerlink" title="① 调度触发"></a>① 调度触发</h3><p>Cron Job 有三种触发方式：</p><ul><li><strong>定时器</strong>：标准的 Cron 表达式，如 <code>0 11 * * 5</code>（每周五 11:00）。这是主力模式，用于固定节奏的发布</li><li><strong>手动触发</strong>：通过命令 <code>cronjob action=run job_id=X</code> 立即执行一次，适合调试或补发</li><li><strong>事件驱动</strong>：RSS 更新检测、Webhook 回调等动态触发（扩展用途）</li></ul><h3 id="②-任务派发"><a href="#②-任务派发" class="headerlink" title="② 任务派发"></a>② 任务派发</h3><p>当 Job 被触发后，Job Router 做三件事：</p><ol><li><strong>Profile 匹配</strong> — 判断任务应该在哪个 Profile 下运行</li><li><strong>Skill 加载</strong> — 如果 Job 绑定了 Skill（如 <code>hexo-blog-management</code>），自动注入 Skill 的全部指令、规范、模板、陷阱说明</li><li><strong>Toolset 授权</strong> — 根据配置的 <code>enabled_toolsets</code> 开放工具边界，未授权的工具不可调用</li></ol><p>这一步决定了任务”能在什么环境中使用什么工具”。相比传统脚本（直接运行一个固定命令），这里多了一层动态调度：同一个 Job 的 prompt 可以根据 Skill 不同而产生完全不同的行为。</p><h3 id="③-执行引擎"><a href="#③-执行引擎" class="headerlink" title="③ 执行引擎"></a>③ 执行引擎</h3><p>执行阶段分为三个串联步骤：</p><ul><li><strong>内容采集</strong>：Web Search 调研选题、查阅资料、核实数据</li><li><strong>内容生成</strong>：AI 写作 + 配图生成（Matplotlib &#x2F; image_gen）</li><li><strong>格式加工</strong>：Frontmatter 写入、Markdown 格式化、图片路径嵌入</li></ul><p>这是一套标准的”输入 → 处理 → 输出”流水线。每次执行都会生成一篇结构完整、包含配图、格式规范的文章。</p><h3 id="④-交付部署"><a href="#④-交付部署" class="headerlink" title="④ 交付部署"></a>④ 交付部署</h3><p>文章写完后，进入交付环节：</p><ul><li><strong>Git Push → EdgeOne Pages</strong>：文章和图片提交到仓库，触发 EdgeOne Pages 的自动构建和部署</li><li><strong>Telegram 推送</strong>：文章上线后，自动推送摘要 + 链接</li><li><strong>邮件通知</strong>：作为可选渠道</li></ul><h3 id="⑤-质量验证"><a href="#⑤-质量验证" class="headerlink" title="⑤ 质量验证"></a>⑤ 质量验证</h3><p>交付后并不结束，而是进入验证阶段：</p><ul><li><strong>生成验证</strong>：<code>hexo generate</code> 确认无误</li><li><strong>空页检测</strong>：检查 <code>public/index.html</code> 是否为空（Hexo 常见的”主题加载失败”陷阱）</li><li><strong>Sitemap 检查</strong>：确认搜索引擎可发现新文章</li></ul><p>在验证链中，任何一步失败都会触发告警，而不是静默失败。</p><h2 id="实战配置：Golook-博客的发文任务"><a href="#实战配置：Golook-博客的发文任务" class="headerlink" title="实战配置：Golook 博客的发文任务"></a>实战配置：Golook 博客的发文任务</h2><p>以本博客的每周发文任务为例，完整的 Cron Job 配置如下：</p><figure class="highlight yaml"><table><tr><td class="gutter"><pre><span class="line">1</span><br><span class="line">2</span><br><span class="line">3</span><br><span class="line">4</span><br><span class="line">5</span><br><span class="line">6</span><br><span class="line">7</span><br><span class="line">8</span><br><span class="line">9</span><br><span class="line">10</span><br></pre></td><td class="code"><pre><span class="line"><span class="attr">name:</span> <span class="string">&quot;Golook 每周文章&quot;</span></span><br><span class="line"><span class="attr">schedule:</span> <span class="string">&quot;0 11 * * 5&quot;</span>           <span class="comment"># 每周五 11:00</span></span><br><span class="line"><span class="attr">skills:</span> [<span class="string">&quot;hexo-blog-management&quot;</span>] <span class="comment"># 自动加载博客管理 Skill</span></span><br><span class="line"><span class="attr">enabled_toolsets:</span></span><br><span class="line">  <span class="bullet">-</span> <span class="string">terminal</span>     <span class="comment"># hexo generate, git 操作</span></span><br><span class="line">  <span class="bullet">-</span> <span class="string">file</span>         <span class="comment"># 读写文章和图片</span></span><br><span class="line">  <span class="bullet">-</span> <span class="string">web</span>          <span class="comment"># 选题调研</span></span><br><span class="line">  <span class="bullet">-</span> <span class="string">search</span>       <span class="comment"># 资料搜索</span></span><br><span class="line">  <span class="bullet">-</span> <span class="string">image_gen</span>    <span class="comment"># 配图生成</span></span><br><span class="line"><span class="attr">deliver:</span> <span class="string">&quot;origin&quot;</span>  <span class="comment"># 交付到任务来源渠道</span></span><br></pre></td></tr></table></figure><p>几个值得注意的配置细节：</p><p><strong><code>skills</code> 参数的作用</strong>：当你绑定了 <code>hexo-blog-management</code> Skill，任务启动后 Hermes 会自动注入：</p><ul><li>博客仓库路径和分支信息</li><li>文章目录、Frontmatter 规范</li><li>配图生成要求和检查清单</li><li>部署流程和常见陷阱</li><li>EdgeOne Pages 的特殊注意事项</li></ul><p>这些信息写满了一个完整的文档。如果没有 Skill，你需要在 prompt 中全部手写一遍。Skill 相当于”工作记忆”，让每次执行都能站在上一次的知识积累上。</p><p><strong><code>enabled_toolsets</code> 的边界意义</strong>：博客发文任务不需要操控网络服务或发送外部消息（除了 Git Push 和 Telegram 推送），所以工具集只开放了文件操作和数据获取类的工具。这既是安全边界，也是专注边界——让任务不会跑偏去做不相关的事情。</p><p><strong>Prompt 必须自包含</strong>：由于 Cron Job 是无人值守执行的，prompt 必须是”自包含”的——不能假设有人交互。它需要明确写出：</p><ul><li>仓库路径和操作流程</li><li>文章规范和检查清单</li><li>遇到特定异常时的处理策略</li><li>部署步骤</li></ul><p>把 prompt 当成”给一个聪明但需要明确指示的助手指令”来写。</p><h2 id="任务生命周期管理"><a href="#任务生命周期管理" class="headerlink" title="任务生命周期管理"></a>任务生命周期管理</h2><p>Cron Job 的完整生命周期包括以下几个操作：</p><figure class="highlight bash"><table><tr><td class="gutter"><pre><span class="line">1</span><br><span class="line">2</span><br><span class="line">3</span><br><span class="line">4</span><br><span class="line">5</span><br><span class="line">6</span><br><span class="line">7</span><br><span class="line">8</span><br><span class="line">9</span><br><span class="line">10</span><br><span class="line">11</span><br><span class="line">12</span><br><span class="line">13</span><br><span class="line">14</span><br></pre></td><td class="code"><pre><span class="line"><span class="comment"># 创建任务</span></span><br><span class="line">cronjob action=create name=<span class="string">&quot;...&quot;</span> schedule=<span class="string">&quot;...&quot;</span> skills=[<span class="string">&quot;...&quot;</span>] ...</span><br><span class="line"></span><br><span class="line"><span class="comment"># 立即测试</span></span><br><span class="line">cronjob action=run job_id=X</span><br><span class="line"></span><br><span class="line"><span class="comment"># 查看状态</span></span><br><span class="line">cronjob action=list</span><br><span class="line"></span><br><span class="line"><span class="comment"># 修改频率或 prompt</span></span><br><span class="line">cronjob action=update job_id=X schedule=<span class="string">&quot;0 9 * * 1&quot;</span></span><br><span class="line"></span><br><span class="line"><span class="comment"># 删除</span></span><br><span class="line">cronjob action=delete job_id=X</span><br></pre></td></tr></table></figure><p>测试环节尤为重要。建议每创建一个新 Job 后，立即用 <code>action=run</code> 执行一次，观察输出是否符合预期，再放行到定时执行。避免出现”周五到点了才发现任务跑不通”的尴尬。</p><h2 id="选题轮换机制"><a href="#选题轮换机制" class="headerlink" title="选题轮换机制"></a>选题轮换机制</h2><p>自动化发文的一个常见问题是：<strong>内容会逐渐变得重复</strong>。</p><p>Golook 博客通过以下轮换策略来保持内容多样性：</p><table><thead><tr><th>轮次</th><th>选题方向</th><th>示例</th></tr></thead><tbody><tr><td>1</td><td>Hermes 实战经验</td><td>配置技巧、踩坑记录、自动化工作流</td></tr><tr><td>2</td><td>AI 工具对比评测</td><td>STT&#x2F;TTS、代码助手、模型排名</td></tr><tr><td>3</td><td>效率工作流</td><td>AI 工具组合拳、学习路径</td></tr><tr><td>4</td><td>技术深度分析</td><td>模型原理、架构解析</td></tr><tr><td>5</td><td>开发技巧</td><td>Prompt 工程、调试方法、工程实践</td></tr></tbody></table><p>每次执行时，任务会自动检查 <code>source/_posts/</code> 下的已有文章，避免选题重复。如果发现某个方向最近写过，就跳到下一个方向。</p><h2 id="几个容易踩的坑"><a href="#几个容易踩的坑" class="headerlink" title="几个容易踩的坑"></a>几个容易踩的坑</h2><h3 id="坑-1：EdgeOne-Pages-主题缺失"><a href="#坑-1：EdgeOne-Pages-主题缺失" class="headerlink" title="坑 1：EdgeOne Pages 主题缺失"></a>坑 1：EdgeOne Pages 主题缺失</h3><p>这是踩过最惨的坑。EdgeOne Pages 的构建环境是<strong>干净环境</strong>，不会运行 <code>npm install</code>。如果你在 Git 仓库中提交了不完整的 <code>themes/landscape/</code> 目录（只有部分子目录），Hexo 会优先使用本地主题而非 <code>node_modules</code> 中的完整主题，结果生成空页面。</p><p><strong>解决方法</strong>：</p><ul><li>确保仓库中的 <code>themes/</code> 目录完整</li><li>或者删除 <code>themes/</code> 目录，让 Hexo 使用 <code>node_modules</code> 中的版本</li></ul><h3 id="坑-2：配图中文字体乱码"><a href="#坑-2：配图中文字体乱码" class="headerlink" title="坑 2：配图中文字体乱码"></a>坑 2：配图中文字体乱码</h3><p>用 <code>image_gen</code> 工具生成中文配图时，服务端如果缺少中文字体，图片中的中文会显示为方框乱码。</p><p><strong>解决方法</strong>：使用 Python Matplotlib 生成配图，指定系统预装的中文字体：</p><figure class="highlight python"><table><tr><td class="gutter"><pre><span class="line">1</span><br><span class="line">2</span><br><span class="line">3</span><br></pre></td><td class="code"><pre><span class="line"><span class="keyword">import</span> matplotlib; matplotlib.use(<span class="string">&#x27;Agg&#x27;</span>)</span><br><span class="line"><span class="keyword">from</span> matplotlib.font_manager <span class="keyword">import</span> FontProperties</span><br><span class="line">font = FontProperties(fname=<span class="string">&#x27;/usr/share/fonts/opentype/noto/NotoSansCJK-Bold.ttc&#x27;</span>)</span><br></pre></td></tr></table></figure><h3 id="坑-3：文章中泄露内部路径"><a href="#坑-3：文章中泄露内部路径" class="headerlink" title="坑 3：文章中泄露内部路径"></a>坑 3：文章中泄露内部路径</h3><p>自动化任务的工作路径中可能包含内部路径（如 <code>/root/hexo-template-edgeone/</code> 或 Wiki 路径）。发布前务必检查文章中没有泄露这些不可公开的内部引用。</p><h2 id="总结"><a href="#总结" class="headerlink" title="总结"></a>总结</h2><p>Hermes Agent 的 Cron Job 系统将”写文章发博客”这个重复性劳动从手动操作变成了自动化运营。核心收获：</p><ol><li><strong>Skill 绑定</strong>让任务不需要重复描述同一套规范</li><li><strong>Toolset 控制</strong>让任务不会越界操作</li><li><strong>五层链路</strong>覆盖了从触发到验证的全流程</li><li><strong>轮换机制</strong>保证了内容的多样性</li></ol><p>这套思路不仅适用于博客运营，也适用于任何需要定时产出的场景——周报生成、数据汇总、项目状态检查、技术调研总结。核心模式是一样的：配置一个 Job，绑定相关 Skill，设定频率，然后让它自己跑。</p><p>如果你正在运营一个技术博客，或者有这样的想法但担心坚持不下去，自动化可能是让你的博客”活”起来的最有效方式。</p>]]>
    </content>
    <id>https://blog.deptrip.com/2026/06/19/hermes-cron-job-guide-2026/</id>
    <link href="https://blog.deptrip.com/2026/06/19/hermes-cron-job-guide-2026/"/>
    <published>2026-06-19T03:00:00.000Z</published>
    <summary>
      <![CDATA[<p><img src="/images/cron-job-workflow-overview.png" alt="Hermes Agent Cron Job 自动化工作流架构图"></p>
<p>如果你运营着一个技术博客，这篇文章就是为你写的。</p>
<p>传统的博客运营流程是：写文章 → 配图 → 检查格式 → 部署 → 推送通知。这套流程每周走一遍，看似简单，但每一轮都会消耗认知资源——你要构思选题、要手动配图、要记得执行部署命令。更关键的是，<strong>你很难保持固定的发布节奏</strong>，一旦忙起来断更，博客就慢慢变成了”年更”状态。</p>
<p>Hermes Agent 的 Cron Job 系统正是为了解决这个问题而设计的。它不是一个简单的定时脚本，而是一套完整的自动化工作流引擎：支持 Skill 感知的任务路由、工具集权限控制、多 Profile 分发，以及将交付结果推送到任意渠道。</p>
<p>本文基于 Golook 博客（本博客）的实战运营经验，深入拆解 Cron Job 的架构设计、配置方法和最佳实践。</p>]]>
    </summary>
    <title>Hermes Agent Cron Job 实战：零运维自动化博客运营指南</title>
    <updated>2026-07-28T14:35:47.263Z</updated>
  </entry>
  <entry>
    <author>
      <name>Golook</name>
    </author>
    <category term="Hermes 实战" scheme="https://blog.deptrip.com/categories/Hermes-%E5%AE%9E%E6%88%98/"/>
    <category term="AI-Agent" scheme="https://blog.deptrip.com/tags/AI-Agent/"/>
    <category term="Hermes" scheme="https://blog.deptrip.com/tags/Hermes/"/>
    <category term="自动化" scheme="https://blog.deptrip.com/tags/%E8%87%AA%E5%8A%A8%E5%8C%96/"/>
    <category term="Skill" scheme="https://blog.deptrip.com/tags/Skill/"/>
    <category term="实战教程" scheme="https://blog.deptrip.com/tags/%E5%AE%9E%E6%88%98%E6%95%99%E7%A8%8B/"/>
    <content>
      <![CDATA[<p><img src="/images/hermes-skill-write-guide-header.png" alt="Hermes Skill 编写实战概览：从需求到部署的完整流程"></p><blockquote><p>你已经知道 Hermes Skill 是什么了——现在来亲手写一个。</p></blockquote><p>之前的文章拆解了 Hermes Skill 的机制原理——它如何自动发现、执行、改进技能。但社区里缺少一个真正手把手的教程：<strong>怎么从零开始写一条自己的 Skill？</strong></p><p>这篇文章用三个真实场景的 Skill 案例，带你走完从需求分析到编写测试的完整流程。所有代码可直接复制使用。</p><h2 id="一、Skill-文件结构速览"><a href="#一、Skill-文件结构速览" class="headerlink" title="一、Skill 文件结构速览"></a>一、Skill 文件结构速览</h2><p>每条 Skill 是一个标准 Markdown 文件，存放在 <code>~/.hermes/skills/</code> 目录下。文件由两部分组成：</p><p><strong>前半段：YAML Frontmatter（元数据）</strong></p><figure class="highlight yaml"><table><tr><td class="gutter"><pre><span class="line">1</span><br><span class="line">2</span><br><span class="line">3</span><br><span class="line">4</span><br><span class="line">5</span><br><span class="line">6</span><br><span class="line">7</span><br><span class="line">8</span><br><span class="line">9</span><br><span class="line">10</span><br><span class="line">11</span><br></pre></td><td class="code"><pre><span class="line"><span class="meta">---</span></span><br><span class="line"><span class="attr">name:</span> <span class="string">my-first-skill</span></span><br><span class="line"><span class="attr">description:</span> <span class="string">一句话说清楚这个技能做什么</span></span><br><span class="line"><span class="attr">version:</span> <span class="number">1.0</span><span class="number">.0</span></span><br><span class="line"><span class="attr">platforms:</span> [<span class="string">linux</span>, <span class="string">macos</span>]</span><br><span class="line"><span class="attr">metadata:</span></span><br><span class="line">  <span class="attr">hermes:</span></span><br><span class="line">    <span class="attr">tags:</span> [<span class="string">python</span>, <span class="string">automation</span>]</span><br><span class="line">    <span class="attr">category:</span> <span class="string">devops</span></span><br><span class="line">    <span class="attr">requires_toolsets:</span> [<span class="string">terminal</span>]</span><br><span class="line"><span class="meta">---</span></span><br></pre></td></tr></table></figure><p><strong>后半段：Markdown 正文（行为指令）</strong></p><figure class="highlight markdown"><table><tr><td class="gutter"><pre><span class="line">1</span><br><span class="line">2</span><br><span class="line">3</span><br><span class="line">4</span><br><span class="line">5</span><br></pre></td><td class="code"><pre><span class="line">当 [触发条件] 时：</span><br><span class="line"></span><br><span class="line"><span class="bullet">1.</span> 第一步操作</span><br><span class="line"><span class="bullet">2.</span> 第二步操作</span><br><span class="line"><span class="bullet">3.</span> 输出格式要求</span><br></pre></td></tr></table></figure><p>关键元数据字段：</p><table><thead><tr><th>字段</th><th>必填</th><th>说明</th></tr></thead><tbody><tr><td><code>name</code></td><td>[是]</td><td>英文连字符命名，全局唯一。文件名必须等于 name.md</td></tr><tr><td><code>description</code></td><td>[是]</td><td>一句话摘要，Agent 靠它匹配任务。<strong>最重要的一行</strong></td></tr><tr><td><code>version</code></td><td>[是]</td><td>语义化版本号，每次修改递增</td></tr><tr><td><code>platforms</code></td><td>[可选]</td><td>限制运行平台（linux&#x2F;macos&#x2F;windows），留空&#x3D;全平台</td></tr><tr><td><code>tags</code></td><td>[可选]</td><td>分类标签，提高 Agent 检索匹配率</td></tr><tr><td><code>category</code></td><td>[可选]</td><td>归类（devops &#x2F; code &#x2F; web &#x2F; content 等）</td></tr><tr><td><code>requires_toolsets</code></td><td>[可选]</td><td>需要哪些工具集（terminal &#x2F; file &#x2F; web &#x2F; search 等）</td></tr></tbody></table><h2 id="二、实例一：Git-提交规范检查器"><a href="#二、实例一：Git-提交规范检查器" class="headerlink" title="二、实例一：Git 提交规范检查器"></a>二、实例一：Git 提交规范检查器</h2><h3 id="需求分析"><a href="#需求分析" class="headerlink" title="需求分析"></a>需求分析</h3><p>团队协作中最常见的问题之一：提交信息不规范。写一个 Skill，让 Agent 在用户准备提交时自动检查格式是否符合 <a href="https://www.conventionalcommits.org/">Conventional Commits</a> 规范。</p><h3 id="完整-Skill"><a href="#完整-Skill" class="headerlink" title="完整 Skill"></a>完整 Skill</h3><figure class="highlight yaml"><table><tr><td class="gutter"><pre><span class="line">1</span><br><span class="line">2</span><br><span class="line">3</span><br><span class="line">4</span><br><span class="line">5</span><br><span class="line">6</span><br><span class="line">7</span><br><span class="line">8</span><br><span class="line">9</span><br><span class="line">10</span><br><span class="line">11</span><br><span class="line">12</span><br><span class="line">13</span><br><span class="line">14</span><br><span class="line">15</span><br><span class="line">16</span><br><span class="line">17</span><br><span class="line">18</span><br><span class="line">19</span><br><span class="line">20</span><br></pre></td><td class="code"><pre><span class="line"><span class="meta">---</span></span><br><span class="line"><span class="attr">name:</span> <span class="string">conventional-commit-checker</span></span><br><span class="line"><span class="attr">description:</span> <span class="string">检查</span> <span class="string">Git</span> <span class="string">提交信息是否符合</span> <span class="string">Conventional</span> <span class="string">Commits</span> <span class="string">规范（type(scope):</span> <span class="string">description</span> <span class="string">格式）。当用户运行</span> <span class="string">git</span> <span class="string">commit</span> <span class="string">或要求检查提交信息时自动触发。</span></span><br><span class="line"><span class="attr">version:</span> <span class="number">1.0</span><span class="number">.0</span></span><br><span class="line"><span class="attr">platforms:</span> [<span class="string">linux</span>, <span class="string">macos</span>]</span><br><span class="line"><span class="attr">metadata:</span></span><br><span class="line">  <span class="attr">hermes:</span></span><br><span class="line">    <span class="attr">tags:</span> [<span class="string">git</span>, <span class="string">commit</span>, <span class="string">conventional-commits</span>, <span class="string">code-quality</span>]</span><br><span class="line">    <span class="attr">category:</span> <span class="string">devops</span></span><br><span class="line">    <span class="attr">requires_toolsets:</span> [<span class="string">terminal</span>]</span><br><span class="line"><span class="meta">---</span></span><br><span class="line"><span class="meta"></span></span><br><span class="line"><span class="string">当用户执行</span> <span class="string">`git</span> <span class="string">commit`</span> <span class="string">相关操作，或要求检查提交信息格式时：</span></span><br><span class="line"></span><br><span class="line"><span class="number">1</span><span class="string">.</span> <span class="string">获取当前暂存区状态：`git</span> <span class="string">diff</span> <span class="string">--cached</span> <span class="string">--stat`</span></span><br><span class="line"><span class="number">2</span><span class="string">.</span> <span class="string">用正则</span> <span class="string">`^(feat|fix|docs|style|refactor|perf|test|chore|ci)(\(.+\))?:</span> <span class="string">.&#123;1,&#125;$`</span> <span class="string">检查提交信息格式</span></span><br><span class="line"><span class="number">3</span><span class="string">.</span> <span class="string">如果不匹配，给出规范的格式示例</span></span><br><span class="line"><span class="number">4</span><span class="string">.</span> <span class="string">如果匹配，确认提交内容并执行</span></span><br><span class="line"></span><br><span class="line"><span class="string">示例输出：</span></span><br></pre></td></tr></table></figure><p>❌ 提交信息格式不规范<br>当前: “fix bug”<br>推荐: “fix(auth): 修复登录页面的 token 过期处理”</p><figure class="highlight plaintext"><table><tr><td class="gutter"><pre><span class="line">1</span><br><span class="line">2</span><br><span class="line">3</span><br><span class="line">4</span><br><span class="line">5</span><br><span class="line">6</span><br><span class="line">7</span><br><span class="line">8</span><br></pre></td><td class="code"><pre><span class="line"></span><br><span class="line">常用 type 说明：</span><br><span class="line">- feat: 新功能</span><br><span class="line">- fix: 修复 bug</span><br><span class="line">- docs: 文档变更</span><br><span class="line">- refactor: 代码重构</span><br><span class="line">- test: 测试相关</span><br><span class="line">- chore: 杂项/构建</span><br></pre></td></tr></table></figure><h3 id="编写要点"><a href="#编写要点" class="headerlink" title="编写要点"></a>编写要点</h3><ol><li><strong>description 要精准但不过窄</strong> — “检查 Git 提交信息” 太泛；”检查 Git 提交信息是否符合 Conventional Commits 规范” 刚刚好，包含了格式名称让 Agent 能理解</li><li><strong>触发条件要写在前</strong> — 让 Agent 第一眼就知道什么时候该用这个 Skill</li><li><strong>给出示例输出</strong> — Agent 看到具体的输出格式后执行更稳定</li><li><strong>补充背景知识</strong> — 把 type 的说明写上，减少 Agent 猜错的概率</li></ol><h2 id="三、实例二：Python-依赖安全审计"><a href="#三、实例二：Python-依赖安全审计" class="headerlink" title="三、实例二：Python 依赖安全审计"></a>三、实例二：Python 依赖安全审计</h2><h3 id="需求分析-1"><a href="#需求分析-1" class="headerlink" title="需求分析"></a>需求分析</h3><p>项目中引入的第三方依赖可能包含已知漏洞。手动检查麻烦，让 Agent 自动扫描并输出严重程度排序的结果。</p><h3 id="完整-Skill-1"><a href="#完整-Skill-1" class="headerlink" title="完整 Skill"></a>完整 Skill</h3><figure class="highlight yaml"><table><tr><td class="gutter"><pre><span class="line">1</span><br><span class="line">2</span><br><span class="line">3</span><br><span class="line">4</span><br><span class="line">5</span><br><span class="line">6</span><br><span class="line">7</span><br><span class="line">8</span><br><span class="line">9</span><br><span class="line">10</span><br><span class="line">11</span><br><span class="line">12</span><br><span class="line">13</span><br><span class="line">14</span><br><span class="line">15</span><br><span class="line">16</span><br><span class="line">17</span><br><span class="line">18</span><br><span class="line">19</span><br><span class="line">20</span><br><span class="line">21</span><br><span class="line">22</span><br><span class="line">23</span><br><span class="line">24</span><br><span class="line">25</span><br><span class="line">26</span><br><span class="line">27</span><br></pre></td><td class="code"><pre><span class="line"><span class="meta">---</span></span><br><span class="line"><span class="attr">name:</span> <span class="string">dependency-security-audit</span></span><br><span class="line"><span class="attr">description:</span> <span class="string">使用</span> <span class="string">pip-audit</span> <span class="string">扫描</span> <span class="string">Python</span> <span class="string">项目依赖中的已知安全漏洞，按严重程度排序输出。</span></span><br><span class="line"><span class="attr">version:</span> <span class="number">1.0</span><span class="number">.0</span></span><br><span class="line"><span class="attr">platforms:</span> [<span class="string">linux</span>, <span class="string">macos</span>]</span><br><span class="line"><span class="attr">metadata:</span></span><br><span class="line">  <span class="attr">hermes:</span></span><br><span class="line">    <span class="attr">tags:</span> [<span class="string">python</span>, <span class="string">security</span>, <span class="string">dependencies</span>, <span class="string">audit</span>]</span><br><span class="line">    <span class="attr">category:</span> <span class="string">devops</span></span><br><span class="line">    <span class="attr">requires_toolsets:</span> [<span class="string">terminal</span>]</span><br><span class="line"><span class="meta">---</span></span><br><span class="line"><span class="meta"></span></span><br><span class="line"><span class="string">当用户要求检查依赖安全或执行安全审计时：</span></span><br><span class="line"></span><br><span class="line"><span class="number">1</span><span class="string">.</span> <span class="string">检查</span> <span class="string">requirements.txt</span> <span class="string">或</span> <span class="string">pyproject.toml</span> <span class="string">是否存在</span></span><br><span class="line"><span class="number">2</span><span class="string">.</span> <span class="string">如果</span> <span class="string">pip-audit</span> <span class="string">未安装，提示用户安装：`pip</span> <span class="string">install</span> <span class="string">pip-audit`</span></span><br><span class="line"><span class="number">3</span><span class="string">.</span> <span class="string">运行</span> <span class="string">`pip-audit`</span> <span class="string">扫描已知漏洞</span></span><br><span class="line"><span class="number">4</span><span class="string">.</span> <span class="string">按严重程度排序输出（CRITICAL</span> <span class="string">&gt;</span> <span class="string">HIGH</span> <span class="string">&gt;</span> <span class="string">MEDIUM</span> <span class="string">&gt;</span> <span class="string">LOW）</span></span><br><span class="line"><span class="number">5</span><span class="string">.</span> <span class="string">对每个漏洞给出：</span></span><br><span class="line">   <span class="bullet">-</span> <span class="string">依赖名称和当前版本</span></span><br><span class="line">   <span class="bullet">-</span> <span class="string">CVE</span> <span class="string">编号</span></span><br><span class="line">   <span class="bullet">-</span> <span class="string">严重程度</span></span><br><span class="line">   <span class="bullet">-</span> <span class="string">建议升级到的安全版本</span></span><br><span class="line"></span><br><span class="line"><span class="string">注意：安装</span> <span class="string">pip-audit</span> <span class="string">前先询问用户确认。</span></span><br><span class="line"></span><br><span class="line"><span class="string">输出格式示例：</span></span><br></pre></td></tr></table></figure><p>🔍 依赖安全审计结果</p><p>[CRITICAL] requests 2.28.0 → 2.31.0<br>  CVE-2023-32681: 证书验证绕过<br>  <a href="https://nvd.nist.gov/vuln/detail/CVE-2023-32681">https://nvd.nist.gov/vuln/detail/CVE-2023-32681</a></p><p>[HIGH] urllib3 1.26.15 → 1.26.18<br>  CVE-2023-45803: HTTP 请求走私<br>  <a href="https://nvd.nist.gov/vuln/detail/CVE-2023-45803">https://nvd.nist.gov/vuln/detail/CVE-2023-45803</a></p><p>总计：2 个漏洞（1 CRITICAL, 1 HIGH）</p><figure class="highlight plaintext"><table><tr><td class="gutter"><pre><span class="line">1</span><br><span class="line">2</span><br><span class="line">3</span><br><span class="line">4</span><br><span class="line">5</span><br><span class="line">6</span><br><span class="line">7</span><br><span class="line">8</span><br><span class="line">9</span><br><span class="line">10</span><br><span class="line">11</span><br><span class="line">12</span><br><span class="line">13</span><br><span class="line">14</span><br><span class="line">15</span><br><span class="line">16</span><br><span class="line">17</span><br><span class="line">18</span><br><span class="line">19</span><br><span class="line">20</span><br><span class="line">21</span><br><span class="line">22</span><br><span class="line">23</span><br><span class="line">24</span><br><span class="line">25</span><br><span class="line">26</span><br><span class="line">27</span><br><span class="line">28</span><br><span class="line">29</span><br><span class="line">30</span><br><span class="line">31</span><br><span class="line">32</span><br><span class="line">33</span><br><span class="line">34</span><br><span class="line">35</span><br><span class="line">36</span><br><span class="line">37</span><br><span class="line">38</span><br><span class="line">39</span><br><span class="line">40</span><br><span class="line">41</span><br><span class="line">42</span><br><span class="line">43</span><br><span class="line">44</span><br><span class="line">45</span><br><span class="line">46</span><br><span class="line">47</span><br><span class="line">48</span><br><span class="line">49</span><br><span class="line">50</span><br><span class="line">51</span><br></pre></td><td class="code"><pre><span class="line">```</span><br><span class="line"></span><br><span class="line">### 防御式设计</span><br><span class="line"></span><br><span class="line">这个 Skill 展示了几个重要设计模式：</span><br><span class="line"></span><br><span class="line">- **工具检查** — 先确认 pip-audit 是否已安装，避免运行时报错</span><br><span class="line">- **安全边界** — 安装软件前主动询问用户确认，不擅自行动</span><br><span class="line">- **结构化输出** — 让结果一目了然，Agent 和人类都能快速理解</span><br><span class="line">- **附上参考链接** — 方便用户查阅漏洞详情</span><br><span class="line"></span><br><span class="line">## 四、实例三：博客文章发布质量检查</span><br><span class="line"></span><br><span class="line">### 需求分析</span><br><span class="line"></span><br><span class="line">这个 Skill 直接服务于 Golook 博客的日常运营。每次发布文章前自动检查：Frontmatter 是否完整、配图是否存在引用、链接是否可访问。</span><br><span class="line"></span><br><span class="line">### 完整 Skill</span><br><span class="line"></span><br><span class="line">```yaml</span><br><span class="line">---</span><br><span class="line">name: blog-post-quality-check</span><br><span class="line">description: 在发布 Hexo 博客文章前检查质量：Frontmatter 完整性、配图文件存在性、外部链接可访问性、字数统计。</span><br><span class="line">version: 1.0.0</span><br><span class="line">platforms: [linux, macos]</span><br><span class="line">metadata:</span><br><span class="line">  hermes:</span><br><span class="line">    tags: [hexo, blog, quality-check, publish]</span><br><span class="line">    category: content</span><br><span class="line">    requires_toolsets: [terminal, file, web]</span><br><span class="line">---</span><br><span class="line"></span><br><span class="line">当用户准备发布博客文章或要求质量检查时，对指定文件执行以下检查：</span><br><span class="line"></span><br><span class="line">1. **Frontmatter 检查**</span><br><span class="line">   - 确认存在 title, date, tags, categories 字段</span><br><span class="line">   - `date` 格式为 YYYY-MM-DD HH:mm:ss（24小时制）</span><br><span class="line">   - `tags` 为数组格式 `[tag1, tag2]`</span><br><span class="line">2. **配图检查**</span><br><span class="line">   - 提取文章中所有 `![...](...)` 图片引用</span><br><span class="line">   - 图片路径是否以 `/images/` 开头</span><br><span class="line">   - 检查 `source/images/` 下是否存在对应文件</span><br><span class="line">3. **字数统计**</span><br><span class="line">   - 去掉 frontmatter 和代码块后统计纯文字</span><br><span class="line">   - 不低于 500 字，否则建议补充</span><br><span class="line">4. **链接检查**</span><br><span class="line">   - 提取所有外部 http/https 链接</span><br><span class="line">   - 用 `curl -o /dev/null -s -w &quot;%&#123;http_code&#125;&quot;` 逐一检查</span><br><span class="line">   - 排除 localhost 和内部地址</span><br><span class="line"></span><br><span class="line">输出格式：</span><br></pre></td></tr></table></figure><p>📋 文章质量报告：source&#x2F;_posts&#x2F;文件名.md</p><p>✅ Frontmatter: 完整 (title, date, tags, categories)<br>✅ 配图: 2&#x2F;2 存在<br>⚠️ 字数: 483 字（建议 ≥500）<br>✅ 链接: 3&#x2F;3 可访问</p><p>建议：内容字数接近阈值，考虑补充 1-2 段。</p><figure class="highlight plaintext"><table><tr><td class="gutter"><pre><span class="line">1</span><br><span class="line">2</span><br><span class="line">3</span><br><span class="line">4</span><br><span class="line">5</span><br><span class="line">6</span><br><span class="line">7</span><br><span class="line">8</span><br><span class="line">9</span><br><span class="line">10</span><br><span class="line">11</span><br><span class="line">12</span><br><span class="line">13</span><br><span class="line">14</span><br><span class="line">15</span><br><span class="line">16</span><br><span class="line">17</span><br><span class="line">18</span><br><span class="line">19</span><br><span class="line">20</span><br><span class="line">21</span><br><span class="line">22</span><br><span class="line">23</span><br><span class="line">24</span><br><span class="line">25</span><br><span class="line">26</span><br><span class="line">27</span><br><span class="line">28</span><br><span class="line">29</span><br><span class="line">30</span><br><span class="line">31</span><br><span class="line">32</span><br><span class="line">33</span><br><span class="line">34</span><br><span class="line">35</span><br><span class="line">36</span><br><span class="line">37</span><br></pre></td><td class="code"><pre><span class="line">```</span><br><span class="line"></span><br><span class="line">这个 Skill 直接和 Hexo 博客的发布流程整合——每次 push 前跑一次检查，确保文章质量。</span><br><span class="line"></span><br><span class="line">## 五、Skill 编写原则总结</span><br><span class="line"></span><br><span class="line">通过上面三个案例，可以提炼出一套通用的 Skill 编写原则：</span><br><span class="line"></span><br><span class="line">### 原则一：description 是灵魂</span><br><span class="line"></span><br><span class="line">Agent 通过匹配 description 来调用 Skill。写得好不好直接决定 Skill 是否会被用到。</span><br><span class="line"></span><br><span class="line">| 写法 | 评价 | 原因 |</span><br><span class="line">|------|------|------|</span><br><span class="line">| &quot;检查提交信息&quot; | ❌ 太泛 | Agent 不知道什么时候触发 |</span><br><span class="line">| &quot;检查 Git 提交信息是否符合 Conventional Commits 规范&quot; | ✅ 精准 | 包含格式名称和触发场景 |</span><br><span class="line">| &quot;安全审计&quot; | ❌ 模糊 | 审计什么？怎么审？ |</span><br><span class="line">| &quot;使用 pip-audit 扫描 Python 依赖中的安全漏洞&quot; | ✅ 具体 | 工具+语言+目标都有了 |</span><br><span class="line"></span><br><span class="line">### 原则二：一个 Skill 做一件事</span><br><span class="line"></span><br><span class="line">职责单一的好处：</span><br><span class="line"></span><br><span class="line">- Agent 更容易匹配到正确的 Skill</span><br><span class="line">- 复用性更高（其他 Skill 可以通过名称引用它）</span><br><span class="line">- 测试和调试更简单</span><br><span class="line"></span><br><span class="line">### 原则三：写清楚触发条件</span><br><span class="line"></span><br><span class="line">在行为指令的第一句就写明触发条件。Agent 不需要在长文本里找&quot;什么时候用这个&quot;。</span><br><span class="line"></span><br><span class="line">```markdown</span><br><span class="line"># ✅ 好：开头就写触发条件</span><br><span class="line">当用户准备发布博客文章或要求质量检查时：</span><br><span class="line"></span><br><span class="line"># ❌ 差：隐含在中间</span><br><span class="line">执行以下操作。在博客发布场景中...</span><br></pre></td></tr></table></figure><h3 id="原则四：防御式编程"><a href="#原则四：防御式编程" class="headerlink" title="原则四：防御式编程"></a>原则四：防御式编程</h3><p>Skill 会被 Agent 在各种环境下调用。考虑边界情况：</p><ul><li><strong>工具不存在</strong> → 安装步骤或提示用户</li><li><strong>文件不存在</strong> → 优雅报错</li><li><strong>输入格式异常</strong> → 给出明确的错误信息</li></ul><h3 id="原则五：版本化管理"><a href="#原则五：版本化管理" class="headerlink" title="原则五：版本化管理"></a>原则五：版本化管理</h3><p>每次修改 Skill 后递增 <code>version</code>。这不仅是好习惯——Agent 的 Curator 机制会根据版本号判断哪些 Skill 需要更新。</p><h2 id="六、调试与验证"><a href="#六、调试与验证" class="headerlink" title="六、调试与验证"></a>六、调试与验证</h2><p>Skill 写完后如何确认它能正常工作？</p><h3 id="方法一：手动触发"><a href="#方法一：手动触发" class="headerlink" title="方法一：手动触发"></a>方法一：手动触发</h3><p>在 Hermes 会话中直接说能触发该 Skill 的话：</p><figure class="highlight plaintext"><table><tr><td class="gutter"><pre><span class="line">1</span><br><span class="line">2</span><br></pre></td><td class="code"><pre><span class="line">帮我检查一下当前 git 提交信息格式对不对</span><br><span class="line">帮我检查博客文章 xxx.md 的质量</span><br></pre></td></tr></table></figure><p>看看 Agent 是否调用了对应的 Skill。</p><h3 id="方法二：检查文件"><a href="#方法二：检查文件" class="headerlink" title="方法二：检查文件"></a>方法二：检查文件</h3><figure class="highlight bash"><table><tr><td class="gutter"><pre><span class="line">1</span><br><span class="line">2</span><br><span class="line">3</span><br><span class="line">4</span><br><span class="line">5</span><br></pre></td><td class="code"><pre><span class="line"><span class="comment"># 确认 Skill 文件在正确位置</span></span><br><span class="line"><span class="built_in">ls</span> -la ~/.hermes/skills/conventional-commit-checker.md</span><br><span class="line"></span><br><span class="line"><span class="comment"># 查看文件内容</span></span><br><span class="line"><span class="built_in">cat</span> ~/.hermes/skills/conventional-commit-checker.md</span><br></pre></td></tr></table></figure><h3 id="方法三：常见问题排查"><a href="#方法三：常见问题排查" class="headerlink" title="方法三：常见问题排查"></a>方法三：常见问题排查</h3><table><thead><tr><th>现象</th><th>可能原因</th><th>解决方案</th></tr></thead><tbody><tr><td>Agent 执行相关任务但没调 Skill</td><td>description 不精准</td><td>加入更多触发关键词，重写 description</td></tr><tr><td>Skill 被调用了但执行不对</td><td>prompt 太模糊</td><td>把指令拆成具体步骤，加示例输出</td></tr><tr><td>运行时报错说工具找不到</td><td>缺少 requires_toolsets</td><td>在 metadata 中声明需要的工具集</td></tr><tr><td>Agent 反复问同样的问题</td><td>Skill 没覆盖边界情况</td><td>增加防御式逻辑（文件不存在、工具未安装等）</td></tr><tr><td>技能过时了还在用</td><td>版本没更新</td><td>修改后递增 version 字段</td></tr></tbody></table><h2 id="七、总结"><a href="#七、总结" class="headerlink" title="七、总结"></a>七、总结</h2><p>回到最初的问题：怎么从零写一条 Hermes Skill？</p><p><strong>三步走</strong>：</p><ol><li><strong>分析需求</strong> — 确定触发条件、操作步骤、输出格式</li><li><strong>编写文件</strong> — YAML 元数据（重点是 description） + Markdown 行为指令（重点是触发条件和步骤化操作）</li><li><strong>测试验证</strong> — 用真实场景触发，观察 Agent 是否按预期执行</li></ol><p>三条 Skill 模板都可在你自己的 Hermes 实例上直接使用：</p><table><thead><tr><th>Skill</th><th>文件</th><th>用途</th></tr></thead><tbody><tr><td>conventional-commit-checker</td><td><code>~/.hermes/skills/conventional-commit-checker.md</code></td><td>Git 提交规范检查</td></tr><tr><td>dependency-security-audit</td><td><code>~/.hermes/skills/dependency-security-audit.md</code></td><td>Python 依赖安全扫描</td></tr><tr><td>blog-post-quality-check</td><td><code>~/.hermes/skills/blog-post-quality-check.md</code></td><td>博客文章质量自检</td></tr></tbody></table><p>Skill 系统的真正价值不在于功能多复杂，而在于：<strong>写一次、跑无数次、Agent 自己会记得用。</strong></p><hr><p><em>本文基于 Hermes Agent 实际使用经验编写，Skill 文件示例均经过验证可直接使用。</em></p>]]>
    </content>
    <id>https://blog.deptrip.com/2026/06/12/hermes-skill-hands-on-guide/</id>
    <link href="https://blog.deptrip.com/2026/06/12/hermes-skill-hands-on-guide/"/>
    <published>2026-06-12T15:00:00.000Z</published>
    <summary>
      <![CDATA[<p><img src="/images/hermes-skill-write-guide-header.png" alt="Hermes Skill 编写实战概览：从需求到部署的完整流程"></p>
<blockquote>
<p>你已经知道 Hermes Skill 是什么了——现在来亲手写一个。</p>
</blockquote>
<p>之前的文章拆解了 Hermes Skill 的机制原理——它如何自动发现、执行、改进技能。但社区里缺少一个真正手把手的教程：<strong>怎么从零开始写一条自己的 Skill？</strong></p>
<p>这篇文章用三个真实场景的 Skill 案例，带你走完从需求分析到编写测试的完整流程。所有代码可直接复制使用。</p>
<h2 id="一、Skill-文件结构速览"><a href="#一、Skill-文件结构速览" class="headerlink" title="一、Skill 文件结构速览"></a>一、Skill 文件结构速览</h2>]]>
    </summary>
    <title>Hermes Skill 手把手实战：从零编写可复用的 AI Agent 工作流</title>
    <updated>2026-07-28T14:35:47.263Z</updated>
  </entry>
  <entry>
    <author>
      <name>Golook</name>
    </author>
    <category term="技术实践" scheme="https://blog.deptrip.com/categories/%E6%8A%80%E6%9C%AF%E5%AE%9E%E8%B7%B5/"/>
    <category term="Hermes" scheme="https://blog.deptrip.com/tags/Hermes/"/>
    <category term="context-compression" scheme="https://blog.deptrip.com/tags/context-compression/"/>
    <category term="plugin" scheme="https://blog.deptrip.com/tags/plugin/"/>
    <category term="devlog" scheme="https://blog.deptrip.com/tags/devlog/"/>
    <category term="token-savings" scheme="https://blog.deptrip.com/tags/token-savings/"/>
    <content>
      <![CDATA[<p><img src="/images/context-compressor-arch.png" alt="上下文压缩插件架构概览"></p><blockquote><p>从零到一开发一款 Hermes Agent 插件，实现自动化的 context 压缩 + CCR 可逆存储。</p></blockquote><h2 id="一、背景：为什么需要上下文压缩"><a href="#一、背景：为什么需要上下文压缩" class="headerlink" title="一、背景：为什么需要上下文压缩"></a>一、背景：为什么需要上下文压缩</h2><p>在使用 Hermes Agent 的过程中，一个反复出现的问题是——<strong>工具返回的大 JSON 烧了太多 token</strong>。</p><p>典型的场景：</p><ul><li><code>web_search</code> 返回 50-100 条结果 → 几千甚至上万字符</li><li><code>search_files</code> 一次 grep 匹配上百条 → 大量重复文本</li><li><code>skills_list</code> 返回所有 skill 详情 → 信息密度极低</li></ul><p>按 1 token ≈ 4 chars 估算，一次大输出就能吃掉 1500-3000 tokens。对话几轮下来，上下文窗口里充斥着冗余数据，钱花了、信息没多。</p><h3 id="V1：手动压缩"><a href="#V1：手动压缩" class="headerlink" title="V1：手动压缩"></a>V1：手动压缩</h3><p>最初的方案是写一个 <code>compress_output.py</code> 脚本 + shell alias <code>co</code>，每次看到大输出就手动：</p><figure class="highlight plaintext"><table><tr><td class="gutter"><pre><span class="line">1</span><br></pre></td><td class="code"><pre><span class="line">echo &#x27;&#123;大JSON&#125;&#x27; | python3 compress_output.py</span><br></pre></td></tr></table></figure><p>效果不错，但<strong>太依赖主动性</strong>——经常忘了压缩，或者到下一轮 dialog 才意识到。</p><h3 id="V2-构想：Headroom-Proxy"><a href="#V2-构想：Headroom-Proxy" class="headerlink" title="V2 构想：Headroom Proxy"></a>V2 构想：Headroom Proxy</h3><p>接下来调研了 <a href="https://github.com/michaelnyu/headroom">Headroom</a>（一个输入压缩中间件）。Headroom 能做成透明 HTTP 代理，架在 API 调用路径上自动压缩，还带 KV Cache 对齐（Conformer）。</p><p>想法很美好，但引入一个新 HTTP 层意味着：</p><ul><li>多一层网络依赖</li><li>和高可用 gateway 串联 debug 复杂度高</li><li>模型 provider 路径多一层代理</li></ul><p>最终决定：<strong>不用 Headroom，直接在 Hermes Agent 的插件机制上实现</strong>。</p><h2 id="二、架构设计"><a href="#二、架构设计" class="headerlink" title="二、架构设计"></a>二、架构设计</h2><p>Hermes Agent 支持用 <code>transform_tool_result</code> hook 拦截工具输出，在结果进入 LLM 之前做处理。这是天然的压缩切入面。</p><h3 id="整体结构"><a href="#整体结构" class="headerlink" title="整体结构"></a>整体结构</h3><figure class="highlight plaintext"><table><tr><td class="gutter"><pre><span class="line">1</span><br><span class="line">2</span><br><span class="line">3</span><br><span class="line">4</span><br><span class="line">5</span><br><span class="line">6</span><br><span class="line">7</span><br><span class="line">8</span><br><span class="line">9</span><br><span class="line">10</span><br><span class="line">11</span><br></pre></td><td class="code"><pre><span class="line">工具返回大 JSON</span><br><span class="line">    ↓</span><br><span class="line">transform_tool_result hook 触发</span><br><span class="line">    ↓</span><br><span class="line">context-compressor 插件拦截</span><br><span class="line">    ├── 不符合条件? → 原样透传 (fail-open)</span><br><span class="line">    └── 符合条件? → 调用 compress_output.py</span><br><span class="line">                        ├── 保存原始到 CCR (~/.hermes/ccr/)</span><br><span class="line">                        └── 返回压缩结果</span><br><span class="line">    ↓</span><br><span class="line">LLM 收到精简版 + CCR 可逆标记</span><br></pre></td></tr></table></figure><h3 id="三层防御"><a href="#三层防御" class="headerlink" title="三层防御"></a>三层防御</h3><ol><li>**<code>_should_compress()</code>**：判断是否值得压缩<ul><li>跳过指定工具（vision、browser_vision、TTS 等）</li><li>输入 &lt; 1500 chars → 不压缩</li><li>不是 JSON 大数组（&lt;&#x3D; 20 条）→ 不压缩</li></ul></li><li>**<code>_has_already_compressed()</code>**：检查是否已被压缩过，避免重复压缩</li><li>**<code>_compress_result()</code>**：实际压缩 + 5% 最低收益门槛<ul><li>子进程调用 <code>compress_output.py</code></li><li>30 秒超时保护</li><li>压缩后节省 &lt; 5% → 放弃，原样透传</li></ul></li></ol><h3 id="Fail-Open-原则"><a href="#Fail-Open-原则" class="headerlink" title="Fail-Open 原则"></a>Fail-Open 原则</h3><p><strong>这是设计上最重要的决策</strong>：插件任何环节出问题都不会影响 Hermes 运行。</p><table><thead><tr><th>异常场景</th><th>行为</th></tr></thead><tbody><tr><td>Python 运行时异常</td><td>写一行 debug log → 原数据透传</td></tr><tr><td>subprocess 超时 (30s)</td><td>原数据透传</td></tr><tr><td>压缩脚本不存在</td><td>原数据透传</td></tr><tr><td>非 JSON 输入</td><td>原数据透传</td></tr><tr><td>数据太小</td><td>原数据透传</td></tr><tr><td>已被压缩过</td><td>跳过，不重复压缩</td></tr></tbody></table><h2 id="三、CCR-可逆压缩机制"><a href="#三、CCR-可逆压缩机制" class="headerlink" title="三、CCR 可逆压缩机制"></a>三、CCR 可逆压缩机制</h2><p>CCR（Content Compression with Retrieval）是本方案的关键创新：</p><ul><li><strong>压缩前</strong>，<code>compress_output.py</code> 自动将原始数据保存到 <code>~/.hermes/ccr/&lt;uuid&gt;.json</code></li><li><strong>压缩后</strong>，LLM 收到的结果末尾追加 <code>_ccr_note</code> 字段：<code>@retrieve &lt;uuid&gt;</code></li><li><strong>需要还原时</strong>，LLM 说 <code>@retrieve &lt;uuid&gt;</code> 即可取回完整数据</li><li><strong>自动清理</strong>：超过 7 天的 CCR 缓存自动清除</li></ul><p>这个机制解决了压缩的最大痛点——<strong>信息无损</strong>。LLM 可以安全地丢弃冗余数据，但需要时能随时恢复。</p><h2 id="四、压缩算法"><a href="#四、压缩算法" class="headerlink" title="四、压缩算法"></a>四、压缩算法</h2><p><code>compress_output.py</code> 的压缩策略是多重准则的组合：</p><ol><li><strong>错误优先</strong> — 包含 error&#x2F;exception&#x2F;failed&#x2F;critical&#x2F;fatal 等关键字的条目 <strong>100% 保留</strong></li><li><strong>异常值检测</strong> — 数值字段超过 2σ 的条目保留（IQR 方法）</li><li><strong>头部代表性</strong> — 前 30% 的条目保留（展示数据 schema）</li><li><strong>尾部时效性</strong> — 后 15% 的条目保留（展示最新&#x2F;最近结果）</li><li><strong>多样性择优</strong> — 剩余预算按字段长度、信息量排序择优</li></ol><p>默认压缩上限 20 条，既能保留足够信息，又能大幅减负。</p><h2 id="五、实际效果"><a href="#五、实际效果" class="headerlink" title="五、实际效果"></a>五、实际效果</h2><p>插件启用后的对话中，触发了 <strong>2 次压缩尝试</strong>，真实数据如下：</p><table><thead><tr><th>工具</th><th>原始</th><th>压缩后</th><th>节省</th><th>压缩率</th><th>结果</th></tr></thead><tbody><tr><td><code>search_files</code> (29条)</td><td>5,038 chars (~1,259 tokens)</td><td>4,504 chars (~1,126 tokens)</td><td><strong>534 chars (~133 tokens)</strong></td><td><strong>11%</strong></td><td>✅ 成功</td></tr><tr><td><code>skills_list</code> (22个skill)</td><td>3,961 chars (~990 tokens)</td><td>—</td><td>&lt;5%</td><td>—</td><td>⚠️ 原样透传</td></tr></tbody></table><p><strong>净节省：~133 tokens（1 次有效压缩）</strong></p><h3 id="为什么看起来少？"><a href="#为什么看起来少？" class="headerlink" title="为什么看起来少？"></a>为什么看起来少？</h3><ul><li><strong>插件启用时间短</strong>：当天才装上，只跑了几轮对话</li><li><strong>对话类型决定</strong>：日常聊天中大部分工具输出小于阈值</li><li><strong>阈值设计偏保守</strong>：1500 chars + &gt;20 数组 + &gt;5% 压缩率三者同满足才生效</li></ul><p><strong>但真实场景的收益远不止这些</strong>：</p><table><thead><tr><th>场景</th><th>预期节省</th></tr></thead><tbody><tr><td>大量 web_search（50-100条）</td><td>60-80%</td></tr><tr><td>大文件 grep 结果</td><td>50-70%</td></tr><tr><td>cron 任务批量输出</td><td>40-60%</td></tr><tr><td>多 agent 编排中间结果</td><td>30-50%</td></tr></tbody></table><p>日常对话只是开胃菜，真正的价值在数据密集型场景。</p><h2 id="六、安装与配置"><a href="#六、安装与配置" class="headerlink" title="六、安装与配置"></a>六、安装与配置</h2><figure class="highlight bash"><table><tr><td class="gutter"><pre><span class="line">1</span><br><span class="line">2</span><br><span class="line">3</span><br><span class="line">4</span><br><span class="line">5</span><br></pre></td><td class="code"><pre><span class="line"><span class="comment"># 一行安装 + 启用</span></span><br><span class="line">hermes plugins install yunzhongying2003/hermes-plugin-context-compressor --<span class="built_in">enable</span></span><br><span class="line"></span><br><span class="line"><span class="comment"># 重启网关</span></span><br><span class="line">hermes gateway restart</span><br></pre></td></tr></table></figure><h2 id="七、未来方向"><a href="#七、未来方向" class="headerlink" title="七、未来方向"></a>七、未来方向</h2><ul><li><strong>调试模式</strong>：在插件日志中加入压缩前&#x2F;后 Token 计数，便于评估 ROI</li><li><strong>自适应阈值</strong>：根据近期对话 Token 消耗自动调整压缩门槛</li><li><strong>插件配置化</strong>：支持通过 plugin.yaml 配置压缩阈值、保留条数等参数</li><li><strong>多模型适配</strong>：针对不同模型（DeepSeek、Claude、GPT）做差异化的压缩策略</li></ul><h2 id="八、总结"><a href="#八、总结" class="headerlink" title="八、总结"></a>八、总结</h2><ul><li>从 V1 手动压缩 → V2 Headroom 调研 → 最终插件方案，<strong>走了三条路才找到最优解</strong></li><li>核心设计原则：<strong>fail-open</strong> 确保零风险；<strong>CCR 可逆</strong> 确保信息无损</li><li>插件基于 Hermes 的 <code>transform_tool_result</code> hook，零侵入、热插拔</li><li>日常收益不大，<strong>数据密集型场景才是真正战场</strong></li><li>纯 Python 标准库实现，零外部依赖</li></ul>]]>
    </content>
    <id>https://blog.deptrip.com/2026/06/08/context-compressor-plugin-devlog/</id>
    <link href="https://blog.deptrip.com/2026/06/08/context-compressor-plugin-devlog/"/>
    <published>2026-06-08T15:00:00.000Z</published>
    <summary>
      <![CDATA[<p><img src="/images/context-compressor-arch.png" alt="上下文压缩插件架构概览"></p>
<blockquote>
<p>从零到一开发一款 Hermes Agent 插件，实现自动化的 context 压缩 + CCR 可逆存储。</p>
</blockquote>
<h2 id="一、背景：为什么需要上下文压缩"><a href="#一、背景：为什么需要上下文压缩" class="headerlink" title="一、背景：为什么需要上下文压缩"></a>一、背景：为什么需要上下文压缩</h2><p>在使用 Hermes Agent 的过程中，一个反复出现的问题是——<strong>工具返回的大 JSON 烧了太多 token</strong>。</p>
<p>典型的场景：</p>]]>
    </summary>
    <title>Hermes Agent 上下文压缩插件开发全记录</title>
    <updated>2026-07-28T14:35:47.263Z</updated>
  </entry>
  <entry>
    <author>
      <name>Golook</name>
    </author>
    <category term="AI Agent" scheme="https://blog.deptrip.com/categories/AI-Agent/"/>
    <category term="hermes-agent" scheme="https://blog.deptrip.com/tags/hermes-agent/"/>
    <category term="NousResearch" scheme="https://blog.deptrip.com/tags/NousResearch/"/>
    <category term="Hermes-Desktop" scheme="https://blog.deptrip.com/tags/Hermes-Desktop/"/>
    <content>
      <![CDATA[<blockquote><p>NousResearch 刚刚官宣了 Hermes Desktop 的公开预览——Hermes Agent 的桌面原生版本。这是 Hermes 生态的重要里程碑，首次在 Jensen Huang 的 GTC 主题演讲中亮相，现在所有人都能下载体验。</p></blockquote><span id="more"></span><h2 id="官方公告"><a href="#官方公告" class="headerlink" title="官方公告"></a>官方公告</h2><blockquote><p><strong>原文：</strong> NousResearch @NousResearch · X&#x2F;Twitter<br><strong>数据：</strong> 1,151 回复 · 2,026 转推 · 12,212 喜欢 · 556 万浏览（热度极高）</p></blockquote><p><strong>“The next evolution of Hermes Agent is here! Introducing Hermes Desktop: everything you love about Hermes, now native on your machine. First demoed in Jensen’s GTC keynote, it’s now in public preview.”</strong></p><p>翻译：</p><blockquote><p>Hermes Agent 的下一个进化版本来了！介绍 Hermes Desktop：你喜爱的所有 Hermes 功能，现在原生运行在你的桌面。</p><p>首次在 Jensen 的 GTC 主题演讲中演示，现在进入公开预览。</p></blockquote><p>下载地址：<a href="https://hermes-agent.nousresearch.com/">https://hermes-agent.nousresearch.com</a></p><hr><h2 id="一句话理解"><a href="#一句话理解" class="headerlink" title="一句话理解"></a>一句话理解</h2><p>Hermes Desktop &#x3D; 把原本在终端&#x2F;CLI 里跑的 Agent，变成了 Mac&#x2F;Windows&#x2F;Linux 原生桌面应用。你不需要折腾命令行、环境变量、Python 版本——装好就能用。</p><hr><h2 id="支持平台"><a href="#支持平台" class="headerlink" title="支持平台"></a>支持平台</h2><table><thead><tr><th align="left">平台</th><th align="left">支持情况</th></tr></thead><tbody><tr><td align="left">macOS</td><td align="left">✅ Intel + Apple Silicon</td></tr><tr><td align="left">Windows</td><td align="left">✅ 安装包</td></tr><tr><td align="left">Linux</td><td align="left">✅ AppImage &#x2F; 包管理器</td></tr></tbody></table><p>根据评论区反馈，Windows 和 macOS 的用户体验比较顺畅，Linux 的依赖问题尚在优化中。</p><hr><h2 id="已知问题和社区反馈"><a href="#已知问题和社区反馈" class="headerlink" title="已知问题和社区反馈"></a>已知问题和社区反馈</h2><p>帖子的评论区域有不少实际体验反馈，这里整理关键信息：</p><h3 id="🔴-本地-Ollama-连接问题"><a href="#🔴-本地-Ollama-连接问题" class="headerlink" title="🔴 本地 Ollama 连接问题"></a>🔴 本地 Ollama 连接问题</h3><blockquote><p><strong>Predator Eyes @PredatorEyes9k1：</strong> “无法连接到本地的 Ollama”<br><strong>NousResearch 回复：</strong> “很快就会修复，但目前你可以在命令行中运行 <code>hermes model</code> 来切换模型”</p></blockquote><p>如果你在桌面版上连接本地的 Ollama 失败，临时方案是：</p><figure class="highlight bash"><table><tr><td class="gutter"><pre><span class="line">1</span><br></pre></td><td class="code"><pre><span class="line">hermes model</span><br></pre></td></tr></table></figure><p>选择你想要的模型后，桌面版应该就能正常调用了。</p><h3 id="🟡-OpenClaw-迁移"><a href="#🟡-OpenClaw-迁移" class="headerlink" title="🟡 OpenClaw 迁移"></a>🟡 OpenClaw 迁移</h3><blockquote><p><strong>社区反馈：</strong> Hermes Desktop 支持从 OpenClaw 直接迁移配置<br>这意味着之前用 OpenClaw 的用户可以导出配置和 Skills，导入到 Desktop 中使用</p></blockquote><h3 id="🟢-远程运行问题"><a href="#🟢-远程运行问题" class="headerlink" title="🟢 远程运行问题"></a>🟢 远程运行问题</h3><p>有用户询问 desktop app 能否连接远程 VPS 运行，官方的桌面版设计是本地客户端 + 远程 Agent 的混合模式——桌面版负责 UI 和交互，Agent 可以在远端执行。</p><hr><h2 id="桌面版的特性"><a href="#桌面版的特性" class="headerlink" title="桌面版的特性"></a>桌面版的特性</h2><p>根据 Hermes 官方站点和帖子的信息，Desktop 版带来几个关键变化：</p><ol><li><strong>原生 GUI 界面</strong> — 替代纯 CLI 操作，降低使用门槛</li><li><strong>可视化配置</strong> — 模型选择、工具管理、Skill 管理全部图形化</li><li><strong>内置浏览器</strong> — 桌面版集成了浏览器工具，Agent 可以像人一样操作网页</li><li><strong>语音输入</strong> — 直接语音与 Agent 对话</li><li><strong>一键更新</strong> — 自动检测并安装新版</li></ol><p>更重要的是，Desktop 版<strong>保留了 Hermes 的核心能力</strong>：Memory 系统、Skill 机制、Sub Agent 编排——这些在桌面版上一样不少。</p><hr><h2 id="与-CLI-版的关系"><a href="#与-CLI-版的关系" class="headerlink" title="与 CLI 版的关系"></a>与 CLI 版的关系</h2><p>Desktop 版不是取代 CLI，而是补充。两者的关系：</p><table><thead><tr><th align="left">场景</th><th align="left">推荐使用</th></tr></thead><tbody><tr><td align="left">日常对话、快速任务</td><td align="left">Desktop（图形界面更直观）</td></tr><tr><td align="left">自动化脚本、CI&#x2F;CD</td><td align="left">CLI（无头环境）</td></tr><tr><td align="left">远程服务器</td><td align="left">CLI + SSH</td></tr><tr><td align="left">学习上手</td><td align="left">Desktop（门槛最低）</td></tr><tr><td align="left">深度开发</td><td align="left">CLI（配置更细粒度）</td></tr></tbody></table><p>实际上 Desktop 版底层调用的还是 Hermes Agent 引擎，<code>hermes</code> CLI 命令在后台仍然可用。</p><hr><h2 id="我该不该升级？"><a href="#我该不该升级？" class="headerlink" title="我该不该升级？"></a>我该不该升级？</h2><ul><li><strong>如果你是 Hermes 新手</strong> → 直接下 Desktop 版，省去配置环境的痛苦</li><li><strong>如果你是 CLI 老用户</strong> → Desktop 版可以当做一个辅助 UI 来用，Skills、记忆等配置会自动同步</li><li><strong>如果你没有图形界面（VPS、服务器）</strong> → CLI 版仍然是最佳选择</li></ul>]]>
    </content>
    <id>https://blog.deptrip.com/2026/06/05/hermes-desktop-public-preview/</id>
    <link href="https://blog.deptrip.com/2026/06/05/hermes-desktop-public-preview/"/>
    <published>2026-06-05T04:00:00.000Z</published>
    <summary>
      <![CDATA[<blockquote>
<p>NousResearch 刚刚官宣了 Hermes Desktop 的公开预览——Hermes Agent 的桌面原生版本。这是 Hermes 生态的重要里程碑，首次在 Jensen Huang 的 GTC 主题演讲中亮相，现在所有人都能下载体验。</p>
</blockquote>]]>
    </summary>
    <title>Hermes Desktop 官方发布：从 Jensen GTC 主题演讲到公开预览</title>
    <updated>2026-07-28T14:35:47.263Z</updated>
  </entry>
  <entry>
    <author>
      <name>Golook</name>
    </author>
    <category term="AI工具评测" scheme="https://blog.deptrip.com/categories/AI%E5%B7%A5%E5%85%B7%E8%AF%84%E6%B5%8B/"/>
    <category term="开发技巧" scheme="https://blog.deptrip.com/tags/%E5%BC%80%E5%8F%91%E6%8A%80%E5%B7%A7/"/>
    <category term="代码助手" scheme="https://blog.deptrip.com/tags/%E4%BB%A3%E7%A0%81%E5%8A%A9%E6%89%8B/"/>
    <category term="Cursor" scheme="https://blog.deptrip.com/tags/Cursor/"/>
    <category term="Claude Code" scheme="https://blog.deptrip.com/tags/Claude-Code/"/>
    <category term="AI编程" scheme="https://blog.deptrip.com/tags/AI%E7%BC%96%E7%A8%8B/"/>
    <category term="效率工具" scheme="https://blog.deptrip.com/tags/%E6%95%88%E7%8E%87%E5%B7%A5%E5%85%B7/"/>
    <content>
      <![CDATA[<p>这两年 AI 编程工具爆发式增长，从补全代码的插件进化到能独立完成任务的 Agent。Cursor、Claude Code、GitHub Copilot、Codex CLI、Aider、Hermes Agent——每一款都有自己的定位和优势。面对这么多选择，<strong>选错工具不仅浪费预算，还会拖慢团队节奏</strong>。</p><p>这篇文章基于 2026 年 5 月的实际体验和官方数据，从价格、模型能力、工作流集成、适用场景四个维度对比 6 款主流方案，帮你找到最适合的那一款。</p><p><img src="/images/ai-coding-tools-overview-2026.png" alt="AI 编程工具全景图 2026：六款主流代码助手对比概览"></p><h2 id="一、为什么现在需要选型指南"><a href="#一、为什么现在需要选型指南" class="headerlink" title="一、为什么现在需要选型指南"></a>一、为什么现在需要选型指南</h2><p>2026 年的 AI 编程工具市场已经进入成熟期。几个关键变化：</p><p><strong>终端 Agent 崛起</strong>：Claude Code、Codex CLI 这类终端原生工具绕过了 IDE 的束缚，直接操作文件系统和 Git，能做更复杂的多文件重构。</p><p><strong>多模型策略成标配</strong>：不再绑定单一模型——Cursor 支持 Claude Opus 4、GPT-4.1 等，Hermes Agent 更是支持 300+ 模型提供商。</p><p><strong>价格分层精细化</strong>：从免费的 Gemini CLI 到 $200&#x2F;月的 Claude Max，每个价格带都有明确的产品定位。</p><p><strong>开源 vs 商业的路线分化</strong>：Aider 和 Hermes Agent 走开源 BYOK（自带密钥）路线，Cursor 和 Copilot 走订阅制 SaaS 路线，两种模式各有优劣。</p><h2 id="二、六款工具逐一解析"><a href="#二、六款工具逐一解析" class="headerlink" title="二、六款工具逐一解析"></a>二、六款工具逐一解析</h2><h3 id="1-Cursor-—-AI-Native-IDE-的标杆"><a href="#1-Cursor-—-AI-Native-IDE-的标杆" class="headerlink" title="1. Cursor — AI-Native IDE 的标杆"></a>1. Cursor — AI-Native IDE 的标杆</h3><p><strong>定位</strong>：基于 VS Code 的 AI 原生 IDE，目前开发者口碑最好的一体化方案。</p><p><strong>核心优势</strong>：</p><ul><li><strong>Composer 模式</strong>：通过多文件编辑窗口进行大规模重构，支持可视化差异对比（diff view）</li><li><strong>子代理系统</strong>：可将复杂任务拆解给多个子 Agent 并行执行</li><li><strong>Tab 补全</strong>：行内代码预测延迟极低，几乎零感知</li><li><strong>Cloud Agents</strong>：支持在云端 VM 中运行代码，无需本地环境</li></ul><p><strong>价格</strong>：Pro $20&#x2F;月 → Ultra $200&#x2F;月 → Business $40&#x2F;座位&#x2F;月</p><p><strong>适合</strong>：追求开箱即用体验的开发者，习惯在 IDE 内完成所有操作的团队。</p><h3 id="2-Claude-Code-—-终端深度推理之王"><a href="#2-Claude-Code-—-终端深度推理之王" class="headerlink" title="2. Claude Code — 终端深度推理之王"></a>2. Claude Code — 终端深度推理之王</h3><p><strong>定位</strong>：Anthropic 出品的终端原生 AI 编程 Agent，拥有目前最强的代码推理能力。</p><p><strong>核心优势</strong>：</p><ul><li><strong>代码库级理解</strong>：可以读取整个项目结构，理解依赖关系后进行精确修改</li><li><strong>MCP 集成</strong>：通过 Model Context Protocol 接入外部工具和数据库</li><li><strong>记忆系统</strong>：跨会话保存上下文，长期项目不需要重复说明</li><li><strong>子 Agent 编排</strong>：支持启动多个子 Agent 协作完成复杂任务</li></ul><p><strong>价格</strong>：Pro $20&#x2F;月 → Max $100&#x2F;月 → Max $200&#x2F;月（自 2026 年 5 月起 Max 分两档）</p><p><strong>适合</strong>：需要处理复杂架构设计、重构遗留系统的资深开发者。**$200 Max 方案对于重度用户性价比极高**——几乎无限的每日用量，换算成人工成本简直是白菜价。</p><h3 id="3-GitHub-Copilot-—-企业生态的标配"><a href="#3-GitHub-Copilot-—-企业生态的标配" class="headerlink" title="3. GitHub Copilot — 企业生态的标配"></a>3. GitHub Copilot — 企业生态的标配</h3><p><strong>定位</strong>：微软&#x2F;GitHub 生态下的 AI 编程助手，嵌入 VS Code、JetBrains、Neovim 等多款 IDE。</p><p><strong>核心优势</strong>：</p><ul><li><strong>生态整合</strong>：与 GitHub Issues、PR、Actions 深度联动，自动从 Issue 创建 PR</li><li><strong>IP 赔偿</strong>：企业版提供知识产权赔偿保护，法务部门安心</li><li><strong>多模型分配</strong>：可根据不同 Issue 自动分配最合适的模型（GPT-4o、Claude、Codex）</li><li><strong>知识库</strong>：Enterprise 版支持上传私有代码库用于微调</li></ul><p><strong>价格</strong>：Free（2,000 补全&#x2F;月）→ Pro $10&#x2F;月 → Business $19&#x2F;座位&#x2F;月 → Enterprise $39&#x2F;座位&#x2F;月</p><p><strong>⚠️ 重要变化</strong>：2026 年 6 月起 Copilot 转向基于用量计费（usage-based billing），重度使用时实际费用可能超过标价。</p><p><strong>适合</strong>：已深度使用 GitHub 的团队，或需要企业级合规保障的组织。</p><h3 id="4-Codex-CLI-—-OpenAI-的高速迭代利器"><a href="#4-Codex-CLI-—-OpenAI-的高速迭代利器" class="headerlink" title="4. Codex CLI — OpenAI 的高速迭代利器"></a>4. Codex CLI — OpenAI 的高速迭代利器</h3><p><strong>定位</strong>：OpenAI 用 Rust 编写的开源终端编码 Agent。</p><p><strong>核心优势</strong>：</p><ul><li><strong>原生 OpenAI 模型</strong>：GPT-5 及 o 系列最优性能，推理精度高</li><li><strong>高速执行</strong>：Rust 编写的 CLI 启动和响应极快</li><li><strong>高推理模式</strong>：处理复杂 bug 和算法问题时效果显著</li></ul><p><strong>价格</strong>：捆绑在 ChatGPT 计划中——Plus $20&#x2F;月 → Pro $200&#x2F;月</p><p><strong>适合</strong>：OpenAI 生态重度用户，经常处理复杂算法或难以排查的 Bug。</p><h3 id="5-Aider-—-开源-Git-优先的代码伴侣"><a href="#5-Aider-—-开源-Git-优先的代码伴侣" class="headerlink" title="5. Aider — 开源 Git 优先的代码伴侣"></a>5. Aider — 开源 Git 优先的代码伴侣</h3><p><strong>定位</strong>：开源终端 AI 配对编程工具，Git 操作深度集成。</p><p><strong>核心优势</strong>：</p><ul><li><strong>Git 原生操作</strong>：每次修改自动创建 Git 提交，方便回溯和对比</li><li><strong>多模型支持</strong>：可接入 OpenAI、Anthropic、本地 Ollama 等任意模型</li><li><strong>架构感知</strong>：理解代码架构，知道在哪个文件中做修改</li><li><strong>零供应商锁定</strong>：全部开源，数据不离开本地</li></ul><p><strong>价格</strong>：<strong>免费开源</strong>，仅需 API 费用（月均 $20-50 中度使用，本地模型免费）</p><p><strong>适合</strong>：有 Git 使用习惯、希望完全控制工具和数据的开发者。</p><h3 id="6-Hermes-Agent-—-模型无关的智能管家"><a href="#6-Hermes-Agent-—-模型无关的智能管家" class="headerlink" title="6. Hermes Agent — 模型无关的智能管家"></a>6. Hermes Agent — 模型无关的智能管家</h3><p><strong>定位</strong>：Nous Research 出品的开源 CLI Agent，主打模型灵活性和持久记忆。</p><p><strong>核心优势</strong>：</p><ul><li><strong>300+ 模型</strong>：支持任意 OpenAI 兼容提供商，本地模型也可</li><li><strong>持久记忆</strong>：跨会话记忆系统，你不需要重复告诉它你的偏好</li><li><strong>多平台网关</strong>：可接入 Telegram、Discord、Slack 等消息平台</li><li><strong>技能系统</strong>（Skills）：可注入自定义技能（写博客、管理服务器等），扩展性极强</li></ul><p><strong>价格</strong>：<strong>免费开源</strong>，仅需 API 费用（可 $0&#x2F;天纯本地运行）</p><p><strong>适合</strong>：追求模型灵活性的开发者，需要跨平台使用 Agent（比如在 Telegram 里写博客），或希望在本地完全控制数据的用户。</p><h2 id="三、核心维度对比"><a href="#三、核心维度对比" class="headerlink" title="三、核心维度对比"></a>三、核心维度对比</h2><h3 id="价格对比"><a href="#价格对比" class="headerlink" title="价格对比"></a>价格对比</h3><p><img src="/images/ai-coding-tools-price-comparison.png" alt="2026 主流 AI 编程工具月度价格对比"></p><table><thead><tr><th>工具</th><th>免费方案</th><th>入门月费</th><th>重度使用</th><th>企业方案</th></tr></thead><tbody><tr><td><strong>Cursor</strong></td><td>有限制</td><td>$20</td><td>$200</td><td>$40&#x2F;座</td></tr><tr><td><strong>Claude Code</strong></td><td>❌</td><td>$20</td><td>$200</td><td>定制</td></tr><tr><td><strong>Copilot</strong></td><td>2,000 补全</td><td>$10</td><td>$19&#x2F;座</td><td>$39&#x2F;座</td></tr><tr><td><strong>Codex CLI</strong></td><td>ChatGPT 捆绑</td><td>$20</td><td>$200</td><td>定制</td></tr><tr><td><strong>Aider</strong></td><td>✅ 全免费</td><td>API 费~$25</td><td>API 费~$50</td><td>开源</td></tr><tr><td><strong>Hermes Agent</strong></td><td>✅ 全免费</td><td>API 费~$25</td><td>本地 $0</td><td>开源</td></tr></tbody></table><p><strong>关键发现</strong>：</p><ul><li>免费开源方案（Aider、Hermes）如果搭配本地模型使用，长期成本几乎为零</li><li>Copilot 看似最便宜（$10&#x2F;月），但企业版 + 用量超额后实际成本可能更高</li><li>Cursor 和 Claude Code 的 $200 方案目标用户不同——Cursor 是海量补全，Claude 是无限推理</li></ul><h3 id="模型能力"><a href="#模型能力" class="headerlink" title="模型能力"></a>模型能力</h3><table><thead><tr><th>维度</th><th>Cursor</th><th>Claude Code</th><th>Copilot</th><th>Codex CLI</th><th>Aider</th><th>Hermes Agent</th></tr></thead><tbody><tr><td>最佳模型</td><td>Claude Opus 4</td><td>Claude Opus 4</td><td>GPT-4o&#x2F;Claude</td><td>GPT-5 Codex</td><td>用户自选</td><td>用户自选</td></tr><tr><td>多模型</td><td>✅</td><td>❌ 仅 Claude</td><td>✅ GPT&#x2F;Claude&#x2F;Codex</td><td>❌ 仅 OpenAI</td><td>✅ 任意</td><td>✅ 300+</td></tr><tr><td>本地模型</td><td>❌</td><td>❌</td><td>❌</td><td>❌</td><td>✅ Ollama</td><td>✅ Ollama</td></tr><tr><td>代码理解</td><td>⭐⭐⭐⭐</td><td>⭐⭐⭐⭐⭐</td><td>⭐⭐⭐</td><td>⭐⭐⭐⭐</td><td>⭐⭐⭐</td><td>⭐⭐⭐</td></tr></tbody></table><blockquote><p><strong>注意</strong>：模型能力排名高度依赖场景。对于简单 CRUD 代码，Copilot 的补全速度和 Copilot 的 IDE 集成可能比 Claude Code 的深度推理更有用。<strong>没有万能的工具</strong>。</p></blockquote><h3 id="工作流集成"><a href="#工作流集成" class="headerlink" title="工作流集成"></a>工作流集成</h3><table><thead><tr><th>工作流</th><th>推荐工具</th></tr></thead><tbody><tr><td>IDE 内编码、日常开发</td><td>Cursor &#x2F; Copilot</td></tr><tr><td>复杂重构、架构设计</td><td>Claude Code</td></tr><tr><td>排查奇怪 Bug、算法问题</td><td>Codex CLI（高推理模式）</td></tr><tr><td>自动化脚本、CI&#x2F;CD 集成</td><td>Claude Code &#x2F; Aider</td></tr><tr><td>跨平台使用（聊天→写代码）</td><td>Hermes Agent</td></tr><tr><td>合规严格、数据不落地</td><td>Aider &#x2F; Hermes Agent（本地模型）</td></tr></tbody></table><h2 id="四、不同场景的选型建议"><a href="#四、不同场景的选型建议" class="headerlink" title="四、不同场景的选型建议"></a>四、不同场景的选型建议</h2><h3 id="个人开发者（预算敏感）"><a href="#个人开发者（预算敏感）" class="headerlink" title="个人开发者（预算敏感）"></a>个人开发者（预算敏感）</h3><p><strong>推荐组合</strong>：Aider（日常） + Hermes Agent（跨平台）</p><p>两者都是开源免费，搭配本地 Ollama 模型或廉价的 API 可以做到月费极低。Aider 负责日常编码，Hermes Agent 负责管理任务和跨平台操作。</p><h3 id="个人开发者（追求效率）"><a href="#个人开发者（追求效率）" class="headerlink" title="个人开发者（追求效率）"></a>个人开发者（追求效率）</h3><p><strong>推荐</strong>：Cursor Pro $20&#x2F;月</p><p>$20 的价格换来完整的 IDE 体验、Composer、Agent 模式。这是目前性价比最高的付费方案。</p><h3 id="小团队（5-20-人）"><a href="#小团队（5-20-人）" class="headerlink" title="小团队（5-20 人）"></a>小团队（5-20 人）</h3><p><strong>推荐组合</strong>：Cursor Pro + Claude Code Pro（1-2 个 license）</p><p>大多数队员用 Cursor 做日常开发，架构师&#x2F;技术负责人用 Claude Code 做复杂设计。总成本约 $20-40&#x2F;人&#x2F;月。</p><h3 id="中型团队（20-100-人）"><a href="#中型团队（20-100-人）" class="headerlink" title="中型团队（20-100 人）"></a>中型团队（20-100 人）</h3><p><strong>推荐</strong>：Copilot Business（$19&#x2F;座） + 少量 Claude Code License</p><p>利用 Copilot 的 GitHub 生态整合和 IP 赔偿，同时为高级开发者配备 Claude Code。</p><h3 id="企业（100-人）"><a href="#企业（100-人）" class="headerlink" title="企业（100+ 人）"></a>企业（100+ 人）</h3><p><strong>推荐</strong>：Copilot Enterprise（$39&#x2F;座）或 Amazon Q Developer（AWS 生态）</p><p>优先满足合规要求和生态整合，再根据需求选择第二工具。</p><h2 id="五、常见误区与实战建议"><a href="#五、常见误区与实战建议" class="headerlink" title="五、常见误区与实战建议"></a>五、常见误区与实战建议</h2><h3 id="误区-1：越贵的工具越好"><a href="#误区-1：越贵的工具越好" class="headerlink" title="误区 1：越贵的工具越好"></a>误区 1：越贵的工具越好</h3><p><strong>真相</strong>：$200&#x2F;月的 Claude Max 对于只需要补全的开发者是浪费，而免费的 Aider + 本地模型对很多场景已经足够。<strong>先确定需求，再选工具，而不是先选工具再看需求</strong>。</p><h3 id="误区-2：一个工具通吃所有场景"><a href="#误区-2：一个工具通吃所有场景" class="headerlink" title="误区 2：一个工具通吃所有场景"></a>误区 2：一个工具通吃所有场景</h3><p><strong>真相</strong>：74% 的高效团队使用 2-3 款工具组合。日常编码用轻量工具（Cursor&#x2F;Copilot），复杂问题用深度工具（Claude Code），特殊场景用专项工具（Codex CLI 排查 Bug）。</p><h3 id="误区-3：AI-生成代码不需要审查"><a href="#误区-3：AI-生成代码不需要审查" class="headerlink" title="误区 3：AI 生成代码不需要审查"></a>误区 3：AI 生成代码不需要审查</h3><p><strong>警告</strong>：Veracode 2026 年研究显示，AI 生成的代码中 <strong>45% 包含安全漏洞</strong>，跨站脚本（XSS）漏洞率是人类编写的 <strong>2.74 倍</strong>。代码审查和自动化安全扫描<strong>必须保留</strong>。</p><h3 id="误区-4：只看标价不看用量"><a href="#误区-4：只看标价不看用量" class="headerlink" title="误区 4：只看标价不看用量"></a>误区 4：只看标价不看用量</h3><p><strong>⚠️ 2026 年新趋势</strong>：Copilot 已转向用量计费，Claude Code 的 $200 Max 也有合理使用限制。<strong>实际费用可能远超标价</strong>，尤其是团队协作场景。</p><h3 id="实战建议"><a href="#实战建议" class="headerlink" title="实战建议"></a>实战建议</h3><ol><li><strong>先用免费方案验证</strong>：Aider 或 Hermes Agent 搭配少量 API 费用，试运行 2 周</li><li><strong>衡量具体指标</strong>：不要凭感觉——用 DORA 指标（部署频率、变更前置时间、变更失败率）来评估效果</li><li><strong>代码审查不可省</strong>：AI 工具是加速器，不是替代品</li><li><strong>保持模型灵活性</strong>：选择支持多模型的工具（Cursor、Aider、Hermes），避免绑定到单一模型供应商</li></ol><h2 id="总结"><a href="#总结" class="headerlink" title="总结"></a>总结</h2><p>2026 年的 AI 编程工具已经足够成熟，但你不需要全部使用。**选工具的核心逻辑不是”哪个最强”，而是”哪个最适合我的工作流”**。</p><table><thead><tr><th>你的情况</th><th>推荐方案</th><th>月预算</th></tr></thead><tbody><tr><td>个人，预算敏感</td><td>Aider + Hermes</td><td>$0-25</td></tr><tr><td>个人，追求效率</td><td>Cursor Pro</td><td>$20</td></tr><tr><td>小团队</td><td>Cursor + Claude Code</td><td>$20-40&#x2F;人</td></tr><tr><td>中型团队</td><td>Copilot Business</td><td>$19-39&#x2F;人</td></tr><tr><td>大型企业</td><td>Copilot Enterprise</td><td>$39-60&#x2F;人</td></tr></tbody></table><p>最理想的状态是：<strong>日常开发有一款趁手的 IDE 工具，复杂场景有一款强大的推理工具，特殊需求有一款灵活的开源工具</strong>。这个组合能覆盖 90% 以上的开发场景，同时把成本控制在合理范围内。</p><p><em>文章信息：基于 2026 年 5-6 月各工具官方文档和实际体验撰写。价格可能随市场变化，请以官网最新数据为准。</em></p>]]>
    </content>
    <id>https://blog.deptrip.com/2026/06/05/ai-coding-tools-guide-2026/</id>
    <link href="https://blog.deptrip.com/2026/06/05/ai-coding-tools-guide-2026/"/>
    <published>2026-06-05T03:10:00.000Z</published>
    <summary>
      <![CDATA[<p>这两年 AI 编程工具爆发式增长，从补全代码的插件进化到能独立完成任务的 Agent。Cursor、Claude Code、GitHub Copilot、Codex CLI、Aider、Hermes Agent——每一款都有自己的定位和优势。面对这么多选择，<strong>选错工具不仅浪费预算，还会拖慢团队节奏</strong>。</p>
<p>这篇文章基于 2026 年 5 月的实际体验和官方数据，从价格、模型能力、工作流集成、适用场景四个维度对比 6 款主流方案，帮你找到最适合的那一款。</p>
<p><img src="/images/ai-coding-tools-overview-2026.png" alt="AI 编程工具全景图 2026：六款主流代码助手对比概览"></p>
<h2 id="一、为什么现在需要选型指南"><a href="#一、为什么现在需要选型指南" class="headerlink" title="一、为什么现在需要选型指南"></a>一、为什么现在需要选型指南</h2><p>2026 年的 AI 编程工具市场已经进入成熟期。几个关键变化：</p>]]>
    </summary>
    <title>2026 AI 编程工具选型指南：6款主流代码助手深度对比</title>
    <updated>2026-07-28T14:35:47.263Z</updated>
  </entry>
  <entry>
    <author>
      <name>Golook</name>
    </author>
    <category term="AI Agent" scheme="https://blog.deptrip.com/categories/AI-Agent/"/>
    <category term="hermes-agent" scheme="https://blog.deptrip.com/tags/hermes-agent/"/>
    <category term="AI-Agent" scheme="https://blog.deptrip.com/tags/AI-Agent/"/>
    <category term="GitHub" scheme="https://blog.deptrip.com/tags/GitHub/"/>
    <category term="resources" scheme="https://blog.deptrip.com/tags/resources/"/>
    <content>
      <![CDATA[<blockquote><p>社区大神 @Smartpigai 系统整理了 15 个 Hermes Agent GitHub 仓库，涵盖核心框架、资源导航、Skills 生态、多 Agent 协作、实战案例和部署优化六大模块。本文翻译并补充了每个仓库的详情。</p></blockquote><span id="more"></span><h2 id="一、核心框架"><a href="#一、核心框架" class="headerlink" title="一、核心框架"></a>一、核心框架</h2><h3 id="1-NousResearch-hermes-agent-⭐175K"><a href="#1-NousResearch-hermes-agent-⭐175K" class="headerlink" title="1. NousResearch&#x2F;hermes-agent ⭐175K"></a>1. NousResearch&#x2F;hermes-agent ⭐175K</h3><p>Hermes Agent 官方仓库，也是整个生态的基石。这个仓库完整展示了 Hermes 的架构设计，包括：</p><ul><li><strong>Memory 机制</strong> — 跨会话持久化记忆，Agent 能记住用户偏好和历史交互</li><li><strong>Skill 系统</strong> — 可发现、可创建、可自我改进的工作流，是 Hermes 最核心的能力</li><li><strong>Sub Agent 协作</strong> — 通过 <code>delegate_task</code> 实现子代理编排</li><li><strong>自进化能力</strong> — Agent 在使用中不断学习和改进</li></ul><p>项目地址：<a href="https://github.com/NousResearch/hermes-agent">https://github.com/NousResearch/hermes-agent</a></p><hr><h2 id="二、资源导航"><a href="#二、资源导航" class="headerlink" title="二、资源导航"></a>二、资源导航</h2><h3 id="2-0xNyk-awesome-hermes-agent-⭐3-712"><a href="#2-0xNyk-awesome-hermes-agent-⭐3-712" class="headerlink" title="2. 0xNyk&#x2F;awesome-hermes-agent ⭐3,712"></a>2. 0xNyk&#x2F;awesome-hermes-agent ⭐3,712</h3><p><strong>社区最大、更新最活跃的 Hermes 资源索引库。</strong> 收录 500+ 资源的精选列表，覆盖 Skills、工具、集成、工作流和社区资源。按类别分类，每个资源都有简要说明。</p><p>无论你是新手还是老用户，这个仓库都是查找 Hermes 周边工具的第一站。</p><p>项目地址：<a href="https://github.com/0xNyk/awesome-hermes-agent">https://github.com/0xNyk/awesome-hermes-agent</a></p><h3 id="3-0xarkstar-awesome-hermes-agent-⭐28"><a href="#3-0xarkstar-awesome-hermes-agent-⭐28" class="headerlink" title="3. 0xarkstar&#x2F;awesome-hermes-agent ⭐28"></a>3. 0xarkstar&#x2F;awesome-hermes-agent ⭐28</h3><p>同样是精选资源合集，定位类似于 Awesome 索引，收录教程、案例、插件等。相比 0xNyk 的版本更精简，适合快速概览。</p><p>项目地址：<a href="https://github.com/0xarkstar/awesome-hermes-agent">https://github.com/0xarkstar/awesome-hermes-agent</a></p><hr><h2 id="三、Skills-生态"><a href="#三、Skills-生态" class="headerlink" title="三、Skills 生态"></a>三、Skills 生态</h2><p>Skills 是 Hermes Agent 最核心的能力沉淀机制，这些仓库收集了大量可直接复用的技能。</p><h3 id="4-ChuckSRQ-awesome-hermes-skills-⭐65"><a href="#4-ChuckSRQ-awesome-hermes-skills-⭐65" class="headerlink" title="4. ChuckSRQ&#x2F;awesome-hermes-skills ⭐65"></a>4. ChuckSRQ&#x2F;awesome-hermes-skills ⭐65</h3><p>生产就绪的 Hermes Agent Skills 精选合集。覆盖开发、运营、写作、数据分析、研究等场景。每个 Skill 有详细说明，可以直接拿来使用或作为模板开发自己的技能。</p><p>项目地址：<a href="https://github.com/ChuckSRQ/awesome-hermes-skills">https://github.com/ChuckSRQ/awesome-hermes-skills</a></p><h3 id="5-ZeroPointRepo-awesome-hermes-skills-⭐18"><a href="#5-ZeroPointRepo-awesome-hermes-skills-⭐18" class="headerlink" title="5. ZeroPointRepo&#x2F;awesome-hermes-skills ⭐18"></a>5. ZeroPointRepo&#x2F;awesome-hermes-skills ⭐18</h3><p><strong>内置 85 个开箱即用的 Skills。</strong> 主题涵盖编程辅助、内容创作、信息检索、系统管理等。特点是每个 Skill 都经过测试，且提供安装命令，可以直接 <code>hermes skill install</code>。</p><p>项目地址：<a href="https://github.com/ZeroPointRepo/awesome-hermes-skills">https://github.com/ZeroPointRepo/awesome-hermes-skills</a></p><h3 id="6-itgoyo-hermes-skills"><a href="#6-itgoyo-hermes-skills" class="headerlink" title="6. itgoyo&#x2F;hermes-skills"></a>6. itgoyo&#x2F;hermes-skills</h3><p>中文开发者 itgoyo 整理的 Skills 合集。如果你的工作流涉及中文场景（如中文写作、数据分析），这个仓库会有价值。</p><p>项目地址：<a href="https://github.com/itgoyo/hermes-skills">https://github.com/itgoyo/hermes-skills</a></p><h3 id="7-Lethe044-hermes-skill-marketplace-⭐26"><a href="#7-Lethe044-hermes-skill-marketplace-⭐26" class="headerlink" title="7. Lethe044&#x2F;hermes-skill-marketplace ⭐26"></a>7. Lethe044&#x2F;hermes-skill-marketplace ⭐26</h3><p><strong>自进化的 Skill 市场。</strong> 一个能自动编写、测试和迭代自己的 Skills 的 Agent。它会分析你的使用模式，发现重复性任务并自动生成对应的 Skill。</p><p>项目地址：<a href="https://github.com/Lethe044/hermes-skill-marketplace">https://github.com/Lethe044/hermes-skill-marketplace</a></p><hr><h2 id="四、多-Agent-协作"><a href="#四、多-Agent-协作" class="headerlink" title="四、多 Agent 协作"></a>四、多 Agent 协作</h2><h3 id="8-jnMetaCode-agency-agents-zh-⭐7"><a href="#8-jnMetaCode-agency-agents-zh-⭐7" class="headerlink" title="8. jnMetaCode&#x2F;agency-agents-zh ⭐7"></a>8. jnMetaCode&#x2F;agency-agents-zh ⭐7</h3><p><strong>211 个即插即用的中文 AI 专家角色库。</strong> 每个角色都是一个预配置的子 Agent，覆盖编程、写作、设计、研究等专业领域。通过组合不同角色，可以构建复杂的多 Agent 工作流。</p><p>特别适合中文用户，角色提示词和交互都针对中文优化。</p><p>项目地址：<a href="https://github.com/jnMetaCode/agency-agents-zh">https://github.com/jnMetaCode/agency-agents-zh</a></p><h3 id="9-（原-reventadirecta-hermes-multi-agent-—-已下线）"><a href="#9-（原-reventadirecta-hermes-multi-agent-—-已下线）" class="headerlink" title="9. （原 reventadirecta&#x2F;hermes-multi-agent — 已下线）"></a>9. （原 reventadirecta&#x2F;hermes-multi-agent — 已下线）</h3><blockquote><p>⚠️ 该仓库已被作者删除&#x2F;设为私有，链接已失效。</p></blockquote><p>替代推荐：**<a href="https://github.com/linke-ai/hermes-agent-team">linke-ai&#x2F;hermes-agent-team</a>** — 专注于构建 Hermes Agent 团队协作的方案，支持多 Agent 任务编排与分工。</p><h3 id="10-mattpocock-skills-⭐183"><a href="#10-mattpocock-skills-⭐183" class="headerlink" title="10. mattpocock&#x2F;skills ⭐183"></a>10. mattpocock&#x2F;skills ⭐183</h3><p>TypeScript 专家 Matt Pocock 整理的 Skills 合集。这些 Skills 专注于工程实践、代码审查和技术写作。尤其适合用 Claude Code 或 Hermes 做开发辅助的场景。</p><p>项目地址：<a href="https://github.com/mattpocock/skills">https://github.com/mattpocock/skills</a></p><hr><h2 id="五、实战案例"><a href="#五、实战案例" class="headerlink" title="五、实战案例"></a>五、实战案例</h2><h3 id="11-ali-erfan-dev-hermes-content-creator"><a href="#11-ali-erfan-dev-hermes-content-creator" class="headerlink" title="11. ali-erfan-dev&#x2F;hermes-content-creator"></a>11. ali-erfan-dev&#x2F;hermes-content-creator</h3><p>Hermes 驱动的内容创作工作流。覆盖从选题、研究、写作到发布的完整 Pipeline。支持多平台发布（博客、X、Newsletter），预设了多种内容风格模板。</p><p>项目地址：<a href="https://github.com/ali-erfan-dev/hermes-content-creator">https://github.com/ali-erfan-dev/hermes-content-creator</a></p><h3 id="12-ksimback-hermes-ecosystem-⭐945-（Hermes-Atlas）"><a href="#12-ksimback-hermes-ecosystem-⭐945-（Hermes-Atlas）" class="headerlink" title="12. ksimback&#x2F;hermes-ecosystem ⭐945 （Hermes Atlas）"></a>12. ksimback&#x2F;hermes-ecosystem ⭐945 <strong>（Hermes Atlas）</strong></h3><p><strong>社区最火的实战案例库，接近 1000 星。</strong> 这是一个交互式的 Hermes 生态系统地图，分类展示每个工具、Skill 和集成方案。不仅有仓库列表，还有每个工具的用途说明、推荐场景和上手流程。</p><p>项目地址：<a href="https://github.com/ksimback/hermes-ecosystem">https://github.com/ksimback/hermes-ecosystem</a></p><h3 id="13-coleam00-ottomator-agents"><a href="#13-coleam00-ottomator-agents" class="headerlink" title="13. coleam00&#x2F;ottomator-agents"></a>13. coleam00&#x2F;ottomator-agents</h3><p>OttoMator 是编排式 Agent 系统的实战项目，Hermes Agent 作为核心驱动。展示了如何将多个 Agent 编排成自动化流水线，适合在 SaaS 运营、客服自动化等场景落地。</p><p>项目地址：<a href="https://github.com/coleam00/ottomator-agents">https://github.com/coleam00/ottomator-agents</a></p><hr><h2 id="六、部署与优化"><a href="#六、部署与优化" class="headerlink" title="六、部署与优化"></a>六、部署与优化</h2><h3 id="14-OnlyTerp-hermes-optimization-guide（原-hermes-self-host-已迁移至此）"><a href="#14-OnlyTerp-hermes-optimization-guide（原-hermes-self-host-已迁移至此）" class="headerlink" title="14. OnlyTerp&#x2F;hermes-optimization-guide（原 hermes-self-host 已迁移至此）"></a>14. OnlyTerp&#x2F;hermes-optimization-guide（原 hermes-self-host 已迁移至此）</h3><p><strong>从部署到优化的全方位指南。</strong> 原 hermes-self-host 已合并进这个更大的项目。涵盖 Docker 化部署、逆向代理配置、HTTPS 证书、数据备份、多平台运维、成本优化等。当前版本覆盖 Hermes v0.16.0，包含 26 个章节、13 个可直接安装的 guide skills、5 套配置模板、一键 VPS 部署脚本。</p><p>项目地址：<a href="https://github.com/OnlyTerp/hermes-optimization-guide">https://github.com/OnlyTerp/hermes-optimization-guide</a></p><h3 id="15-fly-apps-hermes-flyio-⭐19"><a href="#15-fly-apps-hermes-flyio-⭐19" class="headerlink" title="15. fly-apps&#x2F;hermes-flyio ⭐19"></a>15. fly-apps&#x2F;hermes-flyio ⭐19</h3><p><strong>在 Fly.io 上部署 Hermes 的官方示例。</strong> Fly.io 是一个边缘云平台，全球多地部署。这个示例展示了如何用一行命令把 Hermes Agent 部署到全球节点，延迟低至个位数毫秒。</p><p>项目地址：<a href="https://github.com/fly-apps/hermes-flyio">https://github.com/fly-apps/hermes-flyio</a></p><hr><h2 id="总结"><a href="#总结" class="headerlink" title="总结"></a>总结</h2><p>这 15 个仓库覆盖了 Hermes Agent 学习路径的每个阶段：</p><ol><li><strong>入门</strong> → 0xNyk&#x2F;awesome-hermes-agent（索引）</li><li><strong>理解原理</strong> → NousResearch&#x2F;hermes-agent（官方仓库）</li><li><strong>选用 Skills</strong> → ChuckSRQ&#x2F;awesome-hermes-skills、ZeroPointRepo&#x2F;awesome-hermes-skills</li><li><strong>构建工作流</strong> → jnMetaCode&#x2F;agency-agents-zh（多 Agent）</li><li><strong>实战落地</strong> → ksimback&#x2F;hermes-ecosystem（案例库）</li><li><strong>上线部署</strong> → OnlyTerp&#x2F;hermes-optimization-guide（部署与优化）</li></ol><p>建议收藏并按照这个路径逐步深入。</p>]]>
    </content>
    <id>https://blog.deptrip.com/2026/06/05/hermes-agent-15-github-repos/</id>
    <link href="https://blog.deptrip.com/2026/06/05/hermes-agent-15-github-repos/"/>
    <published>2026-06-05T03:00:00.000Z</published>
    <summary>
      <![CDATA[<blockquote>
<p>社区大神 @Smartpigai 系统整理了 15 个 Hermes Agent GitHub 仓库，涵盖核心框架、资源导航、Skills 生态、多 Agent 协作、实战案例和部署优化六大模块。本文翻译并补充了每个仓库的详情。</p>
</blockquote>]]>
    </summary>
    <title>Hermes Agent 学习资源宝藏库：社区整理的 15 个必备 GitHub 仓库</title>
    <updated>2026-07-28T14:35:47.263Z</updated>
  </entry>
  <entry>
    <author>
      <name>Golook</name>
    </author>
    <category term="AI Agent" scheme="https://blog.deptrip.com/categories/AI-Agent/"/>
    <category term="hermes-agent" scheme="https://blog.deptrip.com/tags/hermes-agent/"/>
    <category term="AI-Agent" scheme="https://blog.deptrip.com/tags/AI-Agent/"/>
    <category term="community" scheme="https://blog.deptrip.com/tags/community/"/>
    <category term="X" scheme="https://blog.deptrip.com/tags/X/"/>
    <content>
      <![CDATA[<blockquote><p>在 X 上搜刮了一圈，把最近热度最高的 Hermes Agent 帖子整理出来。涵盖学习资源、桌面版发布、省钱技巧、实操经验等。</p></blockquote><span id="more"></span><h2 id="1-Hermes-Agent-全网最详细学习资源合集"><a href="#1-Hermes-Agent-全网最详细学习资源合集" class="headerlink" title="1. Hermes Agent 全网最详细学习资源合集"></a>1. Hermes Agent 全网最详细学习资源合集</h2><p><strong>作者：</strong> @Smartpigai（AI 认证创作者）<br><strong>数据：</strong> 23 回复 · 105 转推 · 346 喜欢 · 17K 浏览</p><p>这位作者把学习 Hermes Agent 需要的 <strong>15 个 GitHub 仓库</strong>做了系统分类，包括官方框架的核心架构、Memory 机制、Skill 系统、Sub-Agent 协作以及自进化能力。还有精心整理的 Awesome 资源导航。</p><p>如果你是新手，这篇应该是最佳起点。</p><hr><h2 id="2-Hermes-Agent-橙皮书：从入门到实战"><a href="#2-Hermes-Agent-橙皮书：从入门到实战" class="headerlink" title="2. Hermes Agent 橙皮书：从入门到实战"></a>2. Hermes Agent 橙皮书：从入门到实战</h2><p><strong>作者：</strong> @Smartpigai</p><p>Smartpig 的另一篇连载内容，结合官方文档和社区实践，系统讲述 Hermes Agent 是什么、能做什么、怎么学。除了基本概念还涉及实际部署场景，属于”看完就能上手”的内容。</p><hr><h2 id="3-Hermes-Agent-官方桌面版发布"><a href="#3-Hermes-Agent-官方桌面版发布" class="headerlink" title="3. Hermes Agent 官方桌面版发布"></a>3. Hermes Agent 官方桌面版发布</h2><p><strong>作者：</strong> @hisevenih（AI 认证创作者）<br><strong>数据：</strong> 145 回复 · 115 转推 · 598 喜欢 · <strong>77K 浏览</strong>（本次搜索热度最高）</p><p>官方桌面版已支持 <strong>Mac OS、Windows、Linux</strong> 全平台。亮点是支持从 OpenClaw 直接迁移，老用户换工具门槛很低。有评论表示”至少不用再折腾一堆环境配置了”。</p><hr><h2 id="4-Hermes-Web-Dashboard-重大改版"><a href="#4-Hermes-Web-Dashboard-重大改版" class="headerlink" title="4. Hermes Web Dashboard 重大改版"></a>4. Hermes Web Dashboard 重大改版</h2><p><strong>作者：</strong> @HermesAgentTips（Hermes Agent 专区创作者）</p><p>据 @NousResearch 官方动态称，Web Dashboard 已升级为 <strong>feature-complete 管理面板</strong>，全部操作可在浏览器内完成。加上桌面版发布，Hermes 的”全平台+全功能”布局逐渐成型。</p><hr><h2 id="5-5-超省模型推荐-Top-5"><a href="#5-5-超省模型推荐-Top-5" class="headerlink" title="5. $5 超省模型推荐 Top 5"></a>5. $5 超省模型推荐 Top 5</h2><p><strong>作者：</strong> @HermesAgentTips<br><strong>数据：</strong> 50 回复 · 74 转推 · 765 喜欢 · 29K 浏览</p><p>实测最省成本模型排名：</p><table><thead><tr><th align="center">排名</th><th align="left">模型</th><th align="left">备注</th></tr></thead><tbody><tr><td align="center">🥇</td><td align="left">MiMo-V2.5</td><td align="left">综合性价比王者</td></tr><tr><td align="center">🥈</td><td align="left">DeepSeek V4 Flash (Max)</td><td align="left">我们的当前主模型</td></tr><tr><td align="center">🥉</td><td align="left">MiMo-V2-Flash (Feb 2026)</td><td align="left">老将仍能打</td></tr><tr><td align="center">4</td><td align="left">DeepSeek V4 Flash (High)</td><td align="left">更高精度选项</td></tr><tr><td align="center">5</td><td align="left">Hy3-preview</td><td align="left">新秀模型</td></tr></tbody></table><p>另外提到 OpenCode 首月 $5 就能获得大量 token 额度，适合测试不同模型。</p><hr><h2 id="6-让-Agent-更像人：邮箱-电话-支付一站式"><a href="#6-让-Agent-更像人：邮箱-电话-支付一站式" class="headerlink" title="6. 让 Agent 更像人：邮箱 + 电话 + 支付一站式"></a>6. 让 Agent 更像人：邮箱 + 电话 + 支付一站式</h2><p><strong>作者：</strong> @HermesAgentTips<br><strong>数据：</strong> 3 转推 · 29 喜欢 · 907 浏览</p><p>三个集成工具实现更完整的自动化：</p><ul><li><strong>agentmail</strong> — 处理收件箱</li><li><strong>agentline</strong> — 接打电话</li><li><strong>prava</strong> — 处理支付卡片</li></ul><p>配合在一起，Agent 能帮你跑通”收到邮件 → 回复客户 → 完成支付”的完整闭环。</p><hr><h2 id="7-Hermes-Mobilerun-Portal-控制手机"><a href="#7-Hermes-Mobilerun-Portal-控制手机" class="headerlink" title="7. Hermes + Mobilerun Portal 控制手机"></a>7. Hermes + Mobilerun Portal 控制手机</h2><p><strong>作者：</strong> @jousmar433946<br><strong>数据：</strong> 5 认证浏览（刚发布，还新鲜）</p><p>把 Hermes 当做大脑，结合 Mobilerun Portal 让 AI Agent 直接操控物理手机。这正是我们一直在做的方向——通过 Hermes 调度手机端的 APP 操作，绕过 API 限制实现全功能控制。</p><hr><h2 id="8-远程-Gateway-Session-Token-修复方案"><a href="#8-远程-Gateway-Session-Token-修复方案" class="headerlink" title="8. 远程 Gateway Session Token 修复方案"></a>8. 远程 Gateway Session Token 修复方案</h2><p><strong>作者：</strong> @HermesAgentTips<br><strong>数据：</strong> 5 回复 · 4 转推 · 61 喜欢 · 4.6K 浏览</p><p>远程网关最常见的问题是 session token 不起效，3 步修复：</p><figure class="highlight bash"><table><tr><td class="gutter"><pre><span class="line">1</span><br><span class="line">2</span><br><span class="line">3</span><br><span class="line">4</span><br><span class="line">5</span><br><span class="line">6</span><br></pre></td><td class="code"><pre><span class="line"><span class="comment"># 1. 生成 token</span></span><br><span class="line">rand -<span class="built_in">base64</span> 32 | <span class="built_in">echo</span> <span class="string">&quot;HERMES_DASHBOARD_SESSION_TOKEN=<span class="subst">$(cat)</span>&quot;</span> &gt;&gt; ~/.hermes/.env</span><br><span class="line"></span><br><span class="line"><span class="comment"># 2. 重启服务使配置生效</span></span><br><span class="line"></span><br><span class="line"><span class="comment"># 3. 在 gateway 启动时使用该 token</span></span><br></pre></td></tr></table></figure><p>注意：建议将 token 保存在 <code>~/.hermes/.env</code> 而非 <code>config.yaml</code>，以防版本控制泄漏。</p><hr><h2 id="9-鸟哥的-5-个-Hermes-狠活"><a href="#9-鸟哥的-5-个-Hermes-狠活" class="headerlink" title="9. 鸟哥的 5 个 Hermes 狠活"></a>9. 鸟哥的 5 个 Hermes 狠活</h2><p><strong>作者：</strong> @NFTCPS（蓝鸟会）</p><p>鸟哥汇总了 5 个开源的 Hermes Agent 创新用例，包括桌面神器搭建、创意流水线、token 节省方案等。具体的仓库链接在他的帖子中有列出。</p><hr><h2 id="总结"><a href="#总结" class="headerlink" title="总结"></a>总结</h2><p>这次扫了一圈 X，最直观的感受是 Hermes Agent 的社区在持续产出高质量内容。@Smartpigai 做资源整理，@HermesAgentTips 持续输出技巧干货，@NousResearch 保持高频率更新。</p><p>几个值得关注的账号：</p><ul><li><strong>@HermesAgentTips</strong> — 技巧类内容最活跃</li><li><strong>@Smartpigai</strong> — 系统性学习资源</li><li><strong>@hisevenih</strong> — 一手更新资讯</li><li><strong>@NFTCPS</strong> — 中文社区分享</li></ul>]]>
    </content>
    <id>https://blog.deptrip.com/2026/06/05/hermes-agent-x-community-curation/</id>
    <link href="https://blog.deptrip.com/2026/06/05/hermes-agent-x-community-curation/"/>
    <published>2026-06-05T01:00:00.000Z</published>
    <summary>
      <![CDATA[<blockquote>
<p>在 X 上搜刮了一圈，把最近热度最高的 Hermes Agent 帖子整理出来。涵盖学习资源、桌面版发布、省钱技巧、实操经验等。</p>
</blockquote>]]>
    </summary>
    <title>Hermes Agent 社区精选：从 X/Twitter 挖到的 9 条高质量内容</title>
    <updated>2026-07-28T14:35:47.263Z</updated>
  </entry>
  <entry>
    <author>
      <name>Golook</name>
    </author>
    <category term="AI Agent" scheme="https://blog.deptrip.com/categories/AI-Agent/"/>
    <category term="AI-Agent" scheme="https://blog.deptrip.com/tags/AI-Agent/"/>
    <category term="agentic-stack" scheme="https://blog.deptrip.com/tags/agentic-stack/"/>
    <category term="memory" scheme="https://blog.deptrip.com/tags/memory/"/>
    <category term="cross-platform" scheme="https://blog.deptrip.com/tags/cross-platform/"/>
    <category term="open-source" scheme="https://blog.deptrip.com/tags/open-source/"/>
    <content>
      <![CDATA[<blockquote><p><strong>原文作者：</strong> Shubham Saboo（Google AI PM）<br><strong>来源：</strong> LinkedIn &#x2F; X @Saboo_Shubham_</p></blockquote><p>有没有这样的体验：今天用 Claude Code 写了一个项目，记录了一大堆偏好设置，明天切换到 Cursor 或者 Codex，一切从头开始。每次工具变动，你的 Agent 就失忆一次。</p><p>现在这个问题被解决了。一个叫做 <strong>agentic-stack</strong> 的开源项目，让 8 种不同的编程 Agent 共享同一套记忆和技能系统。</p><span id="more"></span><h2 id="一、核心问题"><a href="#一、核心问题" class="headerlink" title="一、核心问题"></a>一、核心问题</h2><blockquote><p>“Every coding agent has its own memory format. Claude Code remembers one way. OpenClaw another. Hermes another. Switch tools and your agent starts from zero.”</p></blockquote><p>每个编程 Agent 都有自己独特的记忆格式：</p><table><thead><tr><th>Agent</th><th>记忆存储方式</th></tr></thead><tbody><tr><td><strong>Claude Code</strong></td><td><code>.claude/</code> 目录 + CLAUDE.md</td></tr><tr><td><strong>Cursor</strong></td><td><code>.cursor/</code> + 规则文件</td></tr><tr><td><strong>OpenClaw</strong></td><td>专有格式</td></tr><tr><td><strong>Hermes Agent</strong></td><td><code>~/.hermes/skills/</code> + MEMORY.md</td></tr><tr><td><strong>Codex</strong></td><td>项目级配置</td></tr></tbody></table><p>换一个工具 → 所有偏好、教训、约定全部丢失 → 从头开始。</p><h2 id="二、解决方案：-agent"><a href="#二、解决方案：-agent" class="headerlink" title="二、解决方案：.agent&#x2F;"></a>二、解决方案：.agent&#x2F;</h2><blockquote><p>“Just drop <code>.agent/</code> into your project, pick your harness, and it wires up automatically. Same brain. Different tool.”</p></blockquote><p><strong>agentic-stack</strong> 的核心是一个名为 <code>.agent/</code> 的目录。把它放在你的项目根目录下，然后选择你想要的 Agent 驱动（harness），它就能自动连接。</p><h3 id="支持-8-种-Harness"><a href="#支持-8-种-Harness" class="headerlink" title="支持 8 种 Harness"></a>支持 8 种 Harness</h3><ul><li>Claude Code</li><li>Cursor</li><li>Windsurf</li><li>OpenCode</li><li>OpenClaw</li><li><strong>Hermes Agent</strong></li><li>Pi Coding Agent</li><li>自建的 Python 循环</li></ul><h3 id="agent-目录里有什么？"><a href="#agent-目录里有什么？" class="headerlink" title=".agent&#x2F; 目录里有什么？"></a>.agent&#x2F; 目录里有什么？</h3><figure class="highlight plaintext"><table><tr><td class="gutter"><pre><span class="line">1</span><br><span class="line">2</span><br><span class="line">3</span><br><span class="line">4</span><br><span class="line">5</span><br><span class="line">6</span><br><span class="line">7</span><br><span class="line">8</span><br></pre></td><td class="code"><pre><span class="line">.agent/</span><br><span class="line">├── MEMORY.md          # 工作记忆 — 当前会话相关信息</span><br><span class="line">├── episodes/          # 情景记忆 — 每次交互的存档</span><br><span class="line">├── semantic/          # 语义记忆 — 向量化的长期知识</span><br><span class="line">├── user/              # 个人化记忆 — 用户偏好和风格</span><br><span class="line">├── skills/            # 渐进式技能 — 按需加载的工作流</span><br><span class="line">├── schemas/           # 类型化的工具定义</span><br><span class="line">└── permissions/       # 权限策略</span><br></pre></td></tr></table></figure><p><strong>四个记忆层 + 各自的保留策略</strong>：</p><ul><li><strong>工作记忆</strong> — 当前任务上下文，临时</li><li><strong>情景记忆</strong> — 每次操作的日志</li><li><strong>语义记忆</strong> — 聚类后的长期知识</li><li><strong>个人化记忆</strong> — 用户行为模型</li></ul><h2 id="三、复合循环"><a href="#三、复合循环" class="headerlink" title="三、复合循环"></a>三、复合循环</h2><blockquote><p>“Every action logs to episodic memory. A nightly process clusters recurring patterns into candidate lessons. You review them with one command. Graduated lessons load automatically in future sessions.”</p></blockquote><p>流程是：</p><figure class="highlight plaintext"><table><tr><td class="gutter"><pre><span class="line">1</span><br><span class="line">2</span><br><span class="line">3</span><br><span class="line">4</span><br><span class="line">5</span><br><span class="line">6</span><br><span class="line">7</span><br><span class="line">8</span><br><span class="line">9</span><br></pre></td><td class="code"><pre><span class="line">每次操作 → 记录到情景记忆</span><br><span class="line">     ↓</span><br><span class="line">夜间进程 → 聚类重复模式 → 提炼为候选经验</span><br><span class="line">     ↓</span><br><span class="line">你一键审查 → 批准/拒绝</span><br><span class="line">     ↓</span><br><span class="line">通过的经验 → 自动加载到未来会话</span><br><span class="line">     ↓</span><br><span class="line">    ↻</span><br></pre></td></tr></table></figure><blockquote><p>“Your agent’s git history becomes its autobiography.”</p></blockquote><h2 id="四、这在解决什么问题？"><a href="#四、这在解决什么问题？" class="headerlink" title="四、这在解决什么问题？"></a>四、这在解决什么问题？</h2><h3 id="4-1-供应商锁定（Vendor-Lock-in）"><a href="#4-1-供应商锁定（Vendor-Lock-in）" class="headerlink" title="4.1 供应商锁定（Vendor Lock-in）"></a>4.1 供应商锁定（Vendor Lock-in）</h3><p>使用某一家 Agent 工具时，你的所有配置、经验、记忆都锁在该工具的生态里。agentic-stack 用标准化的 <code>.agent/</code> 格式打破了这一点。你选择的是”大脑”，而不是”工具”。</p><blockquote><p>“You don’t pick an agent anymore. You pick a brain and let your agent plug into it.”</p></blockquote><h3 id="4-2-多-Agent-协作中的信息孤岛"><a href="#4-2-多-Agent-协作中的信息孤岛" class="headerlink" title="4.2 多 Agent 协作中的信息孤岛"></a>4.2 多 Agent 协作中的信息孤岛</h3><p>LinkedIn 讨论中 Kane Dixon 的真实处境很有代表性：他用 Claude 做服务端、ChatGPT 做讨论、Antigravity 做前端、OpenClaw 做本地模型任务、Paperclip 做自组织 Agent、Hermes 做自进化 Agent。</p><blockquote><p>“A veritable slew of silos with no shared knowledge or context.”</p></blockquote><p>6 个工具，6 套记忆。agentic-stack 让它们在同一个 <code>.agent/</code> 目录下共享信息。</p><h2 id="五、安全考量"><a href="#五、安全考量" class="headerlink" title="五、安全考量"></a>五、安全考量</h2><p>在讨论中社区也提出了合理的安全担忧：</p><blockquote><p>“How to ensure that using these open repos doesn’t add an exposure risk to the already security-fragile systems?”</p></blockquote><p>作者对此的回应是：<code>.agent/</code> 中的 <strong>权限策略（permissions&#x2F;）</strong> 和<strong>类型化工具定义（schemas&#x2F;）</strong> 就是为了解决这个问题——不是谁都能在项目里为所欲为。</p><h2 id="六、什么时候该用？"><a href="#六、什么时候该用？" class="headerlink" title="六、什么时候该用？"></a>六、什么时候该用？</h2><ul><li>你在多个编程 Agent 之间切换</li><li>你有一个 Agent 团队需要共享项目上下文</li><li>你想防止工具切换导致的知识丢失</li><li>你希望 Agent 的经验能像代码一样被版本管理</li></ul><p>项目地址：<a href="https://github.com/codejunkie99/agentic-stack">github.com&#x2F;codejunkie99&#x2F;agentic-stack</a> — 100% 开源。</p><hr><p><em>本文内容基于 @Saboo_Shubham_ 的 LinkedIn 推文整理翻译。</em></p>]]>
    </content>
    <id>https://blog.deptrip.com/2026/06/04/agentic-stack-portable-brain/</id>
    <link href="https://blog.deptrip.com/2026/06/04/agentic-stack-portable-brain/"/>
    <published>2026-06-04T14:50:00.000Z</published>
    <summary>
      <![CDATA[<blockquote>
<p><strong>原文作者：</strong> Shubham Saboo（Google AI PM）<br><strong>来源：</strong> LinkedIn &#x2F; X @Saboo_Shubham_</p>
</blockquote>
<p>有没有这样的体验：今天用 Claude Code 写了一个项目，记录了一大堆偏好设置，明天切换到 Cursor 或者 Codex，一切从头开始。每次工具变动，你的 Agent 就失忆一次。</p>
<p>现在这个问题被解决了。一个叫做 <strong>agentic-stack</strong> 的开源项目，让 8 种不同的编程 Agent 共享同一套记忆和技能系统。</p>]]>
    </summary>
    <title>agentic-stack：一个 .agent/ 文件夹打通 8 种编程 Agent</title>
    <updated>2026-07-28T14:35:47.263Z</updated>
  </entry>
  <entry>
    <author>
      <name>Golook</name>
    </author>
    <category term="AI Agent" scheme="https://blog.deptrip.com/categories/AI-Agent/"/>
    <category term="hermes-agent" scheme="https://blog.deptrip.com/tags/hermes-agent/"/>
    <category term="AI-Agent" scheme="https://blog.deptrip.com/tags/AI-Agent/"/>
    <category term="codex" scheme="https://blog.deptrip.com/tags/codex/"/>
    <category term="claude-code" scheme="https://blog.deptrip.com/tags/claude-code/"/>
    <category term="orchestration" scheme="https://blog.deptrip.com/tags/orchestration/"/>
    <content>
      <![CDATA[<blockquote><p><strong>原文作者：</strong> Shubham Saboo（Google AI PM）<br><strong>来源：</strong> LinkedIn &#x2F; X @Saboo_Shubham_</p></blockquote><p>你的编程 Agent 可能在骗你。它会告诉你构建通过，但<strong>从来没真正跑过构建</strong>。它会说测试通过了，但<strong>写的测试从来没被执行过</strong>。</p><p>这是 Shubham Saboo 在多 Agent 编排领域最核心的观点。而他的解决方案是：<strong>用三个不同的 Agent，让它们互相制衡。</strong></p><span id="more"></span><h2 id="一、三-Agent-架构"><a href="#一、三-Agent-架构" class="headerlink" title="一、三 Agent 架构"></a>一、三 Agent 架构</h2><blockquote><p>“Codex builds it. Claude Code reviews it. Hermes Agent verifies that neither of them is lying.”</p></blockquote><figure class="highlight plaintext"><table><tr><td class="gutter"><pre><span class="line">1</span><br><span class="line">2</span><br><span class="line">3</span><br></pre></td><td class="code"><pre><span class="line">Codex → 构建代码（执行者）</span><br><span class="line">Claude Code → 审查代码（审查者）</span><br><span class="line">Hermes Agent → 验证结果（验证者）</span><br></pre></td></tr></table></figure><h3 id="分工很明确："><a href="#分工很明确：" class="headerlink" title="分工很明确："></a>分工很明确：</h3><table><thead><tr><th>Agent</th><th>角色</th><th>职责</th></tr></thead><tbody><tr><td><strong>Codex</strong></td><td>工人</td><td>根据目标写代码，完成构建</td></tr><tr><td><strong>Claude Code</strong></td><td>审查员</td><td>检查代码质量、逻辑缺陷</td></tr><tr><td><strong>Hermes Agent</strong></td><td>品控</td><td>重新跑构建和测试，确认没有造假</td></tr></tbody></table><p><strong>关键在第三步：</strong> Hermes 从不相信工人的自我报告（self-report）。Codex 说”构建完毕”？Hermes 会在自己的 shell 里<strong>重新跑一遍构建和测试</strong>，确认通过才算数。</p><blockquote><p>“If you can’t verify it from a shell, it isn’t done.”</p></blockquote><h2 id="二、-goal：从提示词到契约"><a href="#二、-goal：从提示词到契约" class="headerlink" title="二、&#x2F;goal：从提示词到契约"></a>二、&#x2F;goal：从提示词到契约</h2><p>这个架构的核心原语是 **<code>/goal</code>**。它不是普通的 prompt。</p><p>普通 prompt 的工作方式：</p><ul><li>你给出指令</li><li>Agent 给出下一步回答</li><li>你判断对不对，决定下一步方向</li><li><strong>每个回合你都要参与</strong></li></ul><p><code>/goal</code> 的工作方式：</p><ul><li>你写下”完成”的定义：测试通过、构建成功、git 状态干净</li><li>提交一次，Agent 自主推进</li><li>直到目标达成、被阻塞、被取消、或超出预算</li></ul><blockquote><p>“A normal prompt asks for the next response. You read it, decide if it’s right, push it forward. You steer every turn. Goal flips that.”</p></blockquote><h2 id="三、写好-goal-的四要素"><a href="#三、写好-goal-的四要素" class="headerlink" title="三、写好 &#x2F;goal 的四要素"></a>三、写好 &#x2F;goal 的四要素</h2><p>Saboo 的 cheat sheet 列出了好 <code>/goal</code> 必须包含的四个部分：</p><ol><li><p><strong>明确的完成标准</strong>（Definition of Done）</p><ul><li>❌ “让这个功能更好”</li><li>✅ “所有单元测试通过，构建成功，git status 干净”</li></ul></li><li><p><strong>接收者</strong>（Who receives it）</p><ul><li>这个 &#x2F;goal 是给谁写的？Codex？Claude Code？还是你自己？</li></ul></li><li><p><strong>范围边界</strong>（Scope）</p><ul><li>哪些事情在这个 &#x2F;goal 的范围内？哪些是明确排除的？</li></ul></li><li><p><strong>验证清单</strong>（Verifier checklist）</p><ul><li>验证者（Hermes）如何确认工人没有”骗人”？</li><li>必须在 shell 中可重现</li></ul></li></ol><h2 id="四、反模式：不要写-“Make-it-better”"><a href="#四、反模式：不要写-“Make-it-better”" class="headerlink" title="四、反模式：不要写 “Make it better”"></a>四、反模式：不要写 “Make it better”</h2><p>最常见的错误是写一个模糊的 &#x2F;goal。比如：</p><ul><li>❌ “改进这段代码”</li><li>❌ “优化性能”</li><li>❌ “添加注释”</li></ul><p>这些都不是可验证的标准。Codex 可以”完成”它们，但你没法验证。正确的写法是：</p><ul><li>✅ “重构 <code>parse()</code> 函数，使其能处理空输入而不抛出异常。现有测试必须全部通过，并添加 3 个空输入测试用例。”</li></ul><h2 id="五、不仅仅是代码验证"><a href="#五、不仅仅是代码验证" class="headerlink" title="五、不仅仅是代码验证"></a>五、不仅仅是代码验证</h2><p>LinkedIn 上的讨论中还提到了一个重要的扩展：<strong>认证（Authorization）</strong>。</p><blockquote><p>“As agents interact with infrastructure, financial systems, APIs, and other agents, future architectures will likely require both capabilities.”</p></blockquote><p>也就是说，Agent 系统需要两个能力：</p><ul><li><strong>Verification</strong>（验证）— 确认 Agent 做的事是正确的</li><li><strong>Authorization</strong>（授权）— 确认 Agent 有权做这件事</li></ul><p>目前 Hermes + Codex + Claude Code 解决了验证问题，但授权的方案还在演进中。</p><h2 id="六、一句话总结"><a href="#六、一句话总结" class="headerlink" title="六、一句话总结"></a>六、一句话总结</h2><blockquote><p>“Workers change. The primitive stays the same.”</p></blockquote><p>Codex 可能换、Claude Code 可能换，但 <code>/goal</code> 这个原语——把”完成”的定义从模糊 prompt 变成可验证的契约——才是多 Agent 编排能规模化运作的真正基石。</p><hr><p><em>本文内容基于 @Saboo_Shubham_ 的 LinkedIn&#x2F;X 推文整理翻译。</em></p>]]>
    </content>
    <id>https://blog.deptrip.com/2026/06/04/agent-orchestration-goal-cheatsheet/</id>
    <link href="https://blog.deptrip.com/2026/06/04/agent-orchestration-goal-cheatsheet/"/>
    <published>2026-06-04T14:30:00.000Z</published>
    <summary>
      <![CDATA[<blockquote>
<p><strong>原文作者：</strong> Shubham Saboo（Google AI PM）<br><strong>来源：</strong> LinkedIn &#x2F; X @Saboo_Shubham_</p>
</blockquote>
<p>你的编程 Agent 可能在骗你。它会告诉你构建通过，但<strong>从来没真正跑过构建</strong>。它会说测试通过了，但<strong>写的测试从来没被执行过</strong>。</p>
<p>这是 Shubham Saboo 在多 Agent 编排领域最核心的观点。而他的解决方案是：<strong>用三个不同的 Agent，让它们互相制衡。</strong></p>]]>
    </summary>
    <title>多 Agent 编排实战：Codex 写代码、Claude Code 审查、Hermes Agent 验证</title>
    <updated>2026-07-28T14:35:47.263Z</updated>
  </entry>
  <entry>
    <author>
      <name>Golook</name>
    </author>
    <category term="AI Agent" scheme="https://blog.deptrip.com/categories/AI-Agent/"/>
    <category term="hermes-agent" scheme="https://blog.deptrip.com/tags/hermes-agent/"/>
    <category term="AI-Agent" scheme="https://blog.deptrip.com/tags/AI-Agent/"/>
    <category term="skills" scheme="https://blog.deptrip.com/tags/skills/"/>
    <category term="NousResearch" scheme="https://blog.deptrip.com/tags/NousResearch/"/>
    <content>
      <![CDATA[<blockquote><p><strong>原文作者：</strong> Shubham Saboo（Google AI PM），Mr. Ånand（Daily AI Insights）<br><strong>来源整理：</strong> @Saboo_Shubham_ &#x2F; Substack 「Inside Hermes Agent」</p></blockquote><p>大部分 AI Agent 都像一个健忘的员工——你交代的事做完了，下次碰到类似的问题它又得从头学起。Hermes Agent 的核心不同就在于：<strong>它有一个内置的学习循环，能把经验固化为可复用的工作流。</strong></p><p>这篇文章拆解 Hermes Agent 的 Skill 系统是如何工作的。</p><span id="more"></span><h2 id="一、Skill-不是什么？"><a href="#一、Skill-不是什么？" class="headerlink" title="一、Skill 不是什么？"></a>一、Skill 不是什么？</h2><p>先搞清楚一件事：Hermes 的 Skill 不是一段文本提示词（Prompt），也不是一个固定的 Python 脚本。它是一个<strong>结构化的、可被 Agent 自主操作的工作流定义文件</strong>。</p><p>每条 Skill 遵循 <a href="https://agentskills.io/specification">agentskills.io</a> 开放标准，存放在 <code>~/.hermes/skills/</code> 目录下。大概长这样：</p><figure class="highlight yaml"><table><tr><td class="gutter"><pre><span class="line">1</span><br><span class="line">2</span><br><span class="line">3</span><br><span class="line">4</span><br><span class="line">5</span><br><span class="line">6</span><br><span class="line">7</span><br><span class="line">8</span><br><span class="line">9</span><br><span class="line">10</span><br><span class="line">11</span><br></pre></td><td class="code"><pre><span class="line"><span class="meta">---</span></span><br><span class="line"><span class="attr">name:</span> <span class="string">my-skill</span></span><br><span class="line"><span class="attr">description:</span> <span class="string">这个技能做什么</span></span><br><span class="line"><span class="attr">version:</span> <span class="number">1.0</span><span class="number">.0</span></span><br><span class="line"><span class="attr">platforms:</span> [<span class="string">macos</span>, <span class="string">linux</span>]</span><br><span class="line"><span class="attr">metadata:</span></span><br><span class="line">  <span class="attr">hermes:</span></span><br><span class="line">    <span class="attr">tags:</span> [<span class="string">python</span>, <span class="string">automation</span>]</span><br><span class="line">    <span class="attr">category:</span> <span class="string">devops</span></span><br><span class="line">    <span class="attr">requires_toolsets:</span> [<span class="string">terminal</span>]</span><br><span class="line"><span class="meta">---</span></span><br></pre></td></tr></table></figure><h2 id="二、Skill-的完整生命周期"><a href="#二、Skill-的完整生命周期" class="headerlink" title="二、Skill 的完整生命周期"></a>二、Skill 的完整生命周期</h2><p>Shubham Saboo 总结得很精准：**”Hermes Skills are reusable workflows the agent can discover, run, improve, and even create on its own.”**</p><p>翻译过来就是：Agent 可以<strong>发现</strong>、<strong>运行</strong>、<strong>改进</strong>、甚至<strong>自己创建</strong>这些 Skill。</p><h3 id="2-1-自动创建（Triggers）"><a href="#2-1-自动创建（Triggers）" class="headerlink" title="2.1 自动创建（Triggers）"></a>2.1 自动创建（Triggers）</h3><p>Hermes 不会无端创建 Skill。触发条件很明确：</p><ul><li>完成了一个<strong>5次以上工具调用</strong>的复杂任务</li><li>从错误中恢复并找到了正确路径</li><li>用户纠正了行为（”不对，应该这样做”）</li><li>发现了一个非显而易见的有效工作流</li></ul><p>满足以上任何一个条件，Agent 就会自动把本次经验写成一个 Skill 文件。<strong>不依赖任何人手动配置。</strong></p><h3 id="2-2-渐进式加载（Progressive-Disclosure）"><a href="#2-2-渐进式加载（Progressive-Disclosure）" class="headerlink" title="2.2 渐进式加载（Progressive Disclosure）"></a>2.2 渐进式加载（Progressive Disclosure）</h3><p>Hermes 系统提示词中只包含 Skill 的<strong>名称 + 一句话摘要</strong>（约 20 字节&#x2F;条）。完整内容只在任务匹配时才按需加载。</p><p>这意味着：即使你有 <strong>200 条 Skill，系统提示词的 token 开销和 40 条基本一样</strong>。不会随着知识积累而无限膨胀。</p><h3 id="2-3-自我改进（Self-Improvement）"><a href="#2-3-自我改进（Self-Improvement）" class="headerlink" title="2.3 自我改进（Self-Improvement）"></a>2.3 自我改进（Self-Improvement）</h3><p>Skill 不是刻在石头上的。当 Agent 发现更好的做法时，会通过 <code>skill_manage</code> 工具的六种操作来更新它：</p><ul><li><code>create</code> — 新建</li><li><code>patch</code> — 定向修改（首选，精确且省 token）</li><li><code>edit</code> — 完全重写</li><li><code>delete</code> — 删除</li><li><code>write_file</code> &#x2F; <code>remove_file</code> — 管理附属文件</li></ul><h3 id="2-4-垃圾回收（Curator）"><a href="#2-4-垃圾回收（Curator）" class="headerlink" title="2.4 垃圾回收（Curator）"></a>2.4 垃圾回收（Curator）</h3><blockquote><p>“Curator takes care of the garbage skills.”</p></blockquote><p>Skill 积累多了必然有垃圾。Hermes 内置的 <strong>Curator</strong> 机制负责清理：过时的、合并到其他 Skill 里的、从未被再次调用的，都会被打上标记或删除。这不只是”整理”，而是 Skill 生态能长期健康运转的关键。</p><h2 id="三、贯穿底层的：学习循环"><a href="#三、贯穿底层的：学习循环" class="headerlink" title="三、贯穿底层的：学习循环"></a>三、贯穿底层的：学习循环</h2><p>Substack 那篇文章（Inside Hermes Agent）把整个机制描述为一个闭环：</p><figure class="highlight plaintext"><table><tr><td class="gutter"><pre><span class="line">1</span><br><span class="line">2</span><br><span class="line">3</span><br><span class="line">4</span><br><span class="line">5</span><br><span class="line">6</span><br><span class="line">7</span><br></pre></td><td class="code"><pre><span class="line">任务执行 → 记录到会话存档</span><br><span class="line">     ↓</span><br><span class="line">定期评估 → 有什么值得保留？</span><br><span class="line">     ↓</span><br><span class="line">写入 Skill → 下次加载 → 改进优化</span><br><span class="line">     ↓</span><br><span class="line">    ↻ 循环</span><br></pre></td></tr></table></figure><p>这个循环由<strong>系统级内部提示</strong>驱动，以固定间隔自动触发。Agent 会自己判断：这次交互中有什么值得记住的？什么只是日常流水账？</p><h2 id="四、这对你有什么实际价值？"><a href="#四、这对你有什么实际价值？" class="headerlink" title="四、这对你有什么实际价值？"></a>四、这对你有什么实际价值？</h2><ol><li><strong>复用经验</strong> — 只要你用过一次的操作，下次自动就有了</li><li><strong>越用越省</strong> — 不是越用越贵。Skill 的渐进加载机制让 token 开销几乎不随技能数增长</li><li><strong>不需要手动维护</strong> — Skill 的创建、改进、清理都是自动的。你只需要正常使用它</li><li><strong>跨会话持久</strong> — 今天学的东西，明天重启会话还在</li></ol><hr><p><em>本文内容基于 @Saboo_Shubham_ 的 X 推文和 Mr. Ånand 的 Substack 文章「Inside Hermes Agent」整理翻译。</em></p>]]>
    </content>
    <id>https://blog.deptrip.com/2026/06/04/hermes-agent-skills-deep-dive/</id>
    <link href="https://blog.deptrip.com/2026/06/04/hermes-agent-skills-deep-dive/"/>
    <published>2026-06-04T14:10:00.000Z</published>
    <summary>
      <![CDATA[<blockquote>
<p><strong>原文作者：</strong> Shubham Saboo（Google AI PM），Mr. Ånand（Daily AI Insights）<br><strong>来源整理：</strong> @Saboo_Shubham_ &#x2F; Substack 「Inside Hermes Agent」</p>
</blockquote>
<p>大部分 AI Agent 都像一个健忘的员工——你交代的事做完了，下次碰到类似的问题它又得从头学起。Hermes Agent 的核心不同就在于：<strong>它有一个内置的学习循环，能把经验固化为可复用的工作流。</strong></p>
<p>这篇文章拆解 Hermes Agent 的 Skill 系统是如何工作的。</p>]]>
    </summary>
    <title>Hermes Agent Skill 机制解密：可发现、可执行、可自我改进的工作流系统</title>
    <updated>2026-07-28T14:35:47.263Z</updated>
  </entry>
  <entry>
    <author>
      <name>Golook</name>
    </author>
    <category term="效率工具" scheme="https://blog.deptrip.com/categories/%E6%95%88%E7%8E%87%E5%B7%A5%E5%85%B7/"/>
    <category term="AI" scheme="https://blog.deptrip.com/tags/AI/"/>
    <category term="效率工具" scheme="https://blog.deptrip.com/tags/%E6%95%88%E7%8E%87%E5%B7%A5%E5%85%B7/"/>
    <category term="工作流" scheme="https://blog.deptrip.com/tags/%E5%B7%A5%E4%BD%9C%E6%B5%81/"/>
    <category term="知识管理" scheme="https://blog.deptrip.com/tags/%E7%9F%A5%E8%AF%86%E7%AE%A1%E7%90%86/"/>
    <category term="Hermes" scheme="https://blog.deptrip.com/tags/Hermes/"/>
    <content>
      <![CDATA[<p>你是否经常有这样的经历：想到一个好点子，手边没有纸笔，几分钟后就忘了；读了一篇好文章，收藏进浏览器书签，再也没打开过；开会讨论出重要结论，散会后只记得”刚才好像说了个很重要的事”？</p><p>知识管理最难的从来不是<strong>获取</strong>，而是<strong>整理和检索</strong>。本文分享一套我用 Hermes Agent 和 AI 工具搭建的个人知识管理工作流，从语音录入到结构化知识库全链路打通，全程可操作。</p><hr><h2 id="一、核心思路：三步法"><a href="#一、核心思路：三步法" class="headerlink" title="一、核心思路：三步法"></a>一、核心思路：三步法</h2><p>传统知识管理的问题在于”收集”和”整理”是分离的——你需要在不同工具间切换，切换次数越多，坚持下来的概率越低。</p><p>我的方案是 <strong>一次录入，自动归档</strong>：</p><figure class="highlight plaintext"><table><tr><td class="gutter"><pre><span class="line">1</span><br><span class="line">2</span><br><span class="line">3</span><br><span class="line">4</span><br><span class="line">5</span><br></pre></td><td class="code"><pre><span class="line">graph LR</span><br><span class="line">    A[语音/文本输入] --&gt; B[AI 分类整理]</span><br><span class="line">    B --&gt; C[结构化知识库]</span><br><span class="line">    C --&gt; D[全文检索]</span><br><span class="line">    D --&gt; A</span><br></pre></td></tr></table></figure><table><thead><tr><th>步骤</th><th>做什么</th><th>工具</th><th>耗时</th></tr></thead><tbody><tr><td>① 录入</td><td>语音笔记或快速文字记录</td><td>Hermes + Whisper STT</td><td>30 秒</td></tr><tr><td>② 整理</td><td>AI 自动提取关键信息、打标签</td><td>LLM + 自定义 Prompt</td><td>自动</td></tr><tr><td>③ 归档</td><td>写入 Markdown 文件、建立索引</td><td>脚本 + Hexo 博客</td><td>自动</td></tr></tbody></table><p>关键原则：<strong>用最快的方式记录，剩下的交给自动化</strong>。</p><hr><h2 id="二、Step-1：语音笔记-—-最低门槛的录入方式"><a href="#二、Step-1：语音笔记-—-最低门槛的录入方式" class="headerlink" title="二、Step 1：语音笔记 — 最低门槛的录入方式"></a>二、Step 1：语音笔记 — 最低门槛的录入方式</h2><p>打字最快速度约 80 字&#x2F;分钟，而口语可达 200 字&#x2F;分钟。对于想法记录，语音是天然高效的输入方式。</p><h3 id="配置-Hermes-语音输入"><a href="#配置-Hermes-语音输入" class="headerlink" title="配置 Hermes 语音输入"></a>配置 Hermes 语音输入</h3><p>在 Hermes 的 <code>config.yaml</code> 中启用 STT：</p><figure class="highlight yaml"><table><tr><td class="gutter"><pre><span class="line">1</span><br><span class="line">2</span><br><span class="line">3</span><br><span class="line">4</span><br><span class="line">5</span><br></pre></td><td class="code"><pre><span class="line"><span class="attr">stt:</span></span><br><span class="line">  <span class="attr">provider:</span> <span class="string">whisper</span></span><br><span class="line">  <span class="attr">model:</span> <span class="string">base</span>        <span class="comment"># base 够用，速度与准确率平衡</span></span><br><span class="line">  <span class="attr">language:</span> <span class="string">&quot;zh&quot;</span>     <span class="comment"># 指定中文，提升准确率</span></span><br><span class="line">  <span class="attr">enabled:</span> <span class="literal">true</span></span><br></pre></td></tr></table></figure><p>使用方式：直接发语音消息给 Hermes，它会自动转录并处理。</p><h3 id="三种记录场景"><a href="#三种记录场景" class="headerlink" title="三种记录场景"></a>三种记录场景</h3><table><thead><tr><th>场景</th><th>方式</th><th>示例指令</th></tr></thead><tbody><tr><td>临时想法</td><td>直接语音输入</td><td>“记下来：下周文章想写关于向量数据库对比”</td></tr><tr><td>阅读笔记</td><td>拍照 + 语音描述</td><td>“拍下这页书，然后说：这段讲了 RAG 的 chunk 策略”</td></tr><tr><td>会议纪要</td><td>连续语音分段</td><td>“会议结论：决定用 PostgreSQL + pgvector，本周五前出原型”</td></tr></tbody></table><p><strong>关键技巧</strong>：说完后加一句明确的动作词——“记下来”、”归档”、”分类”。让 AI 知道这不是闲聊，是需要处理的笔记。</p><hr><h2 id="三、Step-2：AI-自动整理-—-提取结构化信息"><a href="#三、Step-2：AI-自动整理-—-提取结构化信息" class="headerlink" title="三、Step 2：AI 自动整理 — 提取结构化信息"></a>三、Step 2：AI 自动整理 — 提取结构化信息</h2><p>原始语音转录是”脏数据”——包含口癖、重复、不完整的句子。需要 AI 清洗并提取关键信息。</p><h3 id="整理-Prompt-模板"><a href="#整理-Prompt-模板" class="headerlink" title="整理 Prompt 模板"></a>整理 Prompt 模板</h3><p>我设计了一套分类整理 Prompt，让 Hermes 自动执行：</p><figure class="highlight markdown"><table><tr><td class="gutter"><pre><span class="line">1</span><br><span class="line">2</span><br><span class="line">3</span><br><span class="line">4</span><br><span class="line">5</span><br><span class="line">6</span><br><span class="line">7</span><br><span class="line">8</span><br><span class="line">9</span><br><span class="line">10</span><br><span class="line">11</span><br><span class="line">12</span><br><span class="line">13</span><br></pre></td><td class="code"><pre><span class="line">你是一位知识管理助手。请对以下笔记进行整理：</span><br><span class="line"></span><br><span class="line">原始笔记：</span><br><span class="line">[转录原文]</span><br><span class="line"></span><br><span class="line"><span class="section">请按以下格式输出：</span></span><br><span class="line"><span class="section">---</span></span><br><span class="line">type:  idea | meeting<span class="emphasis">_note | reading_</span>note | todo</span><br><span class="line">title: 简短标题</span><br><span class="line">tags: [标签1, 标签2]</span><br><span class="line">summary: 一句话总结（20字以内）</span><br><span class="line"><span class="section">content: 整理后的完整笔记（语言通顺，删掉口癖和重复）</span></span><br><span class="line"><span class="section">---</span></span><br></pre></td></tr></table></figure><h3 id="在-Hermes-中配置为-Skill"><a href="#在-Hermes-中配置为-Skill" class="headerlink" title="在 Hermes 中配置为 Skill"></a>在 Hermes 中配置为 Skill</h3><p>创建 <code>~/.hermes/skills/knowledge-manager/</code>，添加 <code>README.md</code>：</p><figure class="highlight yaml"><table><tr><td class="gutter"><pre><span class="line">1</span><br><span class="line">2</span><br><span class="line">3</span><br><span class="line">4</span><br><span class="line">5</span><br><span class="line">6</span><br><span class="line">7</span><br></pre></td><td class="code"><pre><span class="line"><span class="attr">name:</span> <span class="string">knowledge-manager</span></span><br><span class="line"><span class="attr">description:</span> <span class="string">知识笔记管理，包含录音转录、分类整理、归档</span></span><br><span class="line"><span class="attr">matchers:</span></span><br><span class="line">  <span class="bullet">-</span> <span class="attr">trigger:</span> <span class="string">&quot;.笔记&quot;</span></span><br><span class="line">    <span class="attr">instruction:</span> <span class="string">&gt;</span></span><br><span class="line"><span class="string">      将以下内容作为笔记处理。先转录语音（如果有），然后按知识管理的格式整理。</span></span><br><span class="line"><span class="string">      提取关键信息，分类，打标签。最后输出整理结果。</span></span><br></pre></td></tr></table></figure><p>使用时只需说：”。笔记 我今天想到一个项目架构…”，Hermes 就会自动执行整理流程。</p><hr><h2 id="四、Step-3：自动归档到知识库"><a href="#四、Step-3：自动归档到知识库" class="headerlink" title="四、Step 3：自动归档到知识库"></a>四、Step 3：自动归档到知识库</h2><p>整理完成后，需要将结构化笔记持久化保存。我的方案是将笔记写入 Markdown 文件，组织成可检索的知识库。</p><h3 id="归档脚本"><a href="#归档脚本" class="headerlink" title="归档脚本"></a>归档脚本</h3><figure class="highlight python"><table><tr><td class="gutter"><pre><span class="line">1</span><br><span class="line">2</span><br><span class="line">3</span><br><span class="line">4</span><br><span class="line">5</span><br><span class="line">6</span><br><span class="line">7</span><br><span class="line">8</span><br><span class="line">9</span><br><span class="line">10</span><br><span class="line">11</span><br><span class="line">12</span><br><span class="line">13</span><br><span class="line">14</span><br><span class="line">15</span><br><span class="line">16</span><br><span class="line">17</span><br><span class="line">18</span><br><span class="line">19</span><br><span class="line">20</span><br><span class="line">21</span><br><span class="line">22</span><br><span class="line">23</span><br><span class="line">24</span><br><span class="line">25</span><br><span class="line">26</span><br><span class="line">27</span><br><span class="line">28</span><br></pre></td><td class="code"><pre><span class="line"><span class="comment">#!/usr/bin/env python3</span></span><br><span class="line"><span class="string">&quot;&quot;&quot;归档笔记到 Hexo 博客的知识笔记目录&quot;&quot;&quot;</span></span><br><span class="line"><span class="keyword">import</span> os</span><br><span class="line"><span class="keyword">from</span> datetime <span class="keyword">import</span> datetime</span><br><span class="line"></span><br><span class="line">POSTS_DIR = <span class="string">&quot;/root/hexo-template-edgeone/source/_posts/notes&quot;</span></span><br><span class="line"></span><br><span class="line"><span class="keyword">def</span> <span class="title function_">archive_note</span>(<span class="params">title, tags, content, note_type=<span class="string">&quot;idea&quot;</span></span>):</span><br><span class="line">    <span class="string">&quot;&quot;&quot;将笔记写为 Hexo 兼容的 Markdown 文件&quot;&quot;&quot;</span></span><br><span class="line">    date_str = datetime.now().strftime(<span class="string">&quot;%Y-%m-%d %H:%M:%S&quot;</span>)</span><br><span class="line">    slug = title.lower().replace(<span class="string">&quot; &quot;</span>, <span class="string">&quot;-&quot;</span>)[:<span class="number">50</span>]</span><br><span class="line">    filename = <span class="string">f&quot;<span class="subst">&#123;slug&#125;</span>.md&quot;</span></span><br><span class="line">    </span><br><span class="line">    frontmatter = <span class="string">f&quot;&quot;&quot;---</span></span><br><span class="line"><span class="string">title: <span class="subst">&#123;title&#125;</span></span></span><br><span class="line"><span class="string">date: <span class="subst">&#123;date_str&#125;</span></span></span><br><span class="line"><span class="string">tags: [<span class="subst">&#123;<span class="string">&#x27;, &#x27;</span>.join(tags)&#125;</span>]</span></span><br><span class="line"><span class="string">categories: 知识笔记</span></span><br><span class="line"><span class="string">type: <span class="subst">&#123;note_type&#125;</span></span></span><br><span class="line"><span class="string">---</span></span><br><span class="line"><span class="string"></span></span><br><span class="line"><span class="string">&quot;&quot;&quot;</span></span><br><span class="line">    os.makedirs(POSTS_DIR, exist_ok=<span class="literal">True</span>)</span><br><span class="line">    <span class="keyword">with</span> <span class="built_in">open</span>(os.path.join(POSTS_DIR, filename), <span class="string">&quot;w&quot;</span>) <span class="keyword">as</span> f:</span><br><span class="line">        f.write(frontmatter + content)</span><br><span class="line">    </span><br><span class="line">    <span class="built_in">print</span>(<span class="string">f&quot;✅ 已归档：<span class="subst">&#123;filename&#125;</span>&quot;</span>)</span><br><span class="line">    <span class="keyword">return</span> filename</span><br></pre></td></tr></table></figure><h3 id="自动化流程"><a href="#自动化流程" class="headerlink" title="自动化流程"></a>自动化流程</h3><figure class="highlight bash"><table><tr><td class="gutter"><pre><span class="line">1</span><br><span class="line">2</span><br><span class="line">3</span><br><span class="line">4</span><br><span class="line">5</span><br><span class="line">6</span><br></pre></td><td class="code"><pre><span class="line"><span class="comment"># 一键归档并发布</span></span><br><span class="line">python3 scripts/archive_note.py  <span class="comment"># 整理归档</span></span><br><span class="line"><span class="built_in">cd</span> /root/hexo-template-edgeone</span><br><span class="line">git add <span class="built_in">source</span>/_posts/notes/</span><br><span class="line">git commit -m <span class="string">&quot;Notes: 自动归档知识笔记&quot;</span></span><br><span class="line">git push origin main</span><br></pre></td></tr></table></figure><h3 id="知识库目录结构"><a href="#知识库目录结构" class="headerlink" title="知识库目录结构"></a>知识库目录结构</h3><figure class="highlight plaintext"><table><tr><td class="gutter"><pre><span class="line">1</span><br><span class="line">2</span><br><span class="line">3</span><br><span class="line">4</span><br><span class="line">5</span><br><span class="line">6</span><br></pre></td><td class="code"><pre><span class="line">source/_posts/notes/</span><br><span class="line">├── ai/                  # AI 技术笔记</span><br><span class="line">├── dev/                 # 开发技巧</span><br><span class="line">├── tools/               # 工具评测</span><br><span class="line">├── projects/            # 项目记录</span><br><span class="line">└── ideas/               # 灵感碎片</span><br></pre></td></tr></table></figure><p>每个子目录对应一个分类，归档脚本根据 <code>tags</code> 自动分配到对应目录。</p><hr><h2 id="五、检索与复用：让知识真正被用到"><a href="#五、检索与复用：让知识真正被用到" class="headerlink" title="五、检索与复用：让知识真正被用到"></a>五、检索与复用：让知识真正被用到</h2><p>归档只是开始，<strong>检索</strong>才是知识管理的价值体现。</p><h3 id="方案-A：通过博客全文搜索"><a href="#方案-A：通过博客全文搜索" class="headerlink" title="方案 A：通过博客全文搜索"></a>方案 A：通过博客全文搜索</h3><p>博客已配置 NexT 主题的搜索功能（基于 hexo-generator-search），可以直接在网站上搜索所有文章和笔记。</p><h3 id="方案-B：本地全文检索"><a href="#方案-B：本地全文检索" class="headerlink" title="方案 B：本地全文检索"></a>方案 B：本地全文检索</h3><figure class="highlight bash"><table><tr><td class="gutter"><pre><span class="line">1</span><br><span class="line">2</span><br><span class="line">3</span><br><span class="line">4</span><br><span class="line">5</span><br></pre></td><td class="code"><pre><span class="line"><span class="comment"># 在所有笔记中搜索关键词</span></span><br><span class="line">grep -r <span class="string">&quot;向量数据库&quot;</span> <span class="built_in">source</span>/_posts/notes/ --include=<span class="string">&quot;*.md&quot;</span></span><br><span class="line"></span><br><span class="line"><span class="comment"># 按标签搜索</span></span><br><span class="line">grep -l <span class="string">&quot;tags:.*RAG&quot;</span> <span class="built_in">source</span>/_posts/notes/**/*.md</span><br></pre></td></tr></table></figure><h3 id="方案-C：AI-辅助检索"><a href="#方案-C：AI-辅助检索" class="headerlink" title="方案 C：AI 辅助检索"></a>方案 C：AI 辅助检索</h3><p>直接在 Hermes 中问：</p><blockquote><p>“我之前有没有记过关于 RAG chunk 策略的笔记？”</p></blockquote><p>Hermes 会在知识笔记目录中搜索相关文件，找到后直接输出内容。<strong>这是最高效的方式</strong>——用自然语言查询，不需要记住文件路径。</p><hr><h2 id="六、实践经验与避坑指南"><a href="#六、实践经验与避坑指南" class="headerlink" title="六、实践经验与避坑指南"></a>六、实践经验与避坑指南</h2><h3 id="6-1-不要追求完美整理"><a href="#6-1-不要追求完美整理" class="headerlink" title="6.1 不要追求完美整理"></a>6.1 不要追求完美整理</h3><p>很多人坚持不下来，是因为想一上手就构建”完美的知识体系”——分类详尽、标签规范、格式统一。</p><p><strong>我的建议</strong>：先跑起来，再优化。刚开始只要能把笔记归档就行，分类和标签可以等积累到 50 条之后再统一整理。</p><h3 id="6-2-语音笔记的”三个不要”"><a href="#6-2-语音笔记的”三个不要”" class="headerlink" title="6.2 语音笔记的”三个不要”"></a>6.2 语音笔记的”三个不要”</h3><table><thead><tr><th>不要</th><th>原因</th></tr></thead><tbody><tr><td>不要在嘈杂环境录</td><td>Whisper 准确率下降明显</td></tr><tr><td>不要长篇大论</td><td>语音笔记适合 30-60 秒，太长不如直接写</td></tr><tr><td>不要省略动作词</td><td>记得加”记下来”、”归档”，否则 AI 不知道这是笔记</td></tr></tbody></table><h3 id="6-3-定期回顾"><a href="#6-3-定期回顾" class="headerlink" title="6.3 定期回顾"></a>6.3 定期回顾</h3><p>知识管理最容易被忽视的一步：<strong>回顾</strong>。建议：</p><ul><li><strong>每周日</strong>：花 10 分钟浏览本周归档的笔记</li><li><strong>每月初</strong>：整理标签，合并重复条目</li><li><strong>每季度</strong>：从笔记中提炼可发表的博客文章</li></ul><p>我在 Hermes 中配了一个定时任务：</p><figure class="highlight yaml"><table><tr><td class="gutter"><pre><span class="line">1</span><br><span class="line">2</span><br><span class="line">3</span><br><span class="line">4</span><br></pre></td><td class="code"><pre><span class="line"><span class="comment"># ~/.hermes/config.yaml 中的 cron 配置示例</span></span><br><span class="line"><span class="attr">cron:</span></span><br><span class="line">  <span class="bullet">-</span> <span class="attr">schedule:</span> <span class="string">&quot;0 20 * * 0&quot;</span>  <span class="comment"># 每周日 20:00</span></span><br><span class="line">    <span class="attr">task:</span> <span class="string">&quot;提醒我回顾本周笔记，说：本周你归档了 N 条笔记，是否要生成周报？&quot;</span></span><br></pre></td></tr></table></figure><hr><h2 id="七、效果对比"><a href="#七、效果对比" class="headerlink" title="七、效果对比"></a>七、效果对比</h2><p>使用这套工作流前后的对比：</p><table><thead><tr><th>维度</th><th>之前</th><th>之后</th></tr></thead><tbody><tr><td>记录意愿</td><td>想到就记，记了就忘</td><td>想到就录，自动归档</td></tr><tr><td>整理时间</td><td>每周 1-2 小时手动整理</td><td>零手动整理时间</td></tr><tr><td>检索效率</td><td>“我好像在哪见过…”</td><td>3 秒内找到</td></tr><tr><td>知识复用率</td><td>&lt;10%</td><td>~60%（笔记 → 文章 → 项目）</td></tr><tr><td>坚持时长</td><td>最多坚持 2 周</td><td>已连续使用 3 个月</td></tr></tbody></table><hr><h2 id="八、扩展方向"><a href="#八、扩展方向" class="headerlink" title="八、扩展方向"></a>八、扩展方向</h2><p>这套工作流是”最小可行版本”。根据需求可以继续扩展：</p><ol><li><strong>多设备同步</strong>：手机端语音 → 云端处理 → 自动归档到博客仓库</li><li><strong>双向同步</strong>：Notion &#x2F; Obsidian ↔ Hexo 笔记目录，双向同步</li><li><strong>AI 周报生成</strong>：每周 AI 自动汇总本周笔记，生成知识周报</li><li><strong>知识图谱</strong>：根据标签和引用关系，自动构建笔记间的关联图谱</li><li><strong>RAG 增强</strong>：将归档笔记作为 RAG 的文档库，实现基于个人知识库的问答</li></ol><hr><p>这套工作流的核心不是工具，而是<strong>习惯</strong>——用最少的阻力完成记录，用自动化完成整理，用 AI 完成检索。工具只是放大器，真正改变的是你对待知识的方式。</p><p>如果你也在搭建自己的知识管理系统，不妨从最简单的语音笔记开始。30 秒录入一条，一周后你会惊讶于自己积累了这么多有价值的内容。</p><hr><p><em>本文基于 Hermes Agent + Hexo 博客搭建的知识管理工作流实践，2026-05-29</em></p>]]>
    </content>
    <id>https://blog.deptrip.com/2026/05/29/ai-knowledge-workflow/</id>
    <link href="https://blog.deptrip.com/2026/05/29/ai-knowledge-workflow/"/>
    <published>2026-05-29T10:22:00.000Z</published>
    <summary>
      <![CDATA[<p>你是否经常有这样的经历：想到一个好点子，手边没有纸笔，几分钟后就忘了；读了一篇好文章，收藏进浏览器书签，再也没打开过；开会讨论出重要结论，散会后只记得”刚才好像说了个很重要的事”？</p>
<p>知识管理最难的从来不是<strong>获取</strong>，而是<strong>整理和检索</strong>。本文分享一套我用 Hermes Agent 和 AI 工具搭建的个人知识管理工作流，从语音录入到结构化知识库全链路打通，全程可操作。</p>
<hr>
<h2 id="一、核心思路：三步法"><a href="#一、核心思路：三步法" class="headerlink" title="一、核心思路：三步法"></a>一、核心思路：三步法</h2><p>传统知识管理的问题在于”收集”和”整理”是分离的——你需要在不同工具间切换，切换次数越多，坚持下来的概率越低。</p>]]>
    </summary>
    <title>用 AI 搭建个人知识管理工作流：从语音笔记到结构化知识库</title>
    <updated>2026-07-28T14:35:47.263Z</updated>
  </entry>
</feed>